Home » DIY Tutorials
Category Archives: DIY Tutorials
DIY Silk Thread Necklace: Step-by-Step Tutorial with Pictures
A silk thread necklace is an elegant and affordable alternative to gold or stone jewellery. Handmade silk thread necklaces are perfect for festive occasions, weddings, and ethnic outfits.
In this step-by-step guide, you’ll learn how to create a beautiful silk thread necklace using simple materials at home.
Why Make a Handmade Silk Thread Necklace?
 Budget-friendly – Costs much less than store-bought jewellery.
Customisable – Choose colours and beadwork to match any outfit.
Perfect for Gifting & Selling – Handmade jewellery has a high demand in ethnic markets.
Materials Needed:
- Silk thread (colour of your choice)
- Necklace cord or thick wire (for the base)
- Threaded beads (gold, pearl, or coloured)
- Fabric glue or Fevicol
- Scissors
- Hook clasps (for securing the necklace)
Step-by-Step Process
Step 1: Prepare the Base
- Cut a necklace cord or thick wire to the desired length (15-18 inches).
- Apply a thin layer of glue and start wrapping silk thread tightly around the wire.
- Ensure the thread is evenly wrapped for a smooth look.
Step 2: String the Beads
- Once the thread wrapping is complete, start threading beads onto the necklace.
- Arrange them in a pattern (e.g., alternating colours or sizes).
- Add spacers or small pearls between large beads for a designer look.
Step 3: Securing the Ends
- Use hook clasps at both ends of the necklace to secure it.
- Apply glue inside the clasp area for extra durability.
- Allow it to dry completely for at least 4-5 hours before wearing.
Step 4: Final Touches & Wearing
- Check for any loose beads and secure them with extra glue if needed.
- Pair your handmade silk thread necklace with matching earrings or bangles for a complete look.
Expert Tips for a Professional Finish
 Double-wrap the silk thread for a richer look.
 Mix and match colours for a trendy, layered necklace.
 Add kundan or stone embellishments for a bridal jewellery effect.
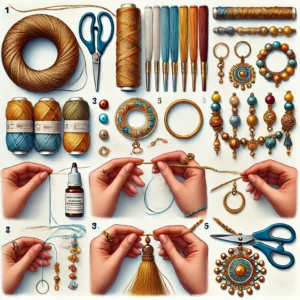
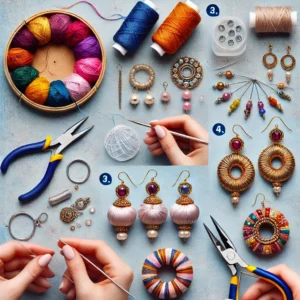
How to make handmade silk thread jhumkas (earrings) – A beginner’s guide
Silk thread jhumkas are a timeless fashion accessory that complements both traditional and contemporary outfits. Making them at home allows you to experiment with colours, designs, and embellishments to match your style.
This step-by-step guide will walk you through making silk thread jhumkas using simple materials.
Why Make Your Own Silk Thread Jhumkas?
 Customizable – Choose colours and designs that match your outfits.
Affordable – DIY jhumkas cost much less than store-bought ones.
Handmade Look – Adds a personal and unique touch to jewellery.
Materials Needed:
- Silk thread (any colour)
- Plastic or wooden jhumka base (available online or in craft stores)
- Fabric glue or Fevicol
- Earring hooks and headpins
- Scissors
- Decorative beads, stones, or gold chains
Step-by-Step Process
Step 1: Wrapping the Jhumka Base
- Take a plastic or wooden jhumka base.
- Apply a thin layer of fabric glue evenly across the base.
- Start wrapping silk thread tightly around the base.
- Ensure there are no gaps between the thread layers for a polished look.
Step 2: Attaching the Earring Hook
- Use a thin headpin to pierce through the top centre of the jhumka base.
- Slide a small bead onto the pin for extra decoration.
- Attach the earring hook by bending the headpin into a loop using pliers.
Step 3: Adding Decorative Elements
- Glue small beads, pearls, or golden chains around the jhumka’s edge.
- Use a toothpick to apply glue carefully for neatness.
- Arrange beads symmetrically for a professional finish.
Step 4: Let It Dry & Wear
- Allow the earrings to dry completely for at least 3-4 hours.
- Your beautiful handmade silk thread jhumkas are now ready to wear!
Expert Tips for Perfect Silk Thread Jhumkas
Use contrasting colours – A gold or white base with a coloured thread creates a unique look.
Wrap double layers of thread for a richer, fuller finish.
Experiment with embellishments – Use kundan stones, rhinestones, or pearl chains for a royal look.
Step-by-Step guide to making silk thread bangles at home
Silk thread bangles are a beautiful and affordable alternative to traditional gold and glass bangles. Their vibrant colours and intricate designs make them a perfect accessory for ethnic and festive wear. In this guide, you’ll learn how to make silk thread bangles at home with simple materials and creative designs.
Why Choose Handmade Silk Thread Bangles?
- Budget-friendly – Costs much less than gold or metal bangles.
- Customisable – Choose colours, patterns, and decorations.
- Lightweight & Comfortable – No risk of breakage like glass bangles.
- Materials Needed:
- Plain plastic or metal bangles (any size)
- Silk thread in your preferred colours
- Fevicol or fabric glue
- Toothpicks or glue brush for even application
- Scissors
- Small decorative stones, beads, or pearls
Step-by-Step Process

Step 1: Prepare the Bangle Base
- Choose a sturdy bangle (plastic or metal).
- If using multiple bangles together, stick them using strong glue and let them dry.
- Apply a thin layer of Fevicol or fabric glue in small sections for easy handling.
Step 2: Wrapping the Silk Thread
- Tie one end of the silk thread inside the bangle to secure it.
- Begin wrapping the silk thread tightly and evenly around the bangle.
- Use toothpicks to spread the glue as you wrap, ensuring a smooth finish.
Step 3: Securing the Ends
- Once fully wrapped, apply glue to the last part of the thread.
- Press it gently and hold for a few seconds to let it dry.
Step 4: Adding Decorations
- Use small beads, pearls, or decorative stones to embellish the bangle.
- Arrange them in patterns or as a single line for a designer look.
- Use a toothpick to apply glue and carefully place each stone.
Step 5: Let It Dry & Wear
- Allow the bangles to dry completely for a few hours before using them.
- Pair them with matching outfits for a stylish ethnic look.
Tips for Making Perfect Silk Thread Bangles
- Use double layers of thread for a richer, fuller look.
- Mix two colours for a dual-tone effect.
- Try zigzag wrapping for a unique design.
- Add hanging beads or charms for an exclusive touch.
How to make handmade rubber bands and scrunchies at home – Step-by-step guide with pictures
Making rubber bands or scrunchies at home is a fun and easy DIY project. Below is a detailed guide on how to make both, along with step-by-step instructions.
How to Make a Handmade Rubber Band
Materials Needed:
- Natural rubber sheets or silicone strips
- Scissors
- Ruler
- Super glue or rubber adhesive
- A marker
Step-by-Step Process:
- Cut the Rubber Sheet:
- Use a ruler and marker to measure and draw thin strips (about 1 cm wide) on the rubber sheet.
- Cut along the lines using sharp scissors.
- Form the Band Shape:
- Take a rubber strip and stretch it slightly to check flexibility.
- Join the ends together to form a circle.
- Secure the Ends:
- Apply a small amount of rubber adhesive or super glue to the ends.
- Press the ends together firmly and let them dry for a few hours.
- Test the Elasticity:
- Once dry, stretch the band gently to check for strength and elasticity.
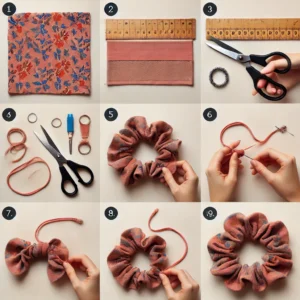
How to Make a Handmade Scrunchie
Materials Needed:
- A fabric of your choice (cotton, silk, or velvet)
- ¼ inch wide elastic (about 8-10 inches long)
- Sewing needle and thread or a sewing machine
- Scissors
- Safety pin
Step-by-Step Process:
- Cut the Fabric:
- Measure and cut a rectangular piece of fabric (around 20 inches long and 4 inches wide).
- Fold and Stitch the Fabric:
- Fold the fabric lengthwise, with the right sides facing each other.
- Sew along the long edge to create a fabric tube, leaving the ends open.
- Turn the Fabric Right-Side Out:
- Use a safety pin to help turn the fabric inside out.
- Insert the Elastic:
- Attach a safety pin to one end of the elastic and thread it through the fabric tube.
- Hold the other end to prevent it from getting lost inside.
- Secure the Elastic:
- Once the elastic is fully threaded, tie or sew the ends together securely.
- Close the Scrunchie:
- Tuck one end of the fabric into the other and sew it shut.
Your handmade scrunchie is now ready! 
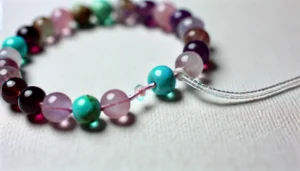
Make Your Own Stunning Beaded Bracelet with These Simple Steps!
Learn how to make a beaded bracelet with this beginner’s guide. Step-by-step instructions, materials needed, and tips to tie a secure knot!
Beaded bracelets are a popular and versatile accessory that can be customized to match any style or outfit. Creating your own beaded bracelet is a fun and creative DIY project that allows you to express your personality and creativity. This guide provides a step-by-step process for making a beaded bracelet, along with essential tips to tie the knot securely so it doesn’t loosen over time.
Materials Needed for Making a Beaded Bracelet
Before starting the process, gather the following materials:
- Beads: You can choose from a variety of beads such as glass, wooden, metal, gemstone, or acrylic, depending on your style preference.
- Elastic Cord or Beading Wire: Elastic cords are commonly used for stretch bracelets, while beading wire is more suitable for bracelets with a clasp.
- Beading Needle: A beading needle makes it easier to thread smaller beads onto the cord or wire.
- Crimp Beads or Crimp Tubes: These small metal beads are used to secure the ends of the wire in place when using a clasp.
- Jump Rings and Clasps (optional): For non-stretchy bracelets, you’ll need jump rings and clasps to fasten the bracelet.
- Scissors or Wire Cutters: These are used to cut the elastic cord or beading wire to the desired length.
- Bead Stoppers or Clips: These small clips help prevent beads from falling off the cord while you are stringing them.
- Glue (Optional): Jewelry glue or clear nail polish can be used to reinforce knots for added security.
Step-by-Step Process to Make a Beaded Bracelet
Follow these steps to create your own custom beaded bracelet:

Step 1: Choose Your Beads and Design
Decide on the type of beads you want to use for your bracelet. You can mix and match different sizes, colors, and shapes to create a unique design. Lay out the beads in the desired order on a flat surface or a bead board to visualize the final design before stringing.
Step 2: Measure and Cut the Cord
Measure your wrist using a measuring tape to determine the length of the bracelet. Add an extra inch to this measurement to allow room for tying knots. Cut the elastic cord or beading wire to the appropriate length using scissors or wire cutters.
Step 3: Secure One End with a Bead Stopper
Attach a bead stopper or clip to one end of the cord to prevent the beads from sliding off while stringing. This is particularly useful when working with multiple beads of varying sizes.
Step 4: Thread the Beads onto the Cord
Start threading the beads onto the elastic cord or beading wire in the order you have laid out. Use a beading needle to make this process easier, especially when working with small beads. Continue threading until you have added all the beads to the cord.
Step 5: Test the Fit
Once all the beads are threaded, wrap the bracelet around your wrist to check the fit. Adjust the number of beads if necessary to ensure the bracelet fits comfortably without being too tight or too loose.
Step 6: Tie a Secure Knot (Elastic Cord Method)
For stretch bracelets made with elastic cord, remove the bead stopper and tie a secure knot at the ends. The surgeon’s knot is a popular choice for securing elastic cords as it is stronger than a regular knot.
- To tie a surgeon’s knot: Cross the two ends of the elastic cord to form a loop, just like tying a regular knot. Then, pass one end of the cord through the loop twice (instead of once). Pull the ends tightly to form a secure knot.
Step 7: Reinforce the Knot
For added security, apply a drop of jewelry glue or clear nail polish to the knot. Let it dry completely to prevent the knot from coming undone over time. Trim any excess cord close to the knot using scissors.
Step 8: Secure the Ends with Crimp Beads (Beading Wire Method)
If using beading wire, thread a crimp bead or crimp tube onto one end of the wire. Loop the wire through the clasp, then back through the crimp bead. Use crimping pliers to squeeze the crimp bead securely in place, flattening it to hold the wire firmly. Trim any excess wire with wire cutters.
Step 9: Attach the Clasp (Beading Wire Method)
Repeat the process on the other end of the bracelet, attaching a jump ring and clasp to complete the bracelet. Ensure both ends are securely crimped to prevent the beads from slipping off.
Step 10: Finish and Enjoy Your Bracelet
Your beaded bracelet is now complete! Check the bracelet for any loose beads or knots and make adjustments if needed. Enjoy wearing your handcrafted jewelry or gifting it to a loved one.
Tips for Tying a Secure Knot
- Use the Right Knot: For elastic cord bracelets, a surgeon’s knot is more secure than a regular knot because it has an extra loop that holds the ends in place.
- Pull Tight, But Not Too Tight: Make sure to pull the knot tightly enough to hold the beads together but not so tight that the elastic cord stretches too much, weakening the bracelet over time.
- Reinforce with Glue: Adding a drop of jewelry glue or clear nail polish to the knot can help prevent it from slipping or loosening. Let the glue dry completely before trimming any excess cord.
- Trim Excess Cord Carefully: Cut the excess cord close to the knot but leave a small tail (about 1/8 inch) to prevent the knot from unraveling.
- Practice Different Knot Techniques: Practice tying different knots like the square knot, surgeon’s knot, and double knot to see which one works best for your type of cord and beads.
Creating a beaded bracelet is a fun and easy DIY project that allows for endless creativity. With the right materials, step-by-step guidance, and proper knotting techniques, you can make beautiful, durable bracelets that you’ll love to wear or gift. Remember to practice tying knots securely to ensure your bracelets last a long time without loosening or breaking.
Delay in Deliveries & Pickups in Mumbai, Gujarat, and Noida Due to Heavy Rains
- Wani
- Bhadrawati
- Warora
- Gondpipari
- Gadchandur
- Aheri
- Sironcha
- Chamurshi
- Garhchiroli
- Surat
- Rajkot
- Jamshedpur
- Vadodra
- Noida
COVID-19 Update: Weekend Shutdown in 10 Districts of Odisha
- GANJAM
- MAYURBHANJ
- KHORDA
- BALASORE
- CUTTACK
- KENDRAPADA
- JAJPUR
- JAGATSINGHPUR
- JHARSUGUDA
- GAJAPATI
DIY box with a cardboard base and empty thread spools
As many of you are crafters, you will be having a lot of empty thread spools in your home. I made my kids to try to make a box with those empty threads and a cardboard base.
Below is the video of them making a box with empty thread spools and cardboard box.
To make it you require a card board base (I used a puzzle cardboard as they are not using it as they have grown up and empty thread spools. Fevicol to fix them on the base. You can also use a thick sheet of cardboard boxes.
Apply fevicol all over the sides and put empty thread spools on the fevicol. Your box will be ready soon. Allow it to dry for atleast 3 hours for better sticking.
Later you can paste a gliiter foam sheet or normal foam sheet or even colour or design paper for better looks. And can decorate the sidewalls as you wish.
Try it by your kids so that they will learn to make things out of waste. Comment your outcome below and can send pictures to pallavi.rags@gmail.com so that you can see your crafts in the website below in this post.
Kids School Projects – English – Homophones
What are Homophones?
Homophones are the two or more different words with same pronunciation with different meanings.
Examples of homophones:

Below is the list of homophones and above is the five sets of homophones done for a school project
- one-won
- see-sea
- meat-meet
- ear-year
- write-right
- weather-whether
- two-to
- here-hear
- ways-vase
- cot-caught
- sun-son
- hole-whole
- six-sikhs
- week-weak
- blue-blew
- sell-cell
- no-know
- hour-our
- ad-add
- ate-eight
- die-dye
- by-buy
- none-nun
- peace-piece
- sum-some
- wait-weight
- break-brake
- flour-flower
- steel-steal
Hope you got the list of easy homophones with known meaning. Comment if you know more homophones and we will add them to the list.
How to make pendant with framed kundans
Let us see how to make a pendant with kundan stones (framed Kundans) in this post. Or buy this pendant @ Rs 50 if you don’t have time to make it.
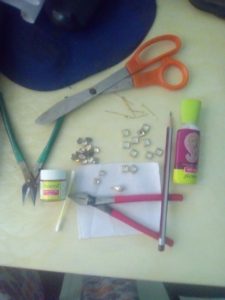
Materials required to make a kundan pendant:
- Square framed kundans – 8mm
- Thilak shape kundans – 8mm
- Canvas Sheet
- Gold colour/gold nail polish
- Drop shape pearl hanging
- Fevicryl
- Cutter
- Plier
- Eye Pins
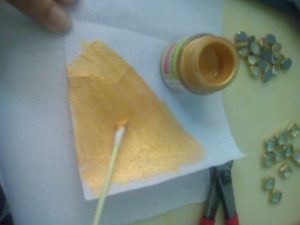
Step 1.
Take a canvas sheet and apply gold paint/nail polish on the canvas sheet using a paint brush or an ear bud. Allow it to dry.
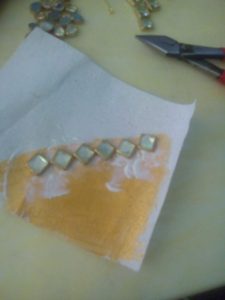
Step 2.
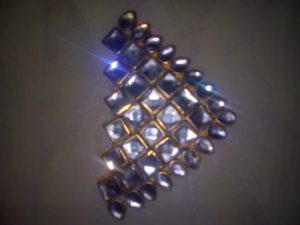
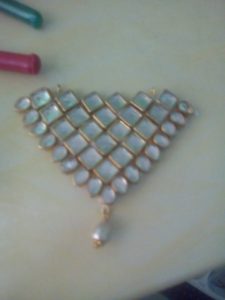
Put square shape kundans in a row on the dried gold colour canvas sheet.
Next add another row of square kundans in between the top 2 kundans. It comes as 6 kundans in top row, 5 kundans in next row and finally to single kundan. Start from the top and add thilak shape kundans as shown in the picture below, only the centre thilak shape kundan points top wards.
Cut the canvas sheet from the remaining sheet as per the pendant shape. I used diy cutter to cut in between kundans.
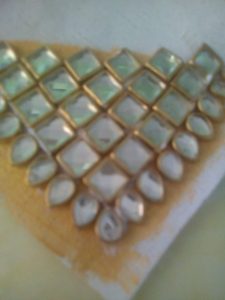
Allow them to dry or they will fell off the canvas sheet. Glue them well.
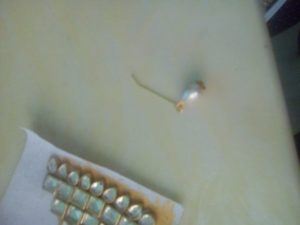
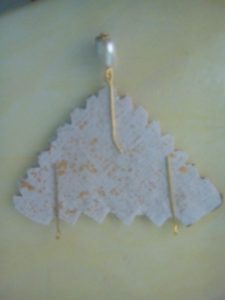
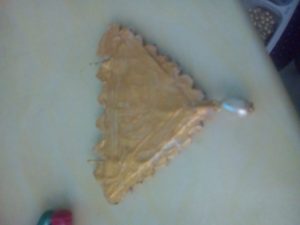
After it dries, turn it to other side and take a pearl hanging and attach it to an eye pin and keep at the downside of the pendant. Put two eyepins on the top at two gaps between kundans . Apply glue on the back side and put another canvas sheet to cover the eye pins and to secure them well. You can add two canvas sheets for strength and hardness of the pendant.
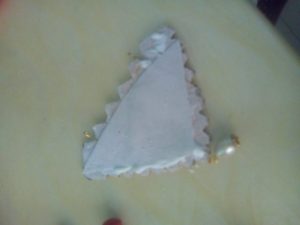
After that you can apply gold paint on the back side as well for neat finish.
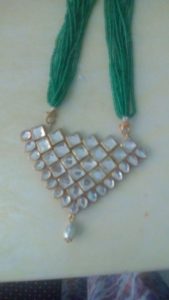
Finally attach the well dried pendant to any chain and is ready to wear. I attached a ready made chain to the pendant and it looks like this.
Products
-
 Beaded pearls 8 mm - 50 beads pack
Original price was: 30.00₹.25.00₹Current price is: 25.00₹.
Beaded pearls 8 mm - 50 beads pack
Original price was: 30.00₹.25.00₹Current price is: 25.00₹.
-
 Red and purple silk thread bangles for kids upto 2'0 size
Original price was: 250.00₹.230.00₹Current price is: 230.00₹.
Red and purple silk thread bangles for kids upto 2'0 size
Original price was: 250.00₹.230.00₹Current price is: 230.00₹.
-
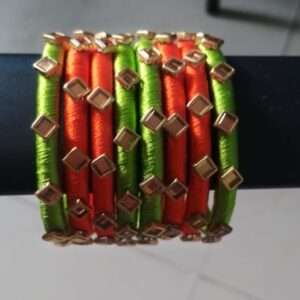 Kids Silk thread Bangles upto 2'0 size orange and green combination square kundans
Original price was: 150.00₹.120.00₹Current price is: 120.00₹.
Kids Silk thread Bangles upto 2'0 size orange and green combination square kundans
Original price was: 150.00₹.120.00₹Current price is: 120.00₹.
-
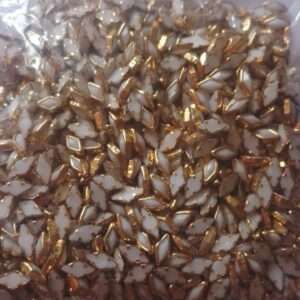 Framed Kundans diamond white
Original price was: 50.00₹.45.00₹Current price is: 45.00₹.
Framed Kundans diamond white
Original price was: 50.00₹.45.00₹Current price is: 45.00₹.
-
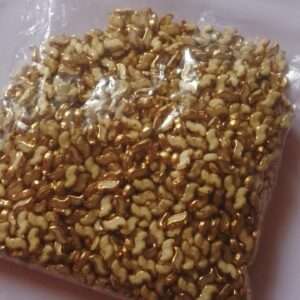 Framed Kundans small s shape light yellow
Original price was: 50.00₹.45.00₹Current price is: 45.00₹.
Framed Kundans small s shape light yellow
Original price was: 50.00₹.45.00₹Current price is: 45.00₹.
-
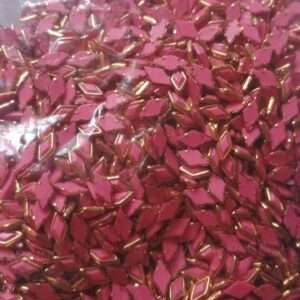 Framed Kundans diamond light pink
Original price was: 50.00₹.45.00₹Current price is: 45.00₹.
Framed Kundans diamond light pink
Original price was: 50.00₹.45.00₹Current price is: 45.00₹.
Latest Posts
- DIY Silk Thread Necklace: Step-by-Step Tutorial with Pictures
- How to make handmade silk thread jhumkas (earrings) – A beginner’s guide
- Step-by-Step guide to making silk thread bangles at home
- How to make handmade rubber bands and scrunchies at home – Step-by-step guide with pictures
- Discover the Rich Significance Behind the Ornaments Worn by Indian Women!

- Make Your Own Stunning Beaded Bracelet with These Simple Steps!