Making rubber bands or scrunchies at home is a fun and easy DIY project. Below is a detailed guide on how to make both, along with step-by-step instructions.
How to Make a Handmade Rubber Band
Materials Needed:
- Natural rubber sheets or silicone strips
- Scissors
- Ruler
- Super glue or rubber adhesive
- A marker
Step-by-Step Process:
- Cut the Rubber Sheet:
- Use a ruler and marker to measure and draw thin strips (about 1 cm wide) on the rubber sheet.
- Cut along the lines using sharp scissors.
- Form the Band Shape:
- Take a rubber strip and stretch it slightly to check flexibility.
- Join the ends together to form a circle.
- Secure the Ends:
- Apply a small amount of rubber adhesive or super glue to the ends.
- Press the ends together firmly and let them dry for a few hours.
- Test the Elasticity:
- Once dry, stretch the band gently to check for strength and elasticity.
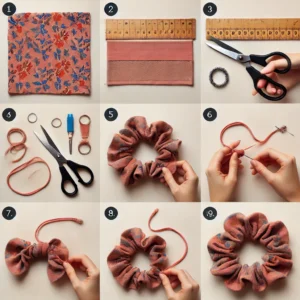
How to Make a Handmade Scrunchie
Materials Needed:
- A fabric of your choice (cotton, silk, or velvet)
- ¼ inch wide elastic (about 8-10 inches long)
- Sewing needle and thread or a sewing machine
- Scissors
- Safety pin
Step-by-Step Process:
- Cut the Fabric:
- Measure and cut a rectangular piece of fabric (around 20 inches long and 4 inches wide).
- Fold and Stitch the Fabric:
- Fold the fabric lengthwise, with the right sides facing each other.
- Sew along the long edge to create a fabric tube, leaving the ends open.
- Turn the Fabric Right-Side Out:
- Use a safety pin to help turn the fabric inside out.
- Insert the Elastic:
- Attach a safety pin to one end of the elastic and thread it through the fabric tube.
- Hold the other end to prevent it from getting lost inside.
- Secure the Elastic:
- Once the elastic is fully threaded, tie or sew the ends together securely.
- Close the Scrunchie:
- Tuck one end of the fabric into the other and sew it shut.
Your handmade scrunchie is now ready! 🎀