Silk thread jhumkas are a timeless fashion accessory that complements both traditional and contemporary outfits. Making them at home allows you to experiment with colours, designs, and embellishments to match your style.
This step-by-step guide will walk you through making silk thread jhumkas using simple materials.
Why Make Your Own Silk Thread Jhumkas?
✅ Customizable – Choose colours and designs that match your outfits.
✅ Affordable – DIY jhumkas cost much less than store-bought ones.
✅ Handmade Look – Adds a personal and unique touch to jewellery.

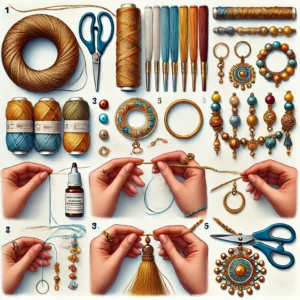
Materials Needed:
- Silk thread (any colour)
- Plastic or wooden jhumka base (available online or in craft stores)
- Fabric glue or Fevicol
- Earring hooks and headpins
- Scissors
- Decorative beads, stones, or gold chains
Step-by-Step Process
Step 1: Wrapping the Jhumka Base
- Take a plastic or wooden jhumka base.
- Apply a thin layer of fabric glue evenly across the base.
- Start wrapping silk thread tightly around the base.
- Ensure there are no gaps between the thread layers for a polished look.
Step 2: Attaching the Earring Hook
- Use a thin headpin to pierce through the top centre of the jhumka base.
- Slide a small bead onto the pin for extra decoration.
- Attach the earring hook by bending the headpin into a loop using pliers.
Step 3: Adding Decorative Elements
- Glue small beads, pearls, or golden chains around the jhumka’s edge.
- Use a toothpick to apply glue carefully for neatness.
- Arrange beads symmetrically for a professional finish.
Step 4: Let It Dry & Wear
- Allow the earrings to dry completely for at least 3-4 hours.
- Your beautiful handmade silk thread jhumkas are now ready to wear!
Expert Tips for Perfect Silk Thread Jhumkas
🎨 Use contrasting colours – A gold or white base with a coloured thread creates a unique look.
💡 Wrap double layers of thread for a richer, fuller finish.
✨ Experiment with embellishments – Use kundan stones, rhinestones, or pearl chains for a royal look.