Home » Posts tagged 'DIYJewellery'
Tag Archives: DIYJewellery
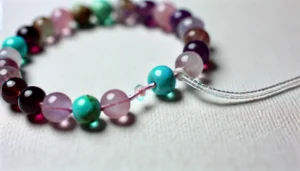
DIY Silk Thread Necklace: Step-by-Step Tutorial with Pictures
A silk thread necklace is an elegant and affordable alternative to gold or stone jewellery. Handmade silk thread necklaces are perfect for festive occasions, weddings, and ethnic outfits.
In this step-by-step guide, you’ll learn how to create a beautiful silk thread necklace using simple materials at home.
Why Make a Handmade Silk Thread Necklace?
✔ Budget-friendly – Costs much less than store-bought jewellery.
✔ Customisable – Choose colours and beadwork to match any outfit.
✔ Perfect for Gifting & Selling – Handmade jewellery has a high demand in ethnic markets.
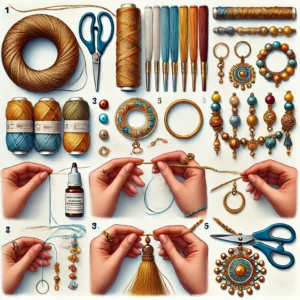
Materials Needed:
- Silk thread (colour of your choice)
- Necklace cord or thick wire (for the base)
- Threaded beads (gold, pearl, or coloured)
- Fabric glue or Fevicol
- Scissors
- Hook clasps (for securing the necklace)
Step-by-Step Process
Step 1: Prepare the Base
- Cut a necklace cord or thick wire to the desired length (15-18 inches).
- Apply a thin layer of glue and start wrapping silk thread tightly around the wire.
- Ensure the thread is evenly wrapped for a smooth look.
Step 2: String the Beads
- Once the thread wrapping is complete, start threading beads onto the necklace.
- Arrange them in a pattern (e.g., alternating colours or sizes).
- Add spacers or small pearls between large beads for a designer look.
Step 3: Securing the Ends
- Use hook clasps at both ends of the necklace to secure it.
- Apply glue inside the clasp area for extra durability.
- Allow it to dry completely for at least 4-5 hours before wearing.
Step 4: Final Touches & Wearing
- Check for any loose beads and secure them with extra glue if needed.
- Pair your handmade silk thread necklace with matching earrings or bangles for a complete look.
Expert Tips for a Professional Finish
✨ Double-wrap the silk thread for a richer look.
🎨 Mix and match colours for a trendy, layered necklace.
💡 Add kundan or stone embellishments for a bridal jewellery effect.
How to make handmade silk thread jhumkas (earrings) – A beginner’s guide
Silk thread jhumkas are a timeless fashion accessory that complements both traditional and contemporary outfits. Making them at home allows you to experiment with colours, designs, and embellishments to match your style.
This step-by-step guide will walk you through making silk thread jhumkas using simple materials.
Why Make Your Own Silk Thread Jhumkas?
✅ Customizable – Choose colours and designs that match your outfits.
✅ Affordable – DIY jhumkas cost much less than store-bought ones.
✅ Handmade Look – Adds a personal and unique touch to jewellery.
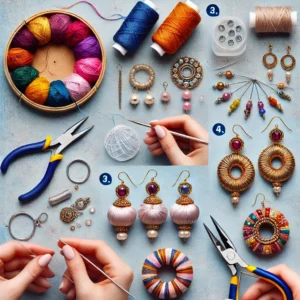
Materials Needed:
- Silk thread (any colour)
- Plastic or wooden jhumka base (available online or in craft stores)
- Fabric glue or Fevicol
- Earring hooks and headpins
- Scissors
- Decorative beads, stones, or gold chains
Step-by-Step Process
Step 1: Wrapping the Jhumka Base
- Take a plastic or wooden jhumka base.
- Apply a thin layer of fabric glue evenly across the base.
- Start wrapping silk thread tightly around the base.
- Ensure there are no gaps between the thread layers for a polished look.
Step 2: Attaching the Earring Hook
- Use a thin headpin to pierce through the top centre of the jhumka base.
- Slide a small bead onto the pin for extra decoration.
- Attach the earring hook by bending the headpin into a loop using pliers.
Step 3: Adding Decorative Elements
- Glue small beads, pearls, or golden chains around the jhumka’s edge.
- Use a toothpick to apply glue carefully for neatness.
- Arrange beads symmetrically for a professional finish.
Step 4: Let It Dry & Wear
- Allow the earrings to dry completely for at least 3-4 hours.
- Your beautiful handmade silk thread jhumkas are now ready to wear!
Expert Tips for Perfect Silk Thread Jhumkas
🎨 Use contrasting colours – A gold or white base with a coloured thread creates a unique look.
💡 Wrap double layers of thread for a richer, fuller finish.
✨ Experiment with embellishments – Use kundan stones, rhinestones, or pearl chains for a royal look.
Step-by-Step guide to making silk thread bangles at home
Silk thread bangles are a beautiful and affordable alternative to traditional gold and glass bangles. Their vibrant colours and intricate designs make them a perfect accessory for ethnic and festive wear. In this guide, you’ll learn how to make silk thread bangles at home with simple materials and creative designs.
Why Choose Handmade Silk Thread Bangles?
- Budget-friendly – Costs much less than gold or metal bangles.
- Customisable – Choose colours, patterns, and decorations.
- Lightweight & Comfortable – No risk of breakage like glass bangles.
- Materials Needed:
- Plain plastic or metal bangles (any size)
- Silk thread in your preferred colours
- Fevicol or fabric glue
- Toothpicks or glue brush for even application
- Scissors
- Small decorative stones, beads, or pearls
Step-by-Step Process

Step 1: Prepare the Bangle Base
- Choose a sturdy bangle (plastic or metal).
- If using multiple bangles together, stick them using strong glue and let them dry.
- Apply a thin layer of Fevicol or fabric glue in small sections for easy handling.
Step 2: Wrapping the Silk Thread
- Tie one end of the silk thread inside the bangle to secure it.
- Begin wrapping the silk thread tightly and evenly around the bangle.
- Use toothpicks to spread the glue as you wrap, ensuring a smooth finish.
Step 3: Securing the Ends
- Once fully wrapped, apply glue to the last part of the thread.
- Press it gently and hold for a few seconds to let it dry.
Step 4: Adding Decorations
- Use small beads, pearls, or decorative stones to embellish the bangle.
- Arrange them in patterns or as a single line for a designer look.
- Use a toothpick to apply glue and carefully place each stone.
Step 5: Let It Dry & Wear
- Allow the bangles to dry completely for a few hours before using them.
- Pair them with matching outfits for a stylish ethnic look.
Tips for Making Perfect Silk Thread Bangles
- Use double layers of thread for a richer, fuller look.
- Mix two colours for a dual-tone effect.
- Try zigzag wrapping for a unique design.
- Add hanging beads or charms for an exclusive touch.
Products
-
 Tulip bead each Rs 6
Original price was: 8.00₹.6.00₹Current price is: 6.00₹.
Tulip bead each Rs 6
Original price was: 8.00₹.6.00₹Current price is: 6.00₹.
-
 AD Charm for invisible necklace blue stone
Original price was: 120.00₹.90.00₹Current price is: 90.00₹.
AD Charm for invisible necklace blue stone
Original price was: 120.00₹.90.00₹Current price is: 90.00₹.
-
 AD Charm for invisible necklace red stone
Original price was: 120.00₹.90.00₹Current price is: 90.00₹.
AD Charm for invisible necklace red stone
Original price was: 120.00₹.90.00₹Current price is: 90.00₹.
-
 Pink AD drop charm for invisible necklace
Original price was: 50.00₹.45.00₹Current price is: 45.00₹.
Pink AD drop charm for invisible necklace
Original price was: 50.00₹.45.00₹Current price is: 45.00₹.
-
 Stone Flower pendant for invisible necklace
Original price was: 50.00₹.48.00₹Current price is: 48.00₹.
Stone Flower pendant for invisible necklace
Original price was: 50.00₹.48.00₹Current price is: 48.00₹.
-
 Flower charm with drop stone for invisible jewellery
Original price was: 55.00₹.45.00₹Current price is: 45.00₹.
Flower charm with drop stone for invisible jewellery
Original price was: 55.00₹.45.00₹Current price is: 45.00₹.
Latest Posts
- DIY Silk Thread Necklace: Step-by-Step Tutorial with Pictures
- How to make handmade silk thread jhumkas (earrings) – A beginner’s guide
- Step-by-Step guide to making silk thread bangles at home
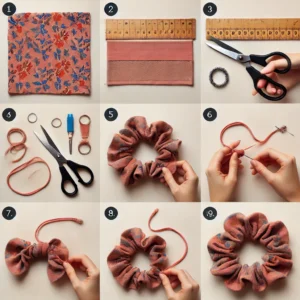
- How to make handmade rubber bands and scrunchies at home – Step-by-step guide with pictures
- Discover the Rich Significance Behind the Ornaments Worn by Indian Women!

- Make Your Own Stunning Beaded Bracelet with These Simple Steps!