Home » Posts tagged '#DIYJewelry'
Tag Archives: #DIYJewelry
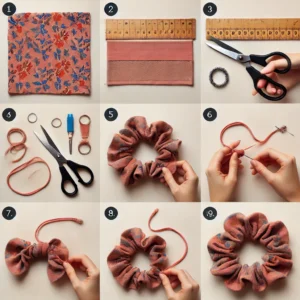
How to make handmade rubber bands and scrunchies at home – Step-by-step guide with pictures
Making rubber bands or scrunchies at home is a fun and easy DIY project. Below is a detailed guide on how to make both, along with step-by-step instructions.
How to Make a Handmade Rubber Band
Materials Needed:
- Natural rubber sheets or silicone strips
- Scissors
- Ruler
- Super glue or rubber adhesive
- A marker
Step-by-Step Process:
- Cut the Rubber Sheet:
- Use a ruler and marker to measure and draw thin strips (about 1 cm wide) on the rubber sheet.
- Cut along the lines using sharp scissors.
- Form the Band Shape:
- Take a rubber strip and stretch it slightly to check flexibility.
- Join the ends together to form a circle.
- Secure the Ends:
- Apply a small amount of rubber adhesive or super glue to the ends.
- Press the ends together firmly and let them dry for a few hours.
- Test the Elasticity:
- Once dry, stretch the band gently to check for strength and elasticity.
How to Make a Handmade Scrunchie
Materials Needed:
- A fabric of your choice (cotton, silk, or velvet)
- ¼ inch wide elastic (about 8-10 inches long)
- Sewing needle and thread or a sewing machine
- Scissors
- Safety pin
Step-by-Step Process:
- Cut the Fabric:
- Measure and cut a rectangular piece of fabric (around 20 inches long and 4 inches wide).
- Fold and Stitch the Fabric:
- Fold the fabric lengthwise, with the right sides facing each other.
- Sew along the long edge to create a fabric tube, leaving the ends open.
- Turn the Fabric Right-Side Out:
- Use a safety pin to help turn the fabric inside out.
- Insert the Elastic:
- Attach a safety pin to one end of the elastic and thread it through the fabric tube.
- Hold the other end to prevent it from getting lost inside.
- Secure the Elastic:
- Once the elastic is fully threaded, tie or sew the ends together securely.
- Close the Scrunchie:
- Tuck one end of the fabric into the other and sew it shut.
Your handmade scrunchie is now ready! 
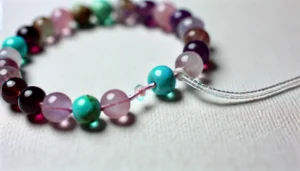
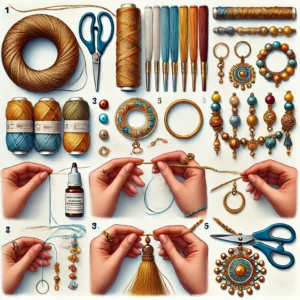
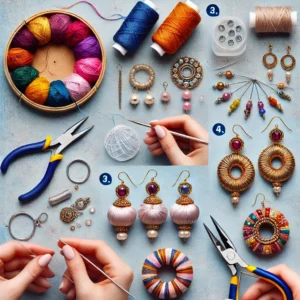
Make Your Own Stunning Beaded Bracelet with These Simple Steps!
Learn how to make a beaded bracelet with this beginner’s guide. Step-by-step instructions, materials needed, and tips to tie a secure knot!
Beaded bracelets are a popular and versatile accessory that can be customized to match any style or outfit. Creating your own beaded bracelet is a fun and creative DIY project that allows you to express your personality and creativity. This guide provides a step-by-step process for making a beaded bracelet, along with essential tips to tie the knot securely so it doesn’t loosen over time.
Materials Needed for Making a Beaded Bracelet
Before starting the process, gather the following materials:
- Beads: You can choose from a variety of beads such as glass, wooden, metal, gemstone, or acrylic, depending on your style preference.
- Elastic Cord or Beading Wire: Elastic cords are commonly used for stretch bracelets, while beading wire is more suitable for bracelets with a clasp.
- Beading Needle: A beading needle makes it easier to thread smaller beads onto the cord or wire.
- Crimp Beads or Crimp Tubes: These small metal beads are used to secure the ends of the wire in place when using a clasp.
- Jump Rings and Clasps (optional): For non-stretchy bracelets, you’ll need jump rings and clasps to fasten the bracelet.
- Scissors or Wire Cutters: These are used to cut the elastic cord or beading wire to the desired length.
- Bead Stoppers or Clips: These small clips help prevent beads from falling off the cord while you are stringing them.
- Glue (Optional): Jewelry glue or clear nail polish can be used to reinforce knots for added security.
Step-by-Step Process to Make a Beaded Bracelet
Follow these steps to create your own custom beaded bracelet:

Step 1: Choose Your Beads and Design
Decide on the type of beads you want to use for your bracelet. You can mix and match different sizes, colors, and shapes to create a unique design. Lay out the beads in the desired order on a flat surface or a bead board to visualize the final design before stringing.
Step 2: Measure and Cut the Cord
Measure your wrist using a measuring tape to determine the length of the bracelet. Add an extra inch to this measurement to allow room for tying knots. Cut the elastic cord or beading wire to the appropriate length using scissors or wire cutters.
Step 3: Secure One End with a Bead Stopper
Attach a bead stopper or clip to one end of the cord to prevent the beads from sliding off while stringing. This is particularly useful when working with multiple beads of varying sizes.
Step 4: Thread the Beads onto the Cord
Start threading the beads onto the elastic cord or beading wire in the order you have laid out. Use a beading needle to make this process easier, especially when working with small beads. Continue threading until you have added all the beads to the cord.
Step 5: Test the Fit
Once all the beads are threaded, wrap the bracelet around your wrist to check the fit. Adjust the number of beads if necessary to ensure the bracelet fits comfortably without being too tight or too loose.
Step 6: Tie a Secure Knot (Elastic Cord Method)
For stretch bracelets made with elastic cord, remove the bead stopper and tie a secure knot at the ends. The surgeon’s knot is a popular choice for securing elastic cords as it is stronger than a regular knot.
- To tie a surgeon’s knot: Cross the two ends of the elastic cord to form a loop, just like tying a regular knot. Then, pass one end of the cord through the loop twice (instead of once). Pull the ends tightly to form a secure knot.
Step 7: Reinforce the Knot
For added security, apply a drop of jewelry glue or clear nail polish to the knot. Let it dry completely to prevent the knot from coming undone over time. Trim any excess cord close to the knot using scissors.
Step 8: Secure the Ends with Crimp Beads (Beading Wire Method)
If using beading wire, thread a crimp bead or crimp tube onto one end of the wire. Loop the wire through the clasp, then back through the crimp bead. Use crimping pliers to squeeze the crimp bead securely in place, flattening it to hold the wire firmly. Trim any excess wire with wire cutters.
Step 9: Attach the Clasp (Beading Wire Method)
Repeat the process on the other end of the bracelet, attaching a jump ring and clasp to complete the bracelet. Ensure both ends are securely crimped to prevent the beads from slipping off.
Step 10: Finish and Enjoy Your Bracelet
Your beaded bracelet is now complete! Check the bracelet for any loose beads or knots and make adjustments if needed. Enjoy wearing your handcrafted jewelry or gifting it to a loved one.
Tips for Tying a Secure Knot
- Use the Right Knot: For elastic cord bracelets, a surgeon’s knot is more secure than a regular knot because it has an extra loop that holds the ends in place.
- Pull Tight, But Not Too Tight: Make sure to pull the knot tightly enough to hold the beads together but not so tight that the elastic cord stretches too much, weakening the bracelet over time.
- Reinforce with Glue: Adding a drop of jewelry glue or clear nail polish to the knot can help prevent it from slipping or loosening. Let the glue dry completely before trimming any excess cord.
- Trim Excess Cord Carefully: Cut the excess cord close to the knot but leave a small tail (about 1/8 inch) to prevent the knot from unraveling.
- Practice Different Knot Techniques: Practice tying different knots like the square knot, surgeon’s knot, and double knot to see which one works best for your type of cord and beads.
Creating a beaded bracelet is a fun and easy DIY project that allows for endless creativity. With the right materials, step-by-step guidance, and proper knotting techniques, you can make beautiful, durable bracelets that you’ll love to wear or gift. Remember to practice tying knots securely to ensure your bracelets last a long time without loosening or breaking.
DIY Terracotta Jewelry: Unleash Your Creativity with These Easy Step-by-Step Images!
Learn how to make terracotta jewelry with our step-by-step guide. Discover the materials needed, tips, and tricks to create beautiful, sustainable pieces at home.
Terracotta jewelry, known for its earthy and rustic charm, is becoming a popular choice among DIY enthusiasts and fashion lovers alike. This handcrafted jewelry, made from natural clay, can be customized in endless designs, making it both unique and sustainable. If you’re looking to create your own terracotta jewelry, this guide will take you through the process step-by-step, complete with images to help you craft stunning pieces right at home.
What You Need to Get Started
Before diving into the steps, gather these essential materials:
- Terracotta clay (available in art supply stores)
- Rolling pin or clay roller
- Cookie cutters or any small mold for shaping
- Sandpaper
- Water and sponge
- Paints (acrylic or fabric paints)
- Paintbrushes
- Jewelry findings (hooks, earring posts, chains, etc.)
- Needle or pin for making holes
- Clear varnish or glaze for finishing
Step-by-Step Process to Make Terracotta Jewelry
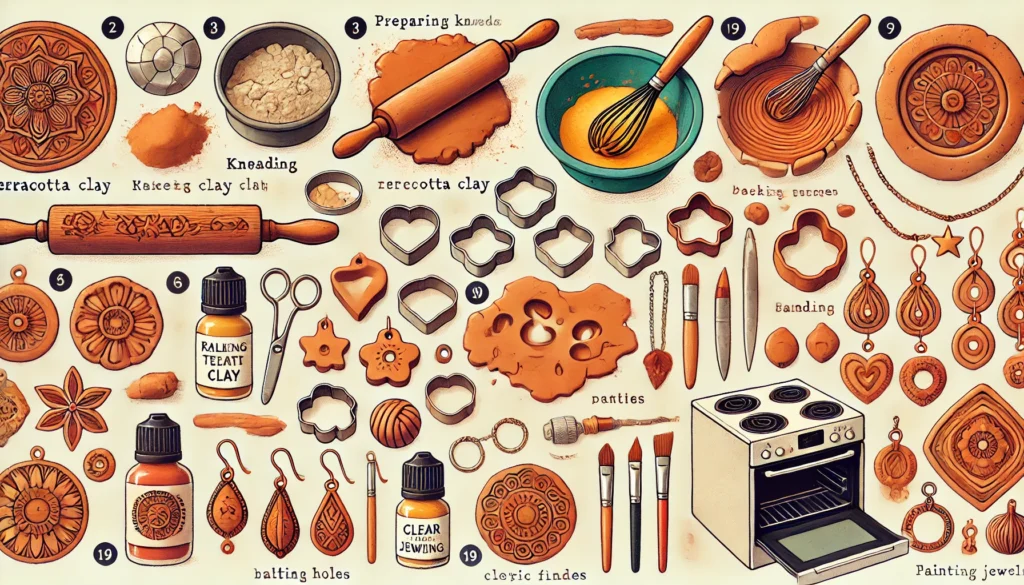
Step 1: Prepare the Clay
To start, take a small amount of terracotta clay and knead it well. Ensure there are no air bubbles, as they can cause cracks during the baking process. The clay should be soft and pliable. If it’s too dry, add a few drops of water and knead again.
Step 2: Roll Out the Clay
Using a rolling pin or clay roller, flatten the clay to your desired thickness—typically around 3 to 5 mm. This thickness ensures that the jewelry pieces are sturdy yet not too heavy to wear.
Step 3: Cut Out Shapes
Use cookie cutters, molds, or a knife to cut out shapes from the rolled-out clay. Popular shapes for terracotta jewelry include circles, squares, leaves, and geometric patterns. If you want to add more intricate designs, use a needle or a carving tool to create patterns on the surface of the clay.
Step 4: Make Holes for Findings
Using a needle or pin, carefully poke holes where you want to attach hooks, chains, or other findings. Ensure the holes are big enough to accommodate your jewelry findings but not too large that they compromise the structure of the clay.
Step 5: Smooth the Edges
Gently smooth the edges of each piece with a damp sponge or your fingers. This will help give a more polished and refined look to the final product. Let the pieces dry for a bit before moving on to the next step.
Step 6: Bake the Clay
Preheat your oven to 220°F (104°C). Place the clay pieces on a baking tray lined with parchment paper and bake for 30-40 minutes. Baking time may vary depending on the size and thickness of your pieces, so keep an eye on them. Once baked, let them cool completely before handling.
Step 7: Sand and Refine
Once the pieces are baked and cooled, use fine-grit sandpaper to smooth out any rough edges or surfaces. This step is crucial for giving your jewelry a professional finish.
Step 8: Paint Your Jewelry
Now comes the fun part—painting! Use acrylic or fabric paints to decorate your jewelry pieces. You can choose traditional designs or contemporary patterns, depending on your style preference. Allow the paint to dry completely.
Step 9: Apply a Varnish
To seal the paint and give the jewelry a shiny finish, apply a layer of clear varnish or glaze. This step also makes the jewelry water-resistant and more durable.
Step 10: Assemble the Jewelry
Attach hooks, chains, and other findings to your jewelry pieces using the holes made earlier. Use pliers to securely attach these findings, ensuring your jewelry is both functional and beautiful.
Step 11: Enjoy Your Handmade Terracotta Jewelry!
Congratulations! You’ve now created your very own terracotta jewelry. Whether it’s a pair of earrings, a necklace, or a bracelet, these handmade pieces are perfect for any occasion and make great gifts too.
Tips for Making Terracotta Jewelry
- Experiment with different shapes, sizes, and colors to create a diverse collection.
- If you’re new to painting, start with simple designs and gradually work your way up to more intricate patterns.
- Always wear a mask when sanding the baked clay to avoid inhaling any dust.
Conclusion
Making terracotta jewelry at home is a fun, creative, and eco-friendly activity that allows you to express your artistic side. With this step-by-step guide and a bit of practice, you’ll be crafting beautiful, unique jewelry pieces in no time!
Products
-
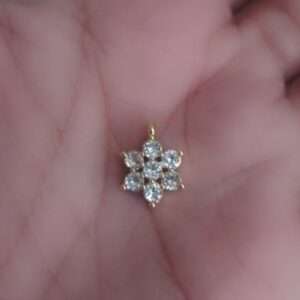
 AD Flower pendant for invisible necklace - pink stone
Original price was: 40.00₹.35.00₹Current price is: 35.00₹.
AD Flower pendant for invisible necklace - pink stone
Original price was: 40.00₹.35.00₹Current price is: 35.00₹.
-
 AD Flower pendant for invisible necklace - white stone
Original price was: 40.00₹.35.00₹Current price is: 35.00₹.
AD Flower pendant for invisible necklace - white stone
Original price was: 40.00₹.35.00₹Current price is: 35.00₹.
-
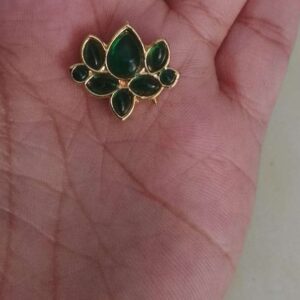 Lotus pendants for invisible necklace - green
Original price was: 38.00₹.35.00₹Current price is: 35.00₹.
Lotus pendants for invisible necklace - green
Original price was: 38.00₹.35.00₹Current price is: 35.00₹.
-
 Lotus pendants for invisible necklace - baby pink
Original price was: 38.00₹.35.00₹Current price is: 35.00₹.
Lotus pendants for invisible necklace - baby pink
Original price was: 38.00₹.35.00₹Current price is: 35.00₹.
-
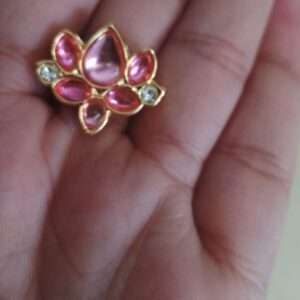
 Lotus pendants for invisible necklace - pink
Original price was: 38.00₹.35.00₹Current price is: 35.00₹.
Lotus pendants for invisible necklace - pink
Original price was: 38.00₹.35.00₹Current price is: 35.00₹.
-
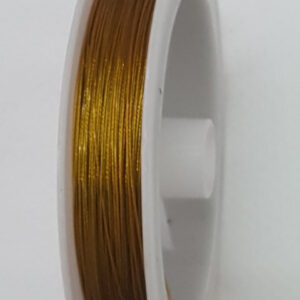 Gear wire for making Necklace - Gold colour
Original price was: 60.00₹.55.00₹Current price is: 55.00₹.
Gear wire for making Necklace - Gold colour
Original price was: 60.00₹.55.00₹Current price is: 55.00₹.
Latest Posts
- DIY Silk Thread Necklace: Step-by-Step Tutorial with Pictures
- How to make handmade silk thread jhumkas (earrings) – A beginner’s guide
- Step-by-Step guide to making silk thread bangles at home

- How to make handmade rubber bands and scrunchies at home – Step-by-step guide with pictures
- Discover the Rich Significance Behind the Ornaments Worn by Indian Women!

- Make Your Own Stunning Beaded Bracelet with These Simple Steps!