Learn decorative mandala borders using dots, scallops, arches, triangles, diamonds, leaves and petals in this step-by-step Lesson 18.
Course: Mandala Art Academy
Module: Intermediate Designs
Lesson: 18
Skill level: Intermediate
Practice time: 45 to 60 minutes
Welcome to Lesson 18
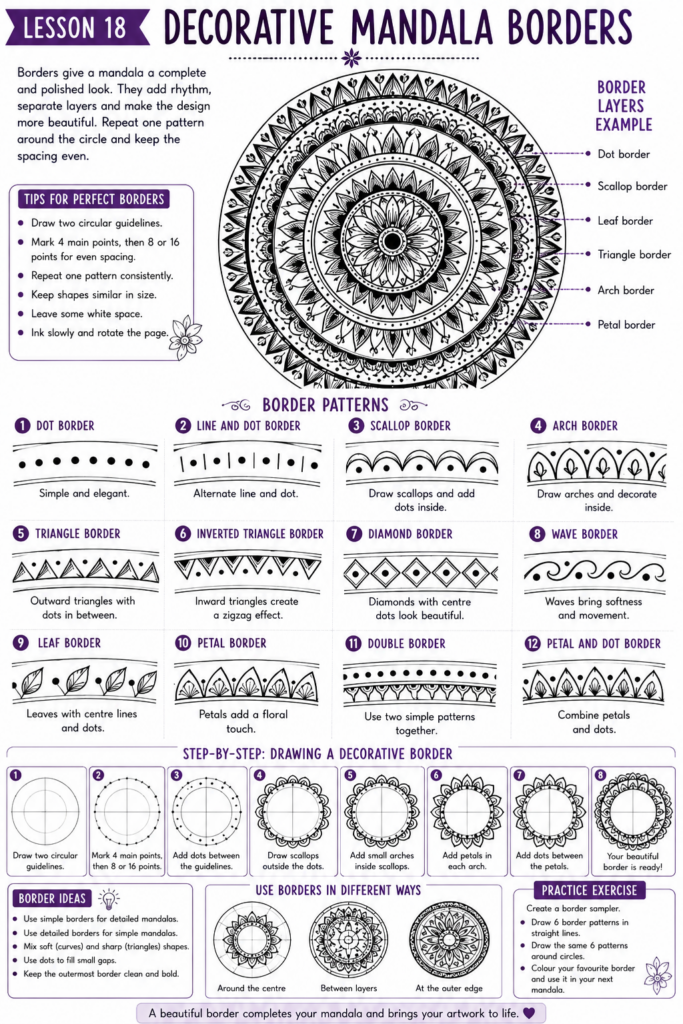
Decorative borders are the finishing frames of mandala art. A mandala may have a beautiful centre, detailed petals and balanced layers, but the outer border gives the artwork a complete and polished look.
In earlier lessons, you learnt dots, lines, curves, petals, leaves, lotus designs, paisley patterns, geometric shapes and sunburst rays. In this lesson, you will bring many of those elements together to create beautiful mandala borders.
A border can be simple, bold, delicate, floral, geometric or highly decorative. The secret is to repeat one pattern carefully around the circle and keep the spacing balanced.
What is a mandala border?
A mandala border is a decorative ring that surrounds or separates different layers of a mandala.
Borders can appear around the centre, between petal layers or at the outer edge of the artwork.
They may include dots, arches, scallops, triangles, leaves, petals, diamonds, waves, lines or tiny floral shapes.
A good border helps organise the design and gives the mandala a clear structure.
Why are decorative borders important in mandala art?
Decorative borders create separation between layers.
They make each part of the mandala easier to see and prevent the design from looking messy.
Borders also add rhythm. When the same shape repeats around a circle, the viewer’s eye naturally follows the pattern.
A well-drawn border can make a simple mandala look rich, balanced and professional.
What will you learn in this lesson?
By the end of Lesson 18, you will understand how to draw simple and detailed mandala borders using dots, arches, scallops, petals, triangles, waves, diamonds and leaf patterns.
You will also learn how to choose the right border for your design, how to keep border spacing even and how to avoid overcrowding the outer edge.
The practice exercise will guide you through a complete mandala border sampler.
Materials needed
Use drawing paper, a pencil, an eraser, a compass, a ruler and a black fineliner or gel pen.
You may also use colour pencils, sketch pens, brush pens, metallic pens or markers after completing the outline.
A protractor is helpful if you want very equal sections, but you can complete this lesson using only circles and light guide marks.
Step 1: Draw two circular guidelines
Begin by drawing two circles with a small gap between them.
This gap will become your border space.
The distance between the circles depends on the type of border you want.
A narrow border works well for dots, short lines and small scallops.
A wider border is better for petals, leaves, triangles and diamonds.
Keep the pencil lines light so that they can be erased after inking.
Step 2: Create a simple dot border
Place dots evenly between the two circular guidelines.
Start with dots at the top, bottom, left and right points.
Then add dots at the diagonal points.
Continue filling the spaces until the ring is complete.
You can use equal-sized dots or alternate between large and small dots.
A dot border is one of the easiest ways to finish a mandala cleanly.
Step 3: Draw a line-and-dot border
Inside the border space, alternate between one short line and one dot.
The pattern should repeat as line, dot, line, dot.
Keep all lines similar in length.
This border looks simple but elegant. It is useful when the surrounding mandala layers are already detailed.
You can also try a longer sequence such as long line, short line, dot.
Step 4: Create a scalloped border
Draw small connected semicircles along the outer circular guideline.
Each scallop should be similar in width and height.
Place one dot inside each scallop.
You may also draw a smaller scallop inside every larger scallop.
Scalloped borders work beautifully with floral mandalas because their rounded shape matches petals and leaves.
Step 5: Draw an arch border
An arch border is slightly taller than a scalloped border.
Draw repeated arches inside the border ring, with each arch beginning and ending on the inner circular guideline.
Add a dot, small petal or short line inside each arch.
You can make the border more detailed by drawing a smaller arch inside every large arch.
This style is useful for outer borders and decorative middle rings.
Step 6: Create a triangle border
Draw repeated small triangles around the outer circle.
Each triangle should point outward.
Keep the base of each triangle along the circular guideline and align the tips carefully.
Add dots between the triangles to soften the sharp edges.
Triangle borders work well with geometric and sunburst mandalas.
Step 7: Create an inverted triangle border
Draw triangles pointing inward instead of outward.
Place them between two circular guidelines.
You may alternate outward and inward triangles to create a zigzag effect.
This border creates energy and movement.
Decorate every alternate triangle with short lines and leave the remaining triangles empty for contrast.
Step 8: Draw a diamond border
Draw one small diamond inside each section of the border.
A diamond can be made by connecting four points: top, bottom, left and right.
Add one dot in the centre of every diamond.
Diamonds give the border a clean geometric look.
You can alternate diamonds with short lines, dots or tiny circles.
Step 9: Create a wave border
Draw a flowing wave line around the mandala.
Try to keep each rise and dip similar in size.
Add dots in the lower curves or small leaves in the upper curves.
Wave borders add softness and movement.
They are helpful when your mandala contains many straight or pointed shapes.
Step 10: Draw a leaf border
Draw small leaves around the outer circle.
Each leaf should point outward or slightly sideways.
Add one centre line inside every leaf.
You may place one dot between each pair of leaves.
A leaf border looks natural and decorative. It works especially well with floral, lotus and paisley mandalas.
Step 11: Create a petal border
Draw repeated pointed or rounded petals around the outer edge.
Make sure all petal tips align with the same circular guideline.
Add a smaller petal inside each large petal or draw a centre line.
Petal borders are useful when you want the mandala to look like a blooming flower.
Keep the petals equal in size so the border remains balanced.
Step 12: Add a double border
Draw two narrow border rings next to each other.
Use a simple pattern in the first ring, such as dots.
Use a slightly larger pattern in the second ring, such as arches or triangles.
Double borders make the mandala look layered and complete.
They are also useful when you want to separate a detailed centre from a bold outer edge.
Step 13: Combine soft and sharp border elements
Try combining rounded scallops with pointed triangles.
You can draw scallops inside the ring and place small triangles outside them.
This creates contrast between softness and energy.
Another option is to use leaves between triangles or dots between diamonds.
Combining shapes carefully helps the border look more interesting without becoming messy.
Step 14: Choose the right border for your mandala
If your mandala is floral, use scallops, petals, leaves or dots.
If your mandala is geometric, use triangles, diamonds, squares or straight lines.
If your mandala is sunburst-style, use pointed rays, dots and circular borders.
If your mandala is already very detailed, choose a simple outer border.
If the centre is simple, you can create a more decorative border to add interest.
Step 15: Review the border before inking
Before using pen, check whether the border pattern fits evenly around the circle.
If the final section looks too crowded or too empty, adjust the spacing in pencil.
It is better to correct the border before inking than to force the last few shapes into a small space.
Once the pencil layout looks balanced, begin outlining slowly.
Work in small sections and rotate the page as needed.
How can you keep borders evenly spaced?
Start by marking four main points: top, bottom, left and right.
Then mark the four diagonal points.
This divides the border into eight sections.
If you need more detail, divide each section again.
Use these marks as starting points for dots, petals, arches or triangles.
This method helps you avoid uneven gaps when you complete the circle.
How can you avoid overcrowding a border?
Do not use too many different shapes in one narrow border.
Choose one main pattern and repeat it clearly.
Leave some white space around detailed shapes.
Use dots as small fillers instead of adding extra petals or leaves everywhere.
If your mandala centre is already busy, keep the outer border clean.
A simple border can often look more elegant than a crowded one.
Beginner practice exercise
Draw six horizontal border strips on a practice sheet.
In the first strip, draw equal-sized dots.
In the second strip, draw line-and-dot patterns.
In the third strip, draw scallops with dots inside.
In the fourth strip, draw small triangles.
In the fifth strip, draw diamonds with centre dots.
In the sixth strip, draw leaves connected by a curved line.
This exercise helps you practise border patterns before drawing them around a circle.
Circular border practice exercise
Draw three concentric circles to create two border rings.
In the inner border, add a simple dot pattern.
In the outer border, draw repeated arches.
Place one small petal inside each arch.
Add dots between the arches.
This will help you practise spacing, repetition and circular movement.
Intermediate practice exercise
Draw one mandala with a simple centre and three decorative borders.
Use a dot border around the centre.
Add a diamond border in the middle.
Finish with an outer border made of scallops and pointed petals.
Decorate only selected shapes with short lines.
Leave enough white space between the borders.
This exercise will help you understand how multiple borders can work together in one design.
Common mistakes to avoid when drawing mandala borders
Avoid starting a border without checking the available space.
Do not make the first few shapes too large because the final section may become crowded.
Avoid using too many different decorations in the same border ring.
Do not press too hard with pencil guidelines.
Avoid erasing before the ink has dried.
Do not make the outer border heavier than the entire mandala unless that is your intentional design choice.
How can you make mandala borders look professional?
Use clean circular guidelines.
Repeat one pattern consistently within each border.
Keep spacing even from start to finish.
Use dots to fill small gaps instead of forcing large shapes into tight spaces.
Choose border styles that match the rest of the mandala.
Use thicker lines for outer edges and thinner lines for inner details.
Check the full design from a distance before adding final details.
Colouring ideas for decorative borders
Use one colour for the main border shape and another colour for dots or small details.
For floral borders, try pink, purple, green or yellow.
For geometric borders, try blue, black, gold, red or silver.
For sunburst borders, use yellow, orange, coral and gold.
You may also keep the inner mandala black and white and colour only the border for a clean decorative effect.
Repeat the same colour pattern around the entire circle.
Homework for Lesson 18
Create one mandala with at least four different decorative borders.
Include one dot border, one scalloped border, one triangle or diamond border and one floral border with petals or leaves.
Keep the centre design simple so that the borders can remain the focus.
Use pencil guidelines before inking.
Complete the artwork in black and white or use a limited colour palette of two to four colours.
After finishing, observe which border looked easiest and which one needed more spacing control.
Creative challenge
Create two border samplers.
In the first sampler, draw six border patterns in straight horizontal strips.
In the second sampler, draw the same six patterns around circles.
Compare which patterns were easier in straight lines and which ones were easier around a circular guide.
This exercise will help you understand how borders change when they are used in mandala art.
Key takeaways from Lesson 18
Decorative borders help frame and separate mandala layers.
Dots, lines, scallops, arches, triangles, diamonds, leaves and petals can all be used as border patterns.
The border should match the style of the mandala.
Guidelines and section marks help keep spacing even.
Simple borders work best when the mandala centre is already detailed.
White space keeps the design clean and readable.
A polished mandala border depends on repetition, spacing and patience.
Lesson summary
In Lesson 18, you learnt how to draw decorative mandala borders using dots, lines, scallops, arches, triangles, diamonds, waves, leaves and petals.
You also learnt how to choose the right border style, keep spacing even, avoid overcrowding and combine multiple borders in one mandala.
Borders are more than finishing details. They guide the viewer’s eye, frame the artwork and give your mandala a complete professional look.
Previous lesson: Lesson 17: Sunburst mandala patterns
Next lesson: Lesson 19: Combining Multiple Mandala Patterns
Support the free Mandala Art Academy
Learning mandala art with us? The Mandala Art Academy is completely free, and every contribution helps us create more step-by-step lessons, practice guides and original tutorial images.
Even a small contribution helps us continue the next lesson.
For supporters in India
Scan the QR code below or use the UPI ID to contribute any amount you are comfortable with.

UPI ID: pallavi.rags-1@okhdfcbank
Pay securely through Razorpay
Prefer to pay by card or another supported online payment method? Use our secure Razorpay page below. Indian and international cards are accepted.
Support Mandala Art Academy and help create the next free lesson
Your support is entirely optional. Every Mandala Art Academy lesson will remain free for everyone.
Thank you for learning with us and helping us create the next lesson. ❤️