Learn how to combine floral, geometric, dot, paisley and border patterns into one balanced mandala design in Lesson 19.
Course: Mandala Art Academy
Module: Intermediate Designs
Lesson: 19
Skill level: Intermediate
Practice time: 50 to 65 minutes
Welcome to Lesson 19
By now, you have learnt many individual mandala elements, including dots, lines, petals, leaves, lotus shapes, paisley motifs, geometric forms, sunburst rays and decorative borders.
In this lesson, you will learn how to combine these patterns into one balanced mandala design.
This is an important step in your mandala art journey because a complete mandala is rarely made from just one pattern. Most beautiful mandalas are created by arranging different elements in layers while keeping the overall design organised and symmetrical.
The goal is not to add every pattern you know. The goal is to choose the right patterns, place them in the right layers and repeat them with patience.
What does it mean to combine mandala patterns?
Combining mandala patterns means using different design elements in one artwork.
For example, you may begin with a small floral centre, add a lotus petal layer, place dots between the petals, include paisley shapes in the next ring and finish with a decorative border.
Each pattern should support the next one.
The mandala should feel connected, not like many unrelated designs placed together.
Why is pattern combination important?
Pattern combination helps your mandalas look richer and more creative.
When you understand how to combine shapes, you can create your own designs instead of copying ready-made patterns.
You can also control the mood of your artwork.
Floral patterns make a mandala feel soft. Geometric patterns make it feel structured. Dots add detail. Borders make the design complete. Paisley shapes add movement. Sunburst rays add energy.
When you combine these thoughtfully, your mandala becomes more expressive and personal.
What will you learn in this lesson?
By the end of Lesson 19, you will understand how to choose a main pattern, select supporting patterns, plan mandala layers and balance detailed areas with simple spaces.
You will also learn how to combine floral, geometric, dot, paisley and border patterns without overcrowding your artwork.
The practice exercise will guide you through a complete mixed-pattern mandala.
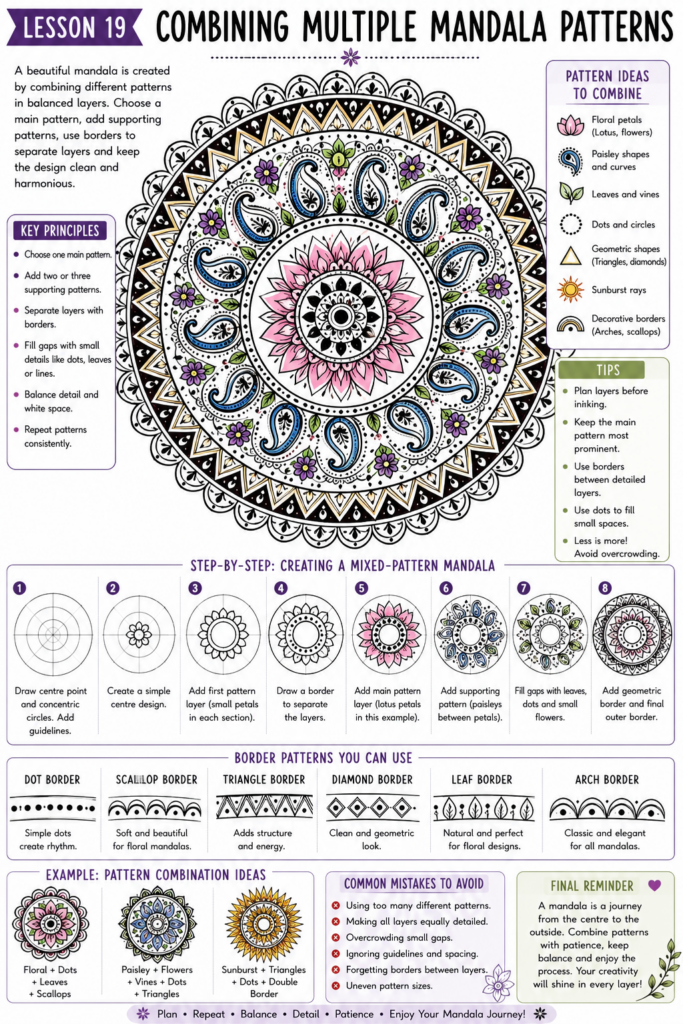
Materials needed
Use drawing paper, a pencil, an eraser, a compass, a ruler and a black fineliner or gel pen.
A protractor is optional, but it can help you divide the mandala more accurately.
You may also use colour pencils, sketch pens, brush pens, metallic pens or markers after completing the outline.
Keep a practice sheet nearby so that you can test pattern combinations before adding them to the final design.
Step 1: Choose one main pattern
Before drawing, decide which pattern will be the main focus of your mandala.
Your main pattern may be lotus petals, paisley shapes, geometric triangles, floral petals or sunburst rays.
Choose only one dominant pattern.
If every pattern tries to become the main attraction, the mandala can look crowded and confusing.
For this lesson, you can choose lotus petals as the main pattern.
Step 2: Choose two supporting patterns
After selecting the main pattern, choose two supporting patterns.
Supporting patterns should fill spaces, add detail or connect the main layers.
For example, if lotus petals are your main pattern, you can use dots and leaves as supporting patterns.
If paisley is your main pattern, you can use small flowers and curved lines as supporting patterns.
If geometric triangles are your main pattern, you can use dots and diamonds as supporting patterns.
This simple planning step makes the final artwork more balanced.
Step 3: Prepare the mandala grid
Mark the centre point of your page.
Draw five or six concentric circles around the centre.
These circles will guide the placement of each pattern layer.
Draw one vertical line and one horizontal line through the centre.
Add two diagonal lines to divide the mandala into eight equal sections.
For a more detailed design, divide each section again to create sixteen sections.
Keep the guidelines light so they can be erased later.
Step 4: Create a simple centre design
Begin with a small centre circle.
Inside the circle, draw one dot, small flower, tiny diamond or mini sunburst.
Keep the centre clean and readable.
The centre should introduce the style of the mandala without becoming too heavy.
For a mixed-pattern mandala, a simple floral centre works well because it can connect easily with petals, leaves, dots and borders.
Step 5: Add the first pattern layer
Around the centre, draw your first repeated pattern.
This can be a row of rounded petals, pointed petals, small triangles or simple arches.
Keep this first layer smaller than the next layers.
Repeat the same shape in every section.
Do not add too much decoration yet. The first layer should create a strong foundation for the rest of the mandala.
Step 6: Add a separating border
After the first pattern layer, draw a narrow border.
This can be a dotted ring, line-and-dot border or simple double-circle border.
A separating border gives the eye a resting point.
It also prevents one pattern layer from merging into the next.
This is one of the easiest ways to keep a mixed mandala neat.
Step 7: Add the main pattern layer
Now add the dominant pattern you selected.
If your main pattern is lotus, draw a ring of larger lotus petals.
If your main pattern is paisley, draw repeated paisley shapes around the circle.
If your main pattern is geometric, draw triangles, diamonds or squares in a structured layer.
Make this layer slightly larger and more noticeable than the others.
Use the circular guidelines to keep the height even.
Step 8: Decorate the main pattern carefully
Add details inside the main shapes.
You may use inner lines, small dots, short strokes, nested outlines or tiny flowers.
Repeat the same decoration in every matching shape.
Avoid decorating each shape differently. Too much variation can disturb the balance.
A clean mixed-pattern mandala depends on repetition, not random decoration.
Step 9: Fill the gaps with supporting patterns
Look at the spaces between the main pattern shapes.
Add small supporting elements such as leaves, dots, teardrops, tiny triangles or small petals.
Keep these filler patterns smaller than the main shapes.
Their job is to connect the design, not dominate it.
If the gap is narrow, use a dot or small leaf. If the gap is wider, use a small flower or paisley-inspired curve.
Step 10: Add a contrasting layer
After the main pattern layer, add a layer that contrasts with it.
If your main layer is floral and soft, add a geometric border with triangles or diamonds.
If your main layer is sharp and geometric, add a rounded scallop or dot border.
Contrast helps the mandala look more interesting.
The design becomes stronger when soft and sharp elements are balanced.
Step 11: Use dots to connect the design
Dots are useful when combining multiple patterns because they help create rhythm.
Place dots at the tips of petals, between triangles, inside arches or along circular borders.
Use dots to fill small empty spaces instead of adding large extra shapes.
A dotted ring can also separate one busy layer from another.
Dots act like small decorative pauses throughout the mandala.
Step 12: Add the outer border
Choose an outer border that matches the overall style.
For a floral mandala, use petals, scallops or leaves.
For a geometric mandala, use triangles, diamonds or squares.
For a sunburst mandala, use rays, dots and circular lines.
For a mixed mandala, choose a border that is decorative but not too heavy.
The outer border should complete the design and frame the artwork.
Step 13: Check the balance of detail
Before inking, look at the full mandala.
Ask yourself whether one layer looks too crowded.
Check whether the main pattern is still visible.
Observe whether the supporting patterns are helping the design or making it too busy.
If needed, erase a few small details.
A beautiful mandala does not need every space to be filled.
Step 14: Ink from the centre outward
Begin outlining from the centre of the mandala.
Move slowly from one layer to the next.
Allow the ink to dry before erasing pencil marks.
Use thicker lines for main outlines and thinner lines for internal details.
Rotate the page while drawing so your hand remains comfortable.
This will help you draw smoother curves and cleaner straight lines.
Step 15: Add final finishing details
After the main structure is inked, add final dots, short lines or small accents.
Do this carefully.
Final details should improve the design, not overcrowd it.
If the mandala already looks complete, stop there.
Knowing when to stop is an important part of mandala art.
How can you choose patterns that work together?
Choose patterns that share a similar mood.
Lotus petals, leaves, dots and scallops work well together because they feel soft and floral.
Triangles, diamonds, squares and straight lines work well together because they feel structured and geometric.
Paisleys, vines, leaves and dots work well together because they create flow and movement.
Sunburst rays, triangles, dots and circular borders work well together because they create energy.
When in doubt, use one main pattern, one border pattern and one filler pattern.
How can you avoid overcrowding mixed mandalas?
Do not use too many different elements in one small space.
Keep each layer focused on one pattern.
Use borders to separate detailed sections.
Leave some shapes empty.
Use dots instead of large fillers when the space is narrow.
Repeat the same decoration in matching areas.
A balanced mandala is not created by adding more and more details. It is created by arranging details wisely.
Beginner practice exercise
Draw a centre circle and divide the mandala into eight equal sections.
Create a small floral centre using eight rounded petals.
Add a dotted border around the flower.
Draw a larger layer of pointed lotus petals.
Place one small leaf between every two lotus petals.
Add a geometric border using small diamonds.
Finish with a scalloped outer border.
Decorate the lotus petals with centre lines and add one dot inside each scallop.
This exercise combines floral, dot, leaf, geometric and border patterns in one design.
Intermediate practice exercise
Create a mandala using sixteen sections.
Begin with a geometric centre made from two overlapping squares.
Add a ring of small petals.
Draw a layer of paisley shapes around the petals.
Fill the spaces between paisleys with leaves and dots.
Add a sunburst-inspired layer using alternating long and short rays.
Finish with a double border containing dots and scallops.
This exercise will help you practise contrast, movement and layered detail.
Pattern combination ideas to try
Combine lotus petals with dotted borders and leaves for a soft floral look.
Combine paisleys with spirals, flowers and curved vines for a flowing design.
Combine triangles, diamonds and dots for a clean geometric mandala.
Combine sunburst rays with circles and dots for a bold energetic design.
Combine petals, scallops and tiny flowers for a decorative handmade style.
Try different combinations on small practice circles before creating a full mandala.
Common mistakes to avoid when combining patterns
Avoid using every pattern you know in one mandala.
Do not make all layers equally detailed.
Avoid placing large filler shapes in small gaps.
Do not change the pattern style randomly within the same layer.
Avoid skipping guidelines because mixed mandalas need structure.
Do not use a heavy outer border if the centre is already very detailed.
Avoid colouring without planning the colour sequence.
How can you make a mixed-pattern mandala look professional?
Plan the layers before drawing.
Use one dominant pattern and two or three supporting patterns.
Keep every layer consistent.
Repeat the same decoration in matching shapes.
Use borders to separate complex areas.
Allow white space between detailed patterns.
Keep the outer edge clean and balanced.
Review the full design before adding final details.
Colouring ideas for mixed mandala designs
Choose one main colour for the dominant pattern.
Use softer shades for supporting patterns.
For a floral mixed mandala, try pink, purple, green and gold.
For a geometric mixed mandala, try blue, black, silver and yellow.
For a sunburst mixed mandala, try yellow, orange, red and brown.
For a calm design, use pastel shades such as lavender, mint, peach and sky blue.
Repeat the same colour order around the mandala to maintain symmetry.
Homework for Lesson 19
Create one complete mandala using at least four different pattern types.
Include one floral element, one geometric element, one dot pattern and one decorative border.
Choose one pattern as the main focus.
Use the remaining patterns as supporting elements.
Keep the design balanced by leaving some white space.
Complete the artwork in black and white or use a limited colour palette of three to five colours.
After finishing, observe whether the patterns feel connected or separate.
Creative challenge
Create three small mandalas using the same grid.
In the first design, combine floral and dot patterns.
In the second design, combine geometric and border patterns.
In the third design, combine paisley, leaves and sunburst rays.
Compare which combination feels most natural to draw.
This exercise will help you discover your personal mandala style.
Key takeaways from Lesson 19
A complete mandala can combine many different patterns, but one pattern should remain the main focus.
Supporting patterns should fill gaps, add rhythm or connect layers.
Borders help separate detailed areas and make the design easier to read.
Dots are useful for softening, connecting and finishing mixed designs.
White space is important when many patterns are used together.
Repeating the same detail in matching sections keeps the mandala balanced.
A strong mixed-pattern mandala depends on planning, patience and control.
Lesson summary
In Lesson 19, you learnt how to combine multiple mandala patterns into one complete artwork.
You explored how to choose a main pattern, add supporting patterns, separate layers with borders, fill gaps with small details and avoid overcrowding.
This lesson helps you move from practising individual elements to creating your own original mandala compositions.
The next lesson will build on this skill by teaching you how to create larger mandala designs with better planning and structure.
Previous lesson: Lesson 18: Decorative mandala borders
Next lesson: Lesson 20: Creating Large Mandala Designs
Support the free Mandala Art Academy
Learning mandala art with us? The Mandala Art Academy is completely free, and every contribution helps us create more step-by-step lessons, practice guides and original tutorial images.
Even a small contribution helps us continue the next lesson.
For supporters in India
Scan the QR code below or use the UPI ID to contribute any amount you are comfortable with.

UPI ID: pallavi.rags-1@okhdfcbank
Pay securely through Razorpay
Prefer to pay by card or another supported online payment method? Use our secure Razorpay page below. Indian and international cards are accepted.
Support Mandala Art Academy and help create the next free lesson
Your support is entirely optional. Every Mandala Art Academy lesson will remain free for everyone.
Thank you for learning with us and helping us create the next lesson. ❤️