Course: STM Creator Academy Candle Making Course
Melting wax may look like the simplest part of candle making, but it is actually one of the most important steps to learn correctly.
If wax is heated too quickly, overheated or placed directly over a flame, it can become unsafe. Incorrect heating can also affect the way your candle sets, holds fragrance, burns and looks after cooling.
The good news is that beginners do not need expensive equipment to melt candle wax safely at home.
A simple double-boiler setup, a thermometer and a little patience are enough to get started.
In this lesson of the STM Creator Academy Candle Making Course, you will learn how to melt candle wax safely, what equipment you need, why temperature matters, which mistakes to avoid and how to prepare your melted wax for the next stage of candle making.
Why does wax need to be melted carefully?
Candle wax changes from a solid into a liquid when heated.
Different waxes melt at different temperatures, which is why candle makers should not treat every wax in exactly the same way.
Soy wax, paraffin wax, beeswax and other candle waxes can all behave differently.
The temperature at which you melt the wax can influence:
- how evenly it melts
- how fragrance blends with the wax
- how colour disperses
- how the candle cools
- the finished surface
- overall candle performance
The most important rule for beginners is simple:
Never heat candle wax directly over an open flame.
Wax is combustible. Excessive heat can create a fire risk.
That is why the double-boiler method is one of the safest and easiest techniques for beginners working at home.
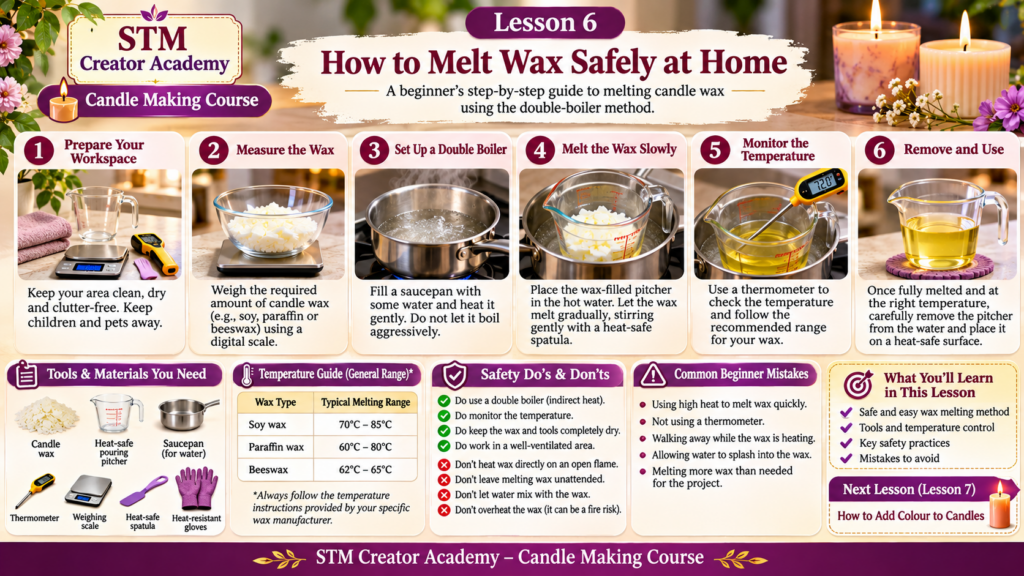
What do you need to melt candle wax at home?
You do not need a professional candle-making studio.
For a basic setup, you will need:
- Candle wax
- A heat-safe pouring pitcher or metal melting container
- A saucepan
- Water
- Candle-making or kitchen thermometer
- Digital weighing scale
- Heat-resistant spoon or silicone spatula
- Heat-resistant gloves or pot holders
- Clean, stable workspace
Keep your candle-making equipment separate from utensils regularly used for preparing food whenever possible.
Wax residues and fragrance oils can remain on equipment even after cleaning.
What is the double-boiler method?
A double boiler uses indirect heat.
Instead of placing your wax container directly on the stove, you heat water in a saucepan and place your wax-filled pouring pitcher inside or above the heated water.
The hot water gradually warms the container and melts the wax.
This gives you better control over temperature and reduces the risk of overheating.
Think of it as giving the wax a warm bath rather than exposing it directly to intense heat.
Step 1: Prepare your workspace
Before switching on the stove, prepare everything you will need.
Keep children and pets away from the working area.
Remove paper, fabric, packaging and other flammable materials from around the stove.
Make sure your work surface is stable and dry.
Keep your thermometer, stirring tool and heat-resistant gloves nearby.
Candle making becomes much safer when everything is ready before the wax begins heating.
Step 2: Measure your wax
Use a digital weighing scale to measure the amount of wax required for your project.
For practice, beginners can start with a small quantity rather than melting a large batch.
Place the measured wax into your pouring pitcher.
Wax may come in flakes, pellets, blocks or slabs depending on the type you purchased.
If you are using a large wax block, cut it into smaller pieces first so that it melts more evenly.
Step 3: Prepare the double boiler
Fill a saucepan with a moderate amount of water.
You do not need to fill the saucepan completely.
Place it on the stove and begin heating the water gently.
The water should become hot enough to transfer heat to the wax container, but there is no need for aggressive boiling.
Place your pouring pitcher containing the wax into the saucepan.
Make sure the pitcher is stable and does not tip over.
Also make sure that water cannot splash into your wax.
Water and candle wax should remain separate.
Step 4: Allow the wax to melt slowly
As the water heats, the wax will gradually begin to soften around the edges.
Do not increase the heat aggressively just because the wax is taking time to melt.
Candle making rewards patience.
Stir the wax gently from time to time using a clean heat-resistant spoon or silicone spatula.
Avoid vigorous stirring because this may introduce unnecessary air bubbles.
Continue heating until the wax becomes completely liquid.
Step 5: Monitor the temperature
A thermometer is one of the most important tools in candle making.
Do not rely only on appearance.
Wax can look completely melted while continuing to become hotter.
Check the temperature regularly during melting.
Different wax manufacturers provide different recommended melting, fragrance-addition and pouring temperatures.
Always follow the instructions supplied with your particular wax.
For example, one soy wax blend may behave differently from another soy wax blend even though both are labelled “soy wax.”
This is why there is no single perfect candle-making temperature that works for every wax.
Record the temperatures you use while practising.
Over time, these notes will help you understand how your chosen wax behaves.
Step 6: Remove the wax from heat
Once the wax has completely melted and reached the temperature recommended for that wax, carefully remove the pitcher from the double boiler.
Use heat-resistant gloves or a pot holder because the container may be very hot.
Place the pitcher on a heat-safe surface.
Do not place a very hot metal pitcher directly onto a delicate countertop.
Your wax is now ready for the next stages, such as adding colour or fragrance, depending on the candle you are making.
We will cover those steps separately in the next lessons.
Why should you use a thermometer?
Beginners sometimes think a thermometer is optional.
It really should be considered essential.
Temperature affects almost every stage of candle making.
If wax becomes too hot, you may:
- damage some fragrance components
- affect wax performance
- create surface problems
- unnecessarily increase fire risk
If the wax becomes too cool before certain ingredients are added, fragrance or colour may not blend properly.
A thermometer removes much of the guesswork.
You do not need an expensive professional thermometer when starting out. A suitable heat-resistant digital or candle-making thermometer can work well.
Can you melt candle wax directly in a saucepan?
It is better not to melt wax directly on the stove.
Direct heat is harder to control and can create hot spots.
The bottom layer of wax may become much hotter than the wax above it.
Indirect heating through a double boiler provides more gradual, even heating.
For home beginners, this is the preferred method.
Can candle wax be melted in a microwave?
Some waxes can technically be melted using microwave-safe equipment, but it is not the method I recommend for beginners.
Microwave heating can create uneven hot spots and makes temperature control more difficult.
If you are learning candle making for the first time, use the double-boiler method.
Once you understand your wax and temperature control properly, you can explore other manufacturer-approved heating methods if required.
What happens if water gets into melted wax?
Try to prevent water from entering your wax.
Even small amounts of moisture can interfere with the finished candle.
Water may cause:
- sputtering
- uneven burning
- surface imperfections
- poor candle performance
This is why you should avoid boiling the water so aggressively that droplets splash into the pouring pitcher.
Keep your tools dry as well.
What should you do if wax starts smoking?
Wax should not normally smoke during ordinary candle making.
If you notice smoke, remove the wax from the heat source immediately if it is safe to do so.
Do not continue heating it.
Smoking wax may indicate excessive temperature.
Allow it to cool in a safe location away from children, pets and combustible materials.
Never leave melting wax unattended.
What should you do if wax catches fire?
Never pour water onto burning wax.
Water can spread burning wax and make the situation much more dangerous.
Turn off the heat if you can do so safely.
Smother a very small contained fire using an appropriate lid or use a suitable fire extinguisher if trained to do so.
If the fire cannot be controlled immediately and safely, leave the area and contact emergency services.
Keeping basic fire-safety equipment nearby is sensible whenever you work with heat, wax or open flames.
Why should you never leave melting wax unattended?
Wax can continue heating even when it appears to be melting normally.
A few minutes of distraction can lead to overheating.
Do not:
- leave the kitchen
- take a long phone call
- start another household task
- leave wax heating while you answer the door
- allow children to supervise it
If you need to step away, switch off the heat first.
Safe candle making is more important than finishing quickly.
Should you melt a large quantity of wax when practising?
No.
Start small.
Melting a small batch allows you to practise:
- weighing
- temperature monitoring
- stirring
- handling your pouring pitcher
- controlling heat
Once you become comfortable with the process, you can increase your batch size.
Small practice batches also reduce wasted material if something goes wrong.
Common beginner mistakes while melting candle wax
One common mistake is using high heat because the wax appears to be melting too slowly.
Another is walking away from the stove.
Some beginners also forget to use a thermometer and simply guess the wax temperature.
Others allow water from the saucepan to splash into the wax.
Another frequent mistake is melting far more wax than the project requires.
Avoiding these simple errors will make your first candle-making projects much easier.
A simple safety checklist before melting wax
Before you begin, ask yourself:
Is my workspace clear?
Is my wax measured?
Is my thermometer ready?
Is my pouring pitcher completely dry?
Are children and pets away from the area?
Am I using indirect heat?
Do I know the manufacturer’s recommended temperature for this wax?
If the answer to all of these is yes, you are ready to begin.
Your Lesson 6 practice activity
For today’s practice, you do not even need to make a complete candle.
Measure a small amount of your chosen candle wax.
Set up a double boiler.
Melt the wax slowly while watching how its appearance changes.
Record:
Wax type:
Amount of wax:
Temperature when melting begins:
Temperature when completely liquid:
Manufacturer’s recommended heating temperature:
Anything you noticed while melting:
Keeping notes may seem unnecessary when you are making your first candle.
But good candle makers test, observe and record.
These records become extremely useful once you start experimenting with different waxes, fragrance oils, colours, wicks and containers.
What have we learned in Lesson 6?
You now know that safely melting wax is not about simply heating it until it becomes liquid.
The important skills are:
control the heat
use indirect heating
monitor temperature
keep water away from the wax
never leave heating wax unattended
follow your wax manufacturer’s instructions
Once you understand these basics, the next stage becomes much easier.
And that stage is where the candle really begins to develop its personality.
In Lesson 7 of the STM Creator Academy Candle Making Course, we will learn:
How to add colour to candles
We will cover candle dyes, how much colour to use, when to add it, how to mix colours evenly and the common mistakes that can lead to patchy or poorly burning candles.
Keep practising, keep experimenting safely, and remember:
A beautiful candle begins long before it is lit.
It begins with understanding your materials.
Support STM Creator Academy
STM Creator Academy creates free step-by-step courses, beginner-friendly tutorials and creative learning resources. If our lessons have helped you, you can support our work with any contribution you are comfortable with.
For supporters in India
Scan the QR code below or use the UPI ID to contribute any amount.

UPI ID: pallavi.rags-1@okhdfcbank
Pay securely through Razorpay:
Prefer card or another supported payment method? Use our Razorpay support page.
Your support is completely optional and helps us create more free lessons, original tutorial images, practice guides and future creative courses.
Our free course lessons will remain accessible to everyone.