Learn how to draw spiral mandala designs step by step using guide circles, repeated spirals, dots, leaves and simple decorative borders.
Course: Mandala Art Academy
Module: Intermediate Designs
Lesson: 16
Skill level: Intermediate
Practice time: 45 to 60 minutes
Spiral mandala designs introduce a sense of movement, rhythm and energy into your artwork. Unlike petals, leaves or geometric shapes, spirals appear to flow continuously, guiding the eye around the mandala and making the design feel dynamic.
In this lesson, you will learn how to draw clean spiral patterns, how to control their size and direction, how to repeat them evenly around a mandala grid, and how to combine spirals with dots, petals, leaves and borders.
What is a spiral mandala pattern?
A spiral is a curved line that begins at a central point and gradually moves outward. In mandala art, spiral motifs can be used as small fillers, decorative curls, repeating petals or complete circular layers.
Spirals may curve clockwise or anticlockwise. They can be tight and compact, wide and open, simple and clean, or richly decorated with dots, leaves and smaller curved lines.
Because spirals create visual movement, they are especially useful when a mandala feels too rigid or static.
Why spiral patterns are valuable in mandala art
Drawing spirals helps improve hand control and teaches you how to maintain a smooth curve without creating sharp bends. It also helps you understand rhythm because each spiral must be repeated with similar spacing, size and direction.
Spirals can make a mandala appear:
- more energetic,
- more decorative,
- softer and more flowing,
- visually connected between different layers.
They are also useful for filling narrow spaces where larger petals or geometric shapes may not fit.
Understanding the basic spiral structure
A simple spiral contains three main elements.
The first is the starting point. This may be a dot, a tiny circle or the tip of a curved line.
The second is the curved path. The line turns around the starting point while slowly increasing the distance between each curve.
The third is the ending stroke. The spiral may end with a tapered line, a small leaf, a dot or another decorative shape.
A clean spiral should look smooth and intentional. The space between the curves should widen gradually rather than changing suddenly.
How to draw a basic spiral step by step
Start by placing a small dot on the page.
Draw a short curved line around the dot. Continue the curve without lifting your pen, moving outward gradually.
Keep your hand relaxed and allow the curve to expand naturally. Avoid turning too sharply because this can make the centre look cramped.
Finish the spiral with a smooth outward stroke.
Practice the same shape several times before adding it to a mandala. Draw some spirals clockwise and others anticlockwise so that you become comfortable with both directions.
Practice different spiral variations
Once you can draw a basic spiral, experiment with different styles.
Tight spiral
Keep the curves close together near the centre. This creates a compact and detailed appearance.
Open spiral
Leave more space between each curve. Open spirals look softer and are easier to decorate.
Double spiral
Draw two spirals facing opposite directions and connect them at the centre. This creates an elegant S-shaped motif.
Leaf spiral
Finish the outer end with a small leaf shape.
Dot spiral
Place tiny dots along the curved line or around the outer edge.
Petal spiral
Draw a spiral inside a petal or teardrop shape. This combines flowing movement with a clear outer structure.
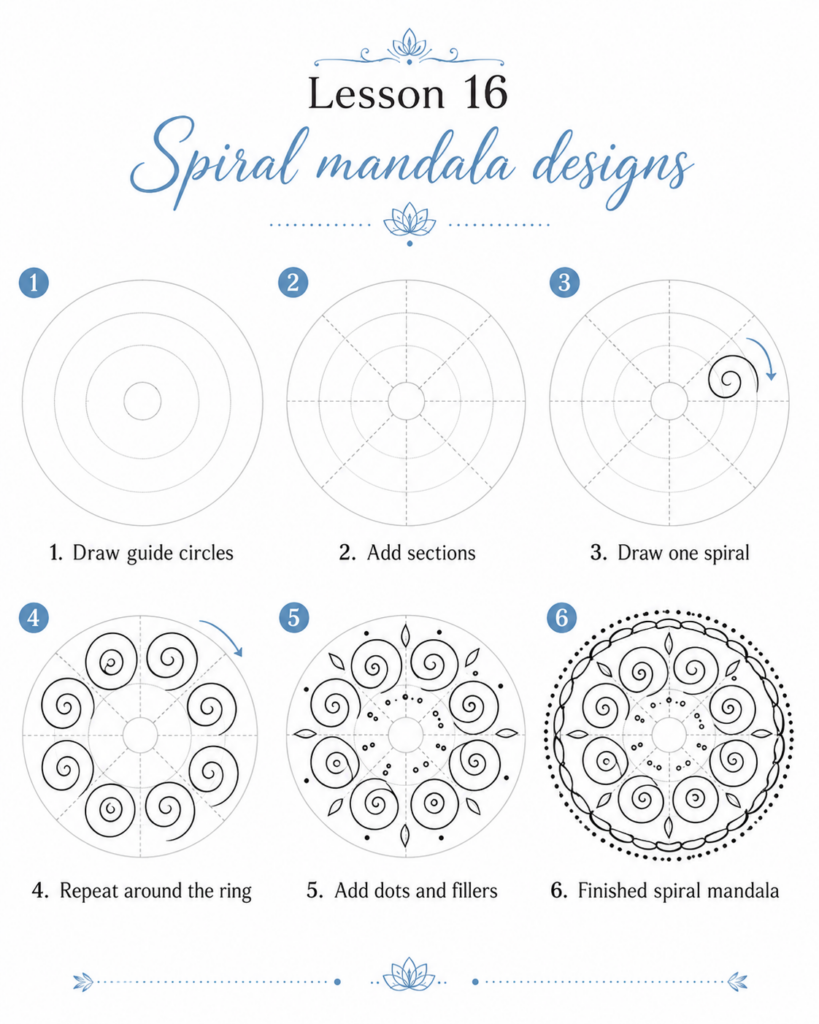
How to create a ring of spiral patterns
Begin with a prepared mandala grid containing several equal sections.
Choose one circular guideline and mark a small point in the centre of every section. These points will become the starting positions for your spirals.
Draw the first spiral carefully. Use the grid lines to control its height and width.
Repeat the same shape in every section. Check each spiral against the first one so that they remain approximately equal.
All spirals can face the same direction to create a rotating effect. Alternatively, you can alternate clockwise and anticlockwise spirals for a balanced woven appearance.
How spiral direction changes the design
Direction is very important in spiral mandalas.
When every spiral turns clockwise, the entire mandala appears to rotate in one direction. This creates strong visual movement.
When every spiral turns anticlockwise, the effect is similar but the movement flows in the opposite direction.
Alternating directions creates a calmer and more balanced pattern. It may also create heart-like, wave-like or S-shaped spaces between neighbouring spirals.
Before completing the full layer, draw two or three test motifs to decide which arrangement looks best.
How to keep spiral patterns even
Smooth repetition is often the most difficult part of this lesson. Use the following method:
First, decide the approximate width and height of one spiral.
Next, use the same circular guidelines for every repeated motif.
Draw lightly with a pencil before outlining with a pen.
Compare each new spiral with the previous one rather than drawing all of them from memory.
Rotate the paper as you work. This allows your hand to maintain a comfortable drawing angle and helps the curves remain consistent.
Remember that small variations are natural in hand-drawn mandala art. The goal is visual balance, not mechanical perfection.
How to decorate spiral mandala patterns
Simple spirals already create a beautiful effect, but small details can make them more expressive.
You can add a dot at the centre of each spiral.
You can draw a second line beside the main curve to create a double outline.
You can place tiny leaves along the outer stroke.
You can fill the spaces between spirals with dots, miniature petals or small arches.
You can shade the inner curve to add depth.
Use decoration selectively. Leaving some areas plain will help the detailed areas stand out.
Combining spirals with other mandala patterns
Spirals work well with many patterns covered in earlier lessons.
Spirals and petals
Place a spiral inside every large petal to make a simple petal more decorative.
Spirals and leaves
Add a small spiral at the base of each leaf or use curved spiral stems between leaf patterns.
Spirals and paisleys
Paisleys naturally contain curved movement, so a small inner spiral can make them look richer.
Spirals and geometric designs
Use spirals inside triangles, diamonds or circular compartments to soften a structured geometric layer.
Spirals and feather patterns
Add small curled lines around feather motifs to create an elegant ornamental effect.
A guided spiral mandala exercise
Draw a small circle for the centre of your mandala.
Surround it with eight simple rounded petals.
In the next layer, divide the circle into eight equal sections and draw one open spiral inside every section.
Make all the spirals turn in the same direction.
Add one small dot at the centre of each spiral.
Fill the spaces between neighbouring spirals with tiny leaves.
Finish the outer layer with a simple curved border and evenly spaced dots.
This exercise allows the spiral layer to remain the main feature without making the overall design too complicated.
Common mistakes and how to avoid them
Making the centre too tight
If the first curve is extremely small, the spiral can become dark and crowded. Begin with enough room for the line to turn smoothly.
Changing the spacing suddenly
The distance between curves should increase gradually. Uneven gaps can make the spiral look unbalanced.
Drawing sharp corners
A spiral should contain continuous curves. Keep your hand relaxed and avoid sudden changes in direction.
Repeating different-sized spirals
Use the same grid boundaries for every motif and sketch lightly before outlining.
Mixing directions accidentally
Decide whether the layer will use one direction or alternating directions before you begin.
Adding too much decoration
Heavy details can hide the spiral itself. Keep the main curved line clearly visible.
Tips for smoother spiral drawing
Practise large spirals before drawing very small ones. Larger shapes give your hand more space to understand the movement.
Move your whole hand rather than relying only on your fingers.
Draw slowly, but avoid stopping repeatedly in the middle of the curve.
Turn the paper instead of forcing your wrist into an uncomfortable position.
Use pencil guidelines until you become confident.
Mini practice challenge
Create three small spiral designs.
In the first, use eight clockwise spirals.
In the second, alternate clockwise and anticlockwise spirals.
In the third, place spirals inside petals and decorate them with dots.
Compare the three designs and observe how the direction, spacing and surrounding shapes change the overall feeling.
Lesson recap
In this lesson, you learned how spiral patterns create movement and rhythm in mandala art. You explored basic, open, tight, double, leaf and petal spirals. You also learned how to repeat spirals around a grid, control their direction, decorate them carefully and combine them with earlier mandala patterns.
Spiral designs may look simple, but drawing them smoothly and evenly requires patience. With regular practice, they will become one of the most versatile patterns in your mandala collection.
Previous Lesson: Lesson 15: Feather mandala patterns
The next lesson is Lesson 17: Sunburst mandala patterns.
Support the free Mandala Art Academy
Learning mandala art with us? The Mandala Art Academy is completely free, and every contribution helps us create more step-by-step lessons, practice guides and original tutorial images.
Even a small contribution helps us continue the next lesson.
For supporters in India
Scan the QR code below or use the UPI ID to contribute any amount you are comfortable with.

UPI ID: pallavi.rags-1@okhdfcbank
Pay securely through Razorpay
Prefer to pay by card or another supported online payment method? Use our secure Razorpay page below. Indian and international cards are accepted.
Support Mandala Art Academy and help create the next free lesson
Your support is entirely optional. Every Mandala Art Academy lesson will remain free for everyone.
Thank you for learning with us and helping us create the next lesson. ❤️