Learn how to draw mandalas on black paper using white gel pens, metallic colours, dots, borders and bright accents in Lesson 27.
Course: Mandala Art Academy
Module: Colouring Techniques
Lesson: 27
Skill level: Beginner to intermediate
Practice time: 45 to 75 minutes
Welcome to Lesson 27
In Lesson 26, you learnt how metallic colours can make mandalas look festive, elegant and premium. In this lesson, you will take that idea further by learning how to draw mandalas on black paper.
Black paper mandalas look dramatic, rich and beautiful because light colours, metallic pens and white details stand out strongly against the dark background. Even a simple mandala can look stunning when drawn on black paper.
This lesson will help you understand which tools work best, how to plan your design, how to keep lines visible and how to avoid common mistakes such as dull colours, smudging and overcrowding.
What is a black paper mandala?
A black paper mandala is a mandala artwork drawn or coloured directly on black paper using opaque, bright or metallic tools.
Instead of drawing black outlines on white paper, you usually draw white, gold, silver or colourful lines on a dark background.
Black paper changes the entire mood of the mandala. It can make the design look bold, festive, cosmic, spiritual, modern or luxurious.
This technique is perfect for greeting cards, bookmarks, wall art, festive décor, handmade gifts and premium-looking art pieces.
Why should you try mandalas on black paper?
Black paper helps bright colours stand out beautifully.
White gel pen, gold metallic pen, silver pen, acrylic markers and neon colours look much stronger on black paper than on white paper.
It also teaches you to think differently about contrast. On white paper, the dark outline usually carries the design. On black paper, the light and metallic lines become the main design.
This technique improves your control because every line becomes more visible.
What will you learn in this lesson?
By the end of Lesson 27, you will understand how to choose black paper, select the right pens, create light guidelines, draw clean mandala outlines and add metallic or coloured details.
You will also learn how to use white highlights, gold accents, dot patterns, borders and simple colour combinations on black paper.
The practice exercise will guide you through creating your first black paper mandala using white and gold details.
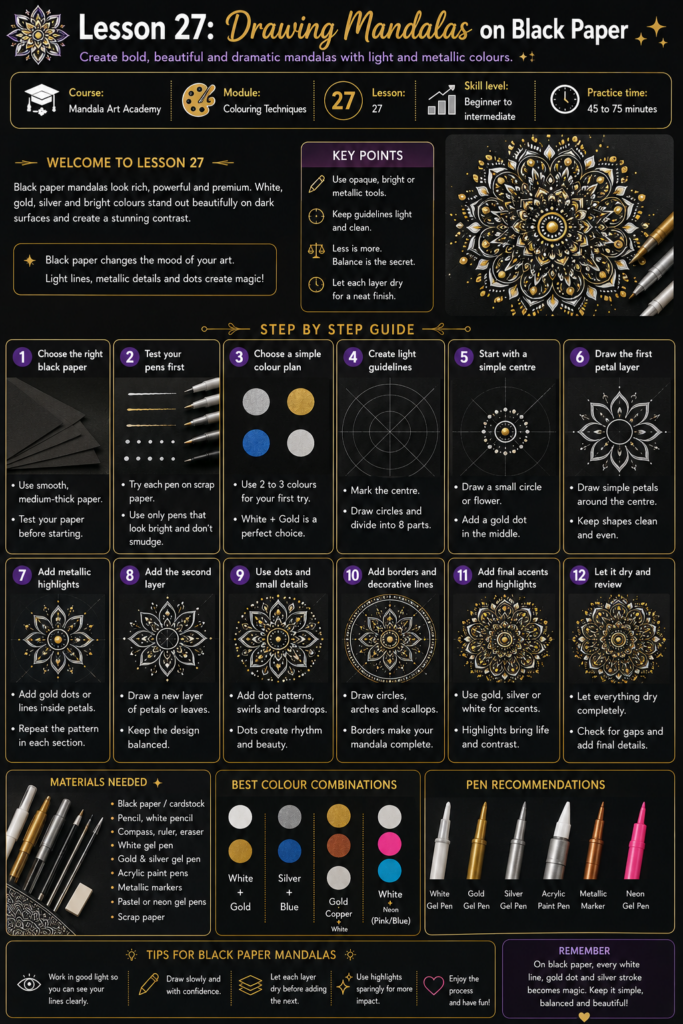
Materials needed
Use black drawing paper, black cardstock or dark craft paper.
You will need a pencil, white pencil or light-coloured pencil for guidelines, a compass, ruler, eraser and pens that show clearly on black paper.
Good options include white gel pens, metallic gel pens, gold pens, silver pens, acrylic paint pens, opaque markers, pastel pencils, metallic brush pens and neon gel pens.
Normal sketch pens and regular colour pencils may not show clearly on black paper unless they are very opaque.
Keep a scrap piece of black paper for testing before drawing the final mandala.
Step 1: Choose the right black paper
Not all black paper works the same way.
Very thin black paper may tear, wrinkle or absorb ink unevenly. Very rough paper may damage gel pen tips or make lines look broken.
Choose medium-thick black paper with a smooth surface.
Black cardstock is a good option for beginners because it is stronger and gives a clean finish.
Before starting, test your pen on the paper. If the ink skips, try a smoother sheet or a different pen.
Step 2: Test your pens first
Testing is very important for black paper mandalas.
Take a scrap piece of the same black paper and draw small lines, dots and curves with each pen.
Check which colours appear bright and which ones look dull.
White, gold and silver usually work well. Some pastel, neon and metallic colours may also show beautifully.
Let the ink dry and check whether it smudges when touched.
Use only the pens that remain clear after drying.
Step 3: Choose a simple colour plan
For your first black paper mandala, use only two or three colours.
A simple and elegant combination is white and gold.
Another beautiful option is silver and blue.
You can also use gold, copper and white for a festive look.
Avoid using too many colours in the beginning because black paper already creates strong contrast.
A limited palette will make the design look cleaner and more professional.
Step 4: Create light guidelines
Guidelines are still important when drawing on black paper.
Use a white pencil, grey pencil, light-coloured pencil or very light regular pencil if it is visible.
Mark the centre point carefully.
Draw concentric circles using a compass.
Draw one vertical line and one horizontal line through the centre.
Add diagonal lines to divide the mandala into eight sections.
Keep the guidelines very light so they do not disturb the final artwork.
Step 5: Start with a simple centre
Begin with a small circle at the centre.
Draw a white dot, tiny flower, diamond or small sunburst shape.
Keep the centre simple.
On black paper, even small details look strong because of the contrast.
You can add a gold dot in the middle and surround it with white dots.
This creates a beautiful focal point without making the centre crowded.
Step 6: Draw the first petal layer
Around the centre, draw a ring of simple petals.
Use a white gel pen or metallic pen.
Draw slowly because mistakes are harder to hide on black paper.
Start with the top, bottom, left and right petals.
Then add the diagonal petals.
Keep the petal shapes clean and similar in size.
Do not add too many internal details yet.
Step 7: Add metallic highlights
After drawing the first petal layer, add small metallic highlights.
Place a gold dot near the tip of each petal.
You can also draw a tiny gold line inside each petal.
Repeat the same highlight in every matching section.
Metallic details look especially beautiful on black paper because they catch light and add richness.
Use them carefully so the shine remains special.
Step 8: Create a dotted border
Draw a circular dotted border around the first petal layer.
Use white dots, gold dots or alternate between both.
Begin by placing dots at the top, bottom, left and right points.
Then place dots at the diagonal points.
Fill the remaining spaces slowly.
Dotted borders are very useful on black paper because they look neat, bright and decorative.
Step 9: Add a larger pattern layer
Outside the dotted border, add a larger pattern layer.
You can use lotus petals, pointed petals, arches, paisley shapes, triangles or sunburst rays.
For your first attempt, choose large pointed petals or lotus petals because they are easier to control.
Draw the outlines in white.
Then add small gold or silver details inside selected areas.
Keep the large shapes open enough so the black background remains visible.
Step 10: Use black space as part of the design
When working on black paper, the empty black areas are not mistakes.
They are part of the beauty.
Do not try to fill every space with white or metallic ink.
Black space helps the bright lines stand out.
It also gives the mandala a clean and elegant look.
A simple black paper mandala with enough empty space can look more professional than a crowded one.
Step 11: Add decorative borders
Use decorative borders to separate the layers.
You can create dot borders, scalloped borders, arch borders, triangle borders or line-and-dot borders.
White borders look clean and bright.
Gold borders look festive and rich.
Silver borders look cool and elegant.
Choose one border style per ring and repeat it carefully.
Step 12: Add small colour accents
After the main design is complete, you may add colour accents.
Try using pastel blue, pink, purple, green, neon yellow or metallic copper.
Use these colours only in small areas such as dots, petal tips, tiny leaves or border details.
Do not cover the entire mandala with too many colours.
Black paper designs look strongest when the colour accents are controlled.
Step 13: Let each layer dry
Gel pens, metallic pens and paint pens may take time to dry on black paper.
Do not place your hand on fresh ink.
Do not erase guidelines too early.
Let each layer dry before moving your hand over it.
If needed, rotate the paper so that your hand does not rest on wet areas.
Patience prevents smudging.
Step 14: Strengthen important lines
After the mandala dries, check whether any line looks dull or broken.
You can carefully redraw selected lines.
Do not redraw every line again because the ink may become thick and uneven.
Strengthen only the centre, main petals, important borders and outer frame.
This final correction can make the artwork look sharper.
Step 15: Add final sparkle details
Finish the mandala with a few small dots, tiny stars or metallic highlights.
You can add white dots between petals, gold dots around the outer border or silver highlights in selected spaces.
Keep the final details balanced.
Stop when the design feels complete.
On black paper, small finishing details can create a magical effect.
How can you make colours show clearly on black paper?
Use opaque pens or pencils.
White gel pens, acrylic markers and metallic pens usually work better than normal sketch pens.
Test every colour before using it.
Apply one clean layer first and allow it to dry.
If the colour still looks dull, add a second layer carefully.
Avoid pressing too hard because it may damage the paper or pen tip.
How can you avoid smudging on black paper?
Let the ink dry completely.
Work from the centre outward.
Rotate the paper while drawing.
Keep a clean sheet under your hand if needed.
Avoid touching metallic or gel ink immediately after drawing.
Do not erase over fresh ink.
Smudging is one of the most common problems in black paper mandalas, so slow work gives better results.
How can you erase guidelines on black paper?
Use very light guidelines from the beginning.
A white pencil may not erase fully, so use it gently.
Some artists prefer leaving very faint guidelines if they blend into the design.
Test your eraser on a scrap piece of black paper before using it on the final artwork.
Erase gently because black paper can show rubbing marks.
If the guidelines are too visible, cover them with dots, borders or small decorative lines.
Beginner practice exercise
Draw a small mandala on black paper.
Use only white and gold pens.
Create a centre circle with a gold dot.
Draw eight white petals around the centre.
Add gold dots at the tips of the petals.
Draw a white dotted border.
Add a second layer of pointed petals.
Finish with a simple gold line-and-dot outer border.
This exercise will help you practise contrast, spacing, dots and metallic highlights.
Intermediate practice exercise
Create a larger mandala on black paper using white, gold and one colour accent.
Begin with a white floral centre.
Add a gold dotted ring.
Draw a lotus petal layer in white.
Use the colour accent inside selected petals.
Add a geometric border using silver or gold.
Finish with white dots around the outer edge.
This exercise will help you combine metallic colours and bright accents while keeping the design balanced.
Common mistakes to avoid when drawing mandalas on black paper
Avoid using pens without testing them first.
Do not draw heavy guidelines that are difficult to hide.
Avoid using too many colours.
Do not touch gel or metallic ink before it dries.
Avoid overcrowding the design with too many white lines.
Do not press paint pens directly on the final artwork without testing the ink flow.
Avoid erasing too harshly because black paper may show marks.
How can you make black paper mandalas look professional?
Use smooth black paper.
Choose a limited colour palette.
Use white for the main structure.
Use metallic colours for highlights.
Keep the design clean and spacious.
Repeat the same details symmetrically.
Allow ink to dry between layers.
Use dots, borders and highlights carefully.
A professional black paper mandala depends on contrast, neatness and restraint.
Colour ideas for black paper mandalas
White and gold create a classic festive look.
Silver and blue create a cool night-sky effect.
Gold and copper create a warm antique style.
White, pink and rose gold create a soft elegant look.
Silver, purple and white create a dreamy cosmic mandala.
Gold, red and green create a festive Indian-inspired design.
White alone can also create a beautiful minimal mandala on black paper.
Homework for Lesson 27
Create one complete mandala on black paper.
Use at least two colours that show clearly on the dark background.
Include a centre design, one petal layer, one dotted border, one decorative border and one outer frame.
Use metallic details in selected areas only.
Leave some black space visible.
After finishing, observe whether the design looks balanced and whether the contrast is strong enough.
Creative challenge
Create two black paper mandalas.
In the first design, use only white pen.
In the second design, use white pen with gold or silver highlights.
Keep the same mandala structure in both artworks.
Compare how the metallic accents change the final appearance.
This challenge will help you understand the power of highlights.
Key takeaways from Lesson 27
Black paper mandalas look bold, dramatic and elegant.
Opaque pens work better than normal colours on black paper.
White, gold and silver are excellent choices for beginners.
Guidelines should be very light.
Black space is part of the design and should not be filled completely.
Metallic accents look beautiful when used in selected areas.
Drying time is important to avoid smudging.
A clean black paper mandala depends on contrast, patience and balanced details.
Lesson summary
In Lesson 27, you learnt how to draw mandalas on black paper using white, metallic and opaque colours.
You explored paper choice, pen testing, light guidelines, white outlines, metallic dots, decorative borders, colour accents and smudge prevention.
Black paper mandalas are perfect for festive cards, bookmarks, wall art and premium handmade designs.
This lesson completes Module 4: Colouring Techniques. In the next lesson, you will begin Module 5: Advanced Mandala Projects with dot mandala art for beginners.
Previous lesson: Lesson 26: Creating metallic mandalas
Next lesson: Lesson 28: Dot Mandala Art for Beginners
Support the free Mandala Art Academy
Learning mandala art with us? The Mandala Art Academy is completely free, and every contribution helps us create more step-by-step lessons, practice guides and original tutorial images.
Even a small contribution helps us continue the next lesson.
For supporters in India
Scan the QR code below or use the UPI ID to contribute any amount you are comfortable with.

UPI ID: pallavi.rags-1@okhdfcbank
Pay securely through Razorpay
Prefer to pay by card or another supported online payment method? Use our secure Razorpay page below. Indian and international cards are accepted.
Support Mandala Art Academy and help create the next free lesson
Your support is entirely optional. Every Mandala Art Academy lesson will remain free for everyone.
Thank you for learning with us and helping us create the next lesson. ❤️