Learn how to create mandala art on canvas with acrylic paints, grids, layers, dots, borders, highlights and finishing tips.
Course: Mandala Art Academy
Module 5: Advanced Mandala Projects
Lesson 31 of 40
Skill level: Intermediate to advanced
Practice time: 60 to 90 minutes
Welcome to Lesson 31
Welcome back to the Mandala Art Academy. In the previous lesson, you learned how to create layered mandala artwork using multiple rings, borders, details, contrast and highlights. In this lesson, we will take mandala art from paper to canvas.
Canvas mandalas look more premium because they can be used as wall art, home décor, handmade gifts, festive décor and even products for selling. Drawing on canvas feels different from drawing on paper, so you need to understand surface preparation, pencil guidelines, paint control, layering, drying time and finishing touches.
This lesson will help you create a neat, balanced and beautiful mandala on canvas, even if you are trying it for the first time.
What is canvas mandala art?
Canvas mandala art is a mandala design created on stretched canvas, canvas board or canvas sheet using acrylic paints, paint pens, markers, dotting tools or fine brushes.
Unlike paper, canvas has texture. This texture gives the artwork a handmade and artistic look, but it can also make fine lines slightly harder to draw. That is why planning and slow detailing are very important.
Canvas mandalas can be simple, colourful, metallic, dotted, floral, geometric or fully detailed. You can create them in black and white, bright colours, pastel shades or festive gold combinations.
Why canvas is special for mandala art
Canvas makes mandala artwork look more finished and display-worthy. A paper mandala is usually kept inside a book or frame, but a canvas mandala can directly become wall décor.
Canvas is also stronger than normal paper. It can hold acrylic paint, metallic paint and layered colour better. If you want to sell your mandala art in the future, canvas projects are a good starting point because they look professional and giftable.
Materials needed
For this lesson, you will need:
Small canvas board or stretched canvas
Pencil and eraser
Compass or round objects
Scale or ruler
Acrylic paints or paint pens
Fine brush or detail brush
Black marker or fine-liner suitable for canvas
Dotting tools or toothpick
White gel pen or white acrylic pen
Metallic gold or silver pen
Paper towel or cotton cloth
Optional varnish or sealant
For beginners, start with a small canvas such as 6×6 inch, 8×8 inch or A5-size canvas board.
Step 1: Choose the right canvas size
If this is your first canvas mandala, do not start too large. A small canvas helps you understand the surface without feeling overwhelmed.
A square canvas works beautifully for mandala art because the circular design sits well in the centre. A round canvas also looks very attractive if available.
Choose a canvas size that gives enough space for 5 to 7 layers. If the canvas is too small, details may become difficult.
Step 2: Prepare the canvas surface
Before drawing, make sure the canvas is clean and dry. If the surface has dust, wipe it gently with a dry cloth.
If your canvas is very rough, you can apply a thin layer of white acrylic paint or gesso and let it dry completely. This creates a smoother base for drawing and painting.
Do not start drawing while the base is wet. Wet canvas can smudge pencil lines and spoil the design.
Step 3: Decide the background colour
You can keep the canvas white, or you can paint a coloured background first.
Popular background ideas include:
White background for clean mandala art
Black background for gold, silver or white mandalas
Pastel pink or blue for soft handmade décor
Dark blue or purple for metallic mandalas
Yellow, orange or red for festive mandalas
Gradient background for artistic wall décor
If you are using a coloured background, paint it evenly and let it dry fully before drawing the mandala.
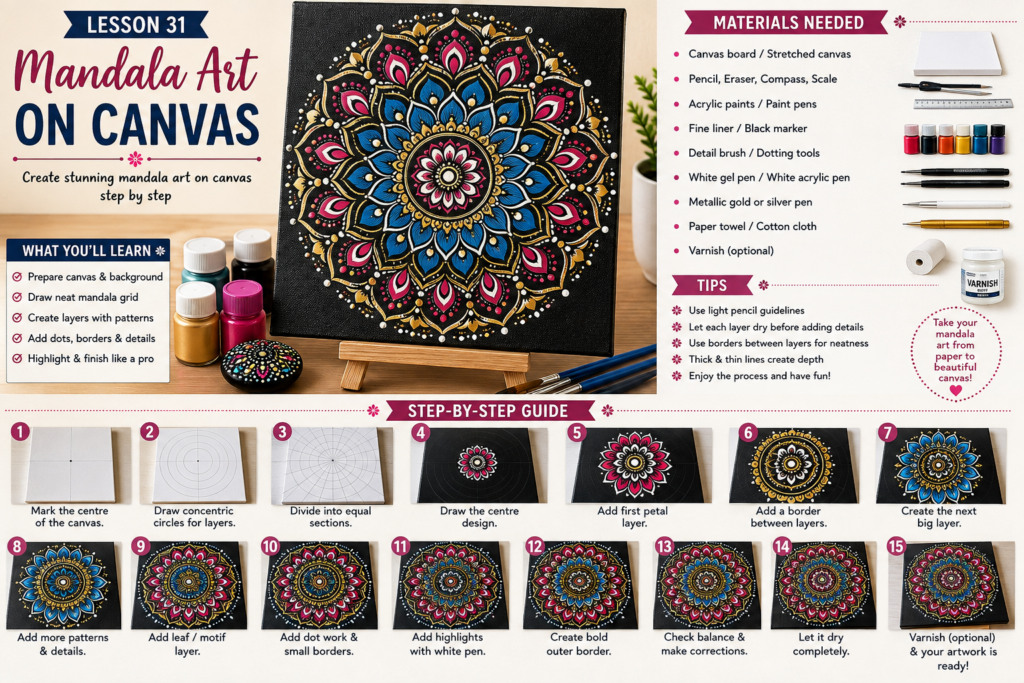
Step 4: Mark the centre point
Find the centre of the canvas using a ruler. Mark it lightly with a pencil.
This centre point is very important because your whole mandala will grow from it. If the centre is not placed correctly, the mandala may look uneven on the canvas.
If you are using a square canvas, draw light diagonal lines from corner to corner to find the centre. Erase the lines gently later.
Step 5: Draw the mandala grid
Use a compass to draw circles from the centre. Start with a small centre circle, then add larger circles around it.
Draw 5 to 7 circles for a beginner-friendly canvas mandala. Keep enough space between the circles so that you can add petals, dots, leaves and borders.
After drawing circles, divide the mandala into equal sections. You can use 8, 12 or 16 sections depending on your comfort level.
Keep all pencil lines light because canvas can be harder to erase than paper.
Step 6: Plan your design before painting
Before using paint or pen, decide the main pattern style.
You can choose:
Floral mandala
Dot mandala
Lotus mandala
Geometric mandala
Zentangle-inspired mandala
Metallic mandala
Layered colourful mandala
For your first canvas project, a layered floral mandala is a good option. It looks attractive and is easier to manage than very detailed Zentangle-style work on canvas.
Step 7: Start from the centre
Begin with the centre design. Use a fine brush, acrylic pen or marker to draw a small flower, dot circle or spiral.
Work slowly because canvas texture can make lines uneven. Do not worry if the first line is not perfect. You can correct small mistakes with paint after it dries.
Let each painted area dry before adding another layer on top. This prevents smudging.
Step 8: Add the first petal layer
Draw petals around the centre. Use simple rounded or teardrop petals.
If you are painting the petals, fill them carefully with acrylic paint. If you are using a pen, outline first and add details later.
Try to keep the petal sizes even. On canvas, handmade variation is natural, so do not stress over tiny differences.
Step 9: Add borders between layers
After the first petal layer, add a small border. Borders make canvas mandalas look neat and organised.
You can use:
Dot border
Double-line border
Small scallop border
Triangle border
Tiny leaf border
Metallic line border
A border also gives your eyes a resting space between detailed layers.
Step 10: Build the middle layers
Now add the main middle layers of the mandala. These layers should be slightly bigger and more decorative.
You can use large petals, lotus shapes, leaves, arches, diamonds or paisley shapes. If your background is dark, use light or metallic colours. If your background is white, use bright colours or black outlines.
Repeat the same pattern carefully around the circle so that the design remains balanced.
Step 11: Add dots and highlights
Dots look beautiful on canvas and are easier to control than very thin lines.
Use dotting tools, the back of a brush, toothpick or acrylic paint pen to add dots around borders, petal tips and empty spaces.
You can use white dots for a soft look, gold dots for a festive look or coloured dots for a playful design.
Let dots dry properly before touching the canvas.
Step 12: Add final details
Once the main mandala is dry, add final details such as thin lines, tiny leaves, small curls, dot trails, metallic accents and white highlights.
Do not overfill the canvas. Canvas mandalas look best when the design has both detailed areas and clean background space.
If needed, use a small brush and background paint to correct minor mistakes.
Step 13: Finish the outer border
The outer border is very important in canvas mandalas because it gives the artwork a complete wall-art look.
Use a bold border such as large petals, thick scallops, decorative arches or dot clusters. You can also add metallic paint on the outer border to make the mandala look premium.
Make sure the border is evenly placed and does not go too close to the edge of the canvas.
Step 14: Let the artwork dry completely
After finishing, let the canvas dry fully. Acrylic paint may feel dry on the surface quickly, but thicker dots and layers need more time.
Keep the canvas flat while drying. Do not stack anything over it.
Once fully dry, gently erase visible pencil lines if possible. Be careful not to damage the paint.
Step 15: Seal the canvas if needed
If you want to protect the artwork, you can apply a clear varnish or sealant. This is optional, but useful if the canvas will be displayed, gifted or sold.
Use varnish only after the artwork is completely dry. Always test the varnish on a small sample first because some pens or paints may react.
A matte varnish gives a soft handmade finish, while a gloss varnish gives a shiny finished look.
Simple canvas mandala design idea
Try this beginner-friendly design:
Black or white background
Small centre flower
First ring of teardrop petals
Thin dot border
Large lotus petals
Leaf layer
Metallic highlight border
Bold outer scallop border
White dot details
This design is simple but looks complete and elegant.
Colour ideas for canvas mandalas
Here are some colour combinations you can try:
Black background with gold and white
White background with pink, purple and blue
Pastel background with white mandala
Deep blue background with silver highlights
Red and gold festive mandala
Green, yellow and orange traditional mandala
Purple and gold premium wall-art mandala
For beginners, choose only three to five colours. Too many colours can make the canvas look crowded.
Beginner practice exercise
Create a small canvas mandala using only three colours.
Use one colour for petals, one colour for borders and one colour for dots. Keep the design simple and focus on clean layers.
This exercise will help you understand paint control on canvas.
Intermediate practice exercise
Create a detailed layered canvas mandala with at least seven layers.
Include one floral layer, one dot border, one leaf layer, one contrast layer, one metallic highlight layer and one bold outer border.
After finishing, observe how the colours and textures look different from paper mandala art.
Common mistakes to avoid
Do not draw dark pencil lines on canvas.
Do not start painting before the background is dry.
Do not use too much water with acrylic paint.
Do not rush dot work because wet dots can smudge.
Do not overcrowd the canvas with too many tiny patterns.
Do not varnish before the artwork is fully dry.
Do not worry if canvas lines are not as smooth as paper lines.
Professional tips
Use a small canvas for your first project.
Keep the centre very accurate.
Use acrylic pens for cleaner details.
Turn the canvas while drawing to keep hand movement comfortable.
Use borders to separate heavy pattern layers.
Let each layer dry before adding highlights.
Take a photo before varnishing so you have a clean record of your artwork.
Creative challenge
Create one canvas mandala that can be used as wall décor or a handmade gift. Choose a theme such as festive, calming, floral, metallic or pastel.
After finishing, write a small title for your artwork. This will help you think like an artist and prepare for future selling or gifting projects.
Homework
Create a rough paper plan before painting on canvas. Draw the centre, circles, main layers and colour plan on paper first.
Then transfer the idea to canvas. Planning on paper reduces mistakes and gives you more confidence while painting.
Key takeaways
Canvas mandala art needs surface preparation and careful planning.
Pencil guidelines should be light because canvas is harder to erase.
Acrylic paint, paint pens and dotting tools work well on canvas.
Layering, borders and highlights make canvas mandalas look professional.
Drying time is very important.
Canvas mandalas are suitable for gifts, décor and handmade selling projects.
Lesson summary
In this lesson, you learned how to create mandala art on canvas using proper surface preparation, centre marking, grid drawing, layered patterns, borders, dots, highlights and finishing techniques. You also learned how to choose background colours, avoid common mistakes and protect finished artwork with optional varnish.
Canvas mandala art is an important advanced project because it helps you move from practice sheets to finished handmade products that can be gifted, displayed or sold.
Previous lesson: Lesson 30: Layered mandala artwork
Next lesson: Lesson 32: Mandala stone painting
Support the free Mandala Art Academy
Learning mandala art with us? The Mandala Art Academy is completely free, and every contribution helps us create more step-by-step lessons, practice guides and original tutorial images.
Even a small contribution helps us continue the next lesson.
For supporters in India
Scan the QR code below or use the UPI ID to contribute any amount you are comfortable with.

UPI ID: pallavi.rags-1@okhdfcbank
Pay securely through Razorpay
Prefer to pay by card or another supported online payment method? Use our secure Razorpay page below. Indian and international cards are accepted.
Support Mandala Art Academy and help create the next free lesson
Your support is entirely optional. Every Mandala Art Academy lesson will remain free for everyone.
Thank you for learning with us and helping us create the next lesson. ❤️