Learn easy lines, curves, arches and borders for beginner mandala art. Practise Lesson 9 and create cleaner, balanced decorative patterns.
Course: Mandala Art Academy
Module: Beginner Mandala Drawing Techniques
Lesson: 9
Skill level: Beginner
Practice time: 25 to 35 minutes
Welcome to Lesson 9
Lines and curves form the hidden structure behind almost every mandala design. Petals, leaves, arches, borders and decorative spaces all begin with simple strokes that are repeated around a centre point.
You do not need to draw perfectly straight lines or flawless curves to create a beautiful mandala. The goal is to develop control gradually and learn how different strokes can be combined to create rhythm, balance and movement.
In this lesson, you will practise straight lines, curved lines, arches, waves and simple decorative borders. You will also learn how to repeat these elements evenly around a circle and use them to connect the different layers of your mandala.
What will you learn in this lesson?
By the end of Lesson 9, you will understand how to draw clean straight lines, gentle curves, arches, waves and repeated border patterns.
You will learn how to control the length and direction of your strokes, divide a circular border into equal spaces and combine lines with dots, petals and leaves.
You will also create a small practice mandala using the line and border patterns introduced in this lesson.
Materials needed
Use plain drawing paper, a pencil, an eraser, a ruler, a compass and a black fineliner or gel pen.
You may also use coloured pens, sketch pens or markers after completing the basic outline.
Keep a separate practice sheet beside you. It is helpful to practise each stroke several times before adding it to your final mandala.
Why are lines important in mandala art?
Lines help organise the different parts of a mandala. They can divide large spaces, connect shapes, create texture and guide the viewer’s eye from the centre towards the outer edge.
Short lines can add detail inside petals. Long lines can divide a circle into sections. Curved lines can create softness and movement, while repeated borders can make the design feel complete.
Even a simple mandala can look intricate when its lines and borders are arranged carefully.
Step 1: Practise straight vertical and horizontal lines
Begin by drawing a row of short vertical lines. Try to keep their height and spacing similar.
Next, draw a row of horizontal lines. Keep your hand relaxed and move the pen slowly.
Practise drawing lines of three different lengths: short, medium and long. Avoid pressing too hard because a tight grip can make the strokes look stiff.
Your lines do not need to be mechanically perfect. Slight handmade variations are natural and can give your mandala character.
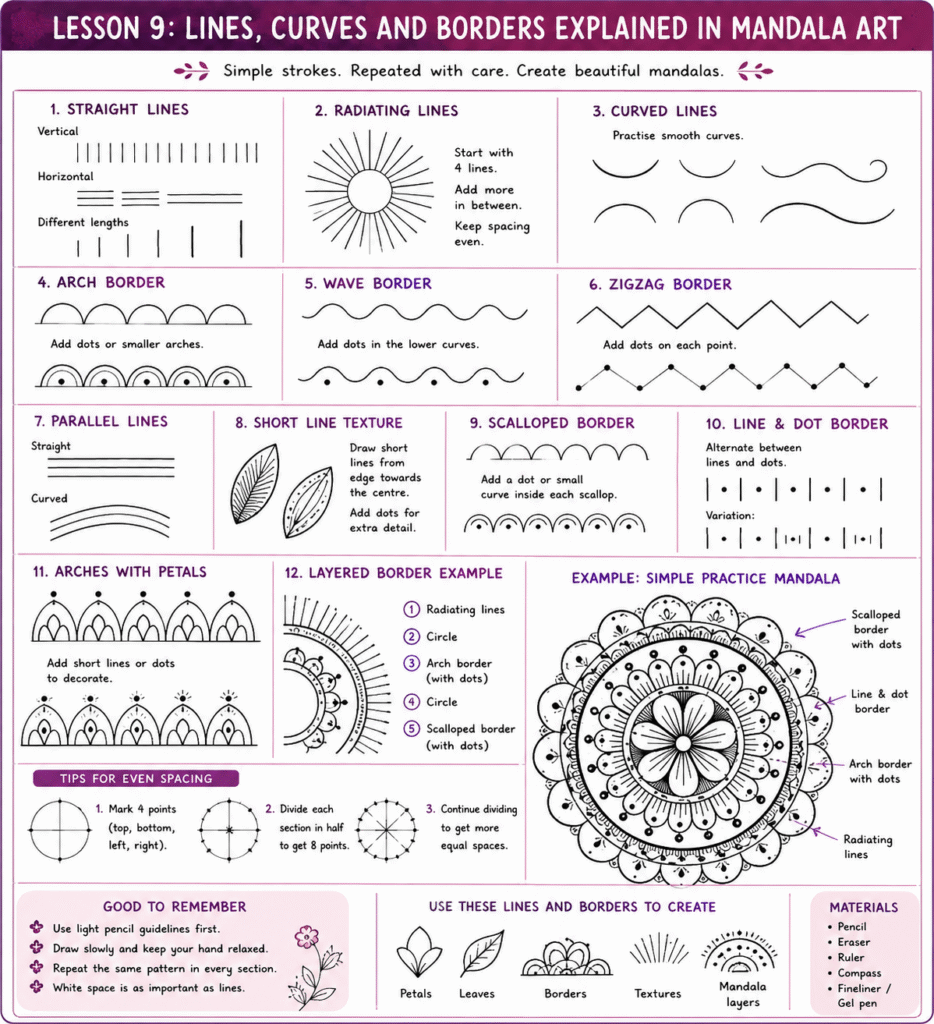
Step 2: Practise lines that radiate from a centre point
Draw a small circle. Add straight lines extending outward from its edge, similar to the rays of the sun.
Begin with four lines at the top, bottom, left and right. Add four more lines between them.
Continue dividing the spaces until you have a balanced ring of radiating lines.
This pattern is useful around mandala centres, flower shapes and circular borders. It can also help create a sense of energy and expansion.
Step 3: Draw simple curved lines
Draw several gentle curves that resemble the shape of a smile.
Next, practise curves facing the opposite direction. These may look like small hills.
Try drawing longer curves, shorter curves and curves with different heights.
Keep the movement smooth. Instead of drawing the curve using several small movements, try to complete it with one continuous stroke.
Curves are commonly used to form petals, leaves, arches and decorative borders.
Step 4: Create a repeated arch border
Draw a horizontal guideline. Mark equally spaced points along the line.
Connect every two neighbouring points using a curved arch. Continue until you have created a complete row of arches.
You can leave the arches empty or decorate them with dots, short lines or smaller arches.
To create a double-arch border, draw a second smaller arch inside each larger arch.
Repeated arches are among the easiest ways to decorate the outer rings of a mandala.
Step 5: Draw a wave border
Draw a flowing line that moves gently up and down.
Try to keep each rise and dip approximately the same size. Practise slowly until the pattern begins to look consistent.
Add dots inside the lower curves or place short lines inside the upper curves.
You can also draw two wave lines beside each other to create a ribbon-like border.
Wave borders add movement and can soften sections that contain many straight or pointed elements.
Step 6: Create a zigzag border
Draw a row of connected diagonal lines that move up and down to form a zigzag.
Keep the distance between each point similar. Use pencil guidelines when you first practise this pattern.
Add a dot at every upper point and lower point. You can also draw a smaller zigzag inside the first one.
Zigzag borders create contrast and work well beside curved petals, rounded leaves and circular dot patterns.
Step 7: Practise parallel line patterns
Draw two straight lines beside each other, keeping the space between them equal.
Next, practise three or four parallel lines.
Repeat the exercise using curved lines. Draw one curve and then add another curve that follows the same direction.
Parallel lines can create depth inside petals and leaves. They can also be used to build thicker borders without filling the entire space with colour.
Step 8: Create a short-line texture
Draw a simple petal or leaf shape.
Fill the shape with short lines that begin near the edge and point towards the centre. Keep the lines separate rather than allowing them to touch.
Repeat the same arrangement inside several matching petals.
Short-line textures can make large empty shapes look detailed while keeping the overall design light and balanced.
You can also alternate between a short line and a dot to create a more decorative texture.
Step 9: Draw a scalloped border
A scalloped border is formed using repeated rounded curves.
Draw a circular or horizontal guideline. Add small connected semicircles along the edge.
Try to keep every semicircle similar in width and height.
Place one dot inside each scallop or add a smaller curved line inside it.
Scalloped borders work especially well around floral mandalas because their rounded shapes complement petals and leaves.
Step 10: Create a line-and-dot border
Draw a circle and mark equally spaced points around it.
Alternate between one short outward-facing line and one dot.
The pattern will repeat as line, dot, line, dot.
You may also create a more detailed sequence using one long line, one short line and one dot.
This technique combines what you learnt in Lesson 8 with the line patterns introduced in this lesson.
Step 11: Combine arches with petals
Draw a row of large arches around a circular guideline.
Inside each arch, add a simple pointed petal. Place one dot above the tip of each petal.
Add short radiating lines inside the petals or along the empty spaces between them.
This combination creates a decorative border that looks detailed but is made from only a few beginner-friendly elements.
Step 12: Build a layered border
Begin with a circle.
Add a row of short radiating lines outside the circle. Draw another circle around those lines.
Add a row of arches outside the second circle. Place dots inside the arches.
Finish the border with a final ring of small scallops or alternating large and small dots.
Layering simple borders can create the appearance of complexity without requiring advanced drawing skills.
How can you maintain equal spacing around a circular border?
Begin by dividing the circle into four equal sections. Mark the top, bottom, left and right points.
Divide each section in half to create eight equal points. Continue dividing the spaces when you need more detailed patterns.
These pencil marks become reference points for your lines, arches, petals or dots.
Avoid beginning at one point and estimating the entire pattern without guidelines. Small spacing errors can become more noticeable as you move around the circle.
Guidelines make the process easier and can be erased after the ink has dried.
Beginner practice exercise
Draw three concentric circles.
Inside the first ring, add short radiating lines. Keep the lines similar in length and spacing.
Inside the second ring, draw a repeated arch pattern. Add one small dot inside every arch.
Inside the third ring, create a border using alternating long lines, short lines and dots.
Outside the largest circle, add eight large scallops. Draw a smaller scallop inside each one and place a dot near its centre.
This simple exercise allows you to practise straight lines, arches, scallops and line-and-dot combinations in one design.
Common mistakes to avoid when drawing lines and borders
Do not hold the pen too tightly. A tight grip can make curves appear uneven and prevent your hand from moving naturally.
Avoid drawing extremely fast. Slow, steady movements usually create cleaner lines.
Do not add a border without checking whether the circle has been divided evenly. Unequal spacing can make the final section appear crowded.
Avoid repeatedly drawing over the same line while the ink is wet. This can make the line thicker than the surrounding strokes.
Do not fill every empty area with lines. White space is also an important part of mandala design.
How can you make your borders look more polished?
Use pencil guidelines before working with ink. Mark the beginning and ending points of each repeated element.
Draw one complete section first and use it as a reference for the remaining sections.
Repeat the same number of lines, dots and curves inside every matching shape.
Allow the ink to dry completely before erasing the pencil marks.
When using colour, repeat the same colour sequence around the complete circle. Consistent repetition creates visual harmony.
Homework for Lesson 9
Create one small mandala using at least five line or border patterns from this lesson.
Include one radiating-line border, one arch border, one wave or zigzag pattern, one scalloped border and one line-and-dot combination.
Use pencil guidelines before drawing with ink. Keep the design in black and white or add two complementary colours.
After completing the mandala, observe which patterns looked balanced and which ones required more practice.
Creative challenge
Choose one basic border, such as an arch border.
Create four different variations of the same pattern.
In the first variation, leave the arches empty. In the second, add dots. In the third, add smaller arches. In the fourth, add petals and short lines.
This exercise will show you how one simple border can be transformed into several unique designs.
Key takeaways from Lesson 9
Lines provide structure, direction and texture in mandala art.
Curves and arches create softness, while zigzags and straight lines add contrast.
Equal spacing is essential when repeating borders around a circle.
Simple borders can be layered to create detailed designs.
Dots, lines, arches, petals and scallops can be combined in many different ways.
Pencil guidelines help beginners create more balanced and symmetrical patterns.
Lesson summary
In Lesson 9, you learnt how to draw straight lines, radiating lines, curved lines, arches, waves, zigzags, scallops and parallel-line patterns.
You also learnt how to combine lines with dots and petals, maintain equal spacing and build layered borders around a mandala.
These patterns will help you connect the centre, middle layers and outer edges of your future mandala designs. Continue practising them separately so that your hand becomes more comfortable with repeated strokes and smooth curves.
Previous lesson: Lesson 8: Easy dot patterns anyone can draw
🏠 Back to Mandala Art Academy
Next lesson: Lesson 10: Easy Petals and Leaves for Beginner Mandala Art