Learn how to make a handmade mandala bookmark with half mandalas, borders, dots, colours, ribbon and simple finishing tips.
Course: Mandala Art Academy
Module 5: Advanced Mandala Projects
Lesson 33 of 40
Skill level: Intermediate
Practice time: 45 to 75 minutes
Welcome to Lesson 33
Welcome back to the Mandala Art Academy. In the previous lesson, you learned how to create beautiful mandala stone paintings using acrylic paints, dotting tools, colour rings and sealing techniques. In this lesson, we will create a practical handmade project: a mandala bookmark.
A mandala bookmark is a small artwork that can be used while reading books, gifted to friends, added to handmade hampers, sold as a craft product or used as a beginner-friendly product for your handmade business. Because the space is narrow, bookmark mandalas teach you how to design within limits while still creating something beautiful.
This lesson will help you create a neat, useful and attractive mandala bookmark using borders, half-mandalas, corner mandalas, floral patterns, dots, colours and finishing details.
What is a mandala bookmark?
A mandala bookmark is a bookmark decorated with mandala patterns. Since bookmarks are usually long and narrow, you may not draw a full circular mandala every time. Instead, you can use half mandalas, side mandalas, corner mandalas, repeated mandala borders or small circular mandala motifs.
This project is perfect for learners because it combines design, usefulness and creativity. You are not only drawing a mandala; you are turning it into a finished handmade item.
Why bookmark projects are useful for mandala learners
Bookmark projects are very helpful because they teach composition. In normal mandala art, you usually start from the centre and expand outward in a circle. In bookmark art, you need to think about placement, size, balance, blank space and finishing.
This helps you learn how to use mandala patterns on real products. Once you understand this, you can later create greeting cards, wall hangings, gift tags, journal covers and handmade stationery.
Materials needed
For this lesson, you will need:
Thick paper, cardstock or watercolour paper
Pencil and eraser
Scale or ruler
Compass or circular objects
Black fine-liner pen
Brush pens, colour pencils or gel pens
Metallic pen or white gel pen
Punching machine
Ribbon, tassel or thread
Optional lamination sheet
Optional corner rounder
Optional glitter pen or sticker accents
Use thicker paper so the bookmark feels strong and does not bend easily.
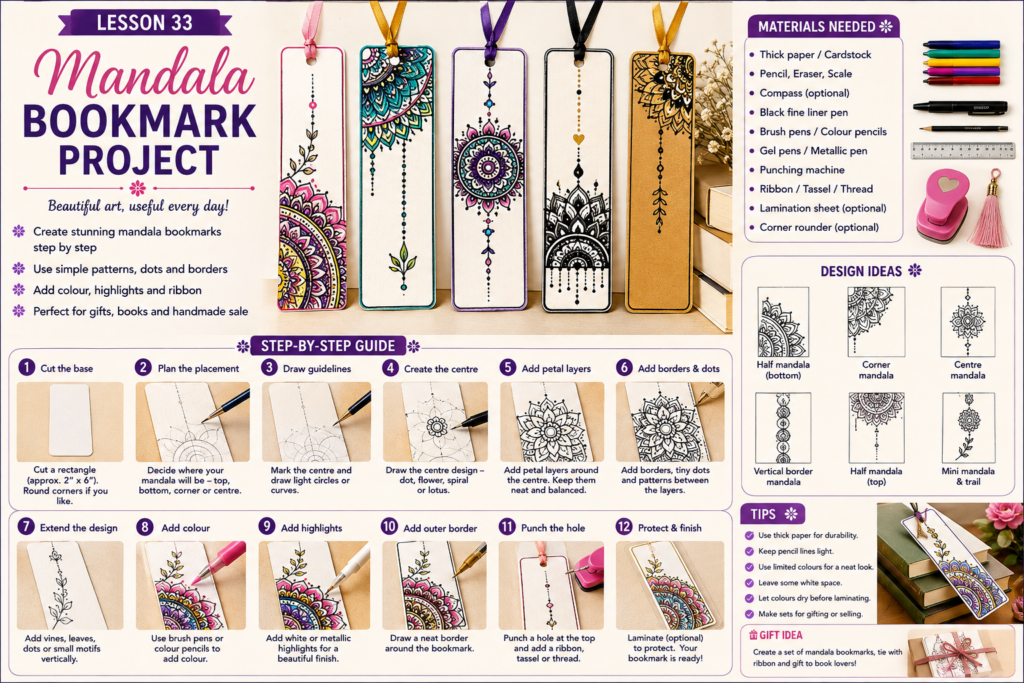
Step 1: Cut the bookmark shape
Start by cutting a rectangle for your bookmark. A good beginner size is around 2 inches wide and 6 inches long. You can also make it longer or wider depending on your style.
Use a ruler to measure neatly and cut the edges straight. If you want a softer look, you can round the corners using scissors or a corner punch.
A clean base makes the finished bookmark look more professional.
Step 2: Choose your mandala placement
Before drawing, decide where your mandala design will sit.
You can choose:
A half mandala at the top
A half mandala at the bottom
A corner mandala
A full small mandala in the centre
A vertical mandala border
Repeated mini mandalas along the bookmark
A floral mandala with leaves flowing downward
For beginners, a half mandala at the bottom or top is easiest and looks very elegant.
Step 3: Draw light guidelines
Use a pencil to draw light guidelines. If you are making a half mandala, place the centre point outside or near the edge of the bookmark. Then draw half circles moving inward into the bookmark space.
If you are making a full small mandala, mark the centre and draw small circles around it.
Keep the pencil lines very light because bookmark paper can look messy if dark pencil marks remain after erasing.
Step 4: Create the centre design
Start with a small centre element. This can be a dot, flower, spiral, small lotus or tiny circle.
For a half mandala, the centre may sit near the edge of the bookmark. Only part of the mandala will be visible, and that is perfectly fine. Half mandalas look beautiful on bookmarks because they create an artistic cut-off effect.
Trace the centre design slowly with a fine-liner pen.
Step 5: Add petal layers
Around the centre, add petal layers. Use rounded petals, pointed petals, teardrop petals or lotus petals.
Because the bookmark is narrow, keep the petals small and neat. Do not make them too wide or they may crowd the design.
If you are drawing a half mandala, make sure the petals follow the curved guideline and remain balanced on both sides.
Step 6: Add borders and dots
Add thin borders between the petal layers. Borders help separate the patterns and make the bookmark look clean.
You can add dot borders, double-line borders, tiny scallops, small triangles or simple curved lines.
Dots work especially well on bookmarks because they add detail without taking too much space. Use small dots around petals and along the edge of the design.
Step 7: Extend the design vertically
A bookmark is long, so the mandala should not look like it is floating alone. You can extend the design by adding vines, leaves, dotted trails, small flowers or decorative lines moving upward or downward.
For example, if your mandala is at the bottom, draw a thin vine moving upward with small leaves and dots. If your mandala is at the top, let tiny dots or curves flow downward.
This creates movement and fills the bookmark beautifully.
Step 8: Add a decorative border around the bookmark
A border around the bookmark gives it a finished look. You can draw a simple line border, dotted border, scallop border or tiny leaf border.
Do not make the outer border too heavy. It should frame the design without taking attention away from the mandala.
Leave a little space from the edge so the border does not get cut or damaged.
Step 9: Add colour carefully
Now add colour using brush pens, colour pencils or gel pens. Because bookmarks are small, use a limited colour palette.
Choose three to five colours only. You can use one main colour, one support colour and one highlight colour.
Good colour combinations include:
Pink, purple and gold
Blue, turquoise and silver
Yellow, orange and red
Black, white and gold
Green, teal and white
Pastel pink, lavender and pearl
Maroon, mustard and gold
Colour slowly and avoid overfilling tiny details.
Step 10: Add highlights
After the colour dries, add highlights with a white gel pen, metallic pen or glitter pen.
You can add highlights on petal tips, dot borders, leaf veins and small empty spaces. Metallic gold or silver can make the bookmark look festive and premium.
Use highlights only in selected areas. Too much shine can make the design look crowded.
Step 11: Punch a hole and add ribbon
At the top of the bookmark, punch a small hole. Make sure the hole is centred and not too close to the edge.
Add a ribbon, tassel, thread, lace or silk thread. This makes the bookmark look complete and gift-worthy.
Choose a ribbon colour that matches the mandala design. For example, use gold ribbon for festive designs, pastel ribbon for soft designs or black ribbon for elegant designs.
Step 12: Protect the bookmark
If you want the bookmark to last longer, you can laminate it or cover it with a clear protective sheet. This is optional but useful if you are gifting or selling the bookmark.
If you laminate, make sure the ink and colour are fully dry first. Wet ink may smudge inside the lamination.
You can also write a short quote or name on the back to make it more personal.
Easy bookmark design ideas
Try these simple ideas:
Half lotus mandala at the bottom
Corner mandala with leaf border
Mini mandala in the centre with dotted trails
Black and white mandala with gold dots
Pastel floral mandala with ribbon
Vertical mandala border along one side
Festive mandala bookmark with metallic highlights
Choose one idea first instead of trying everything in one bookmark.
Beginner practice project
Create one simple bookmark with a half mandala at the bottom.
Use:
One centre circle
Two petal layers
One dot border
One leaf trail
One outer bookmark border
One ribbon or tassel
Keep the colour palette simple. Focus on neatness and balance.
Intermediate practice project
Create a set of three mandala bookmarks using the same colour theme.
Bookmark 1: half mandala
Bookmark 2: corner mandala
Bookmark 3: vertical mandala border
This will help you understand how one mandala style can be used in different product layouts.
Common mistakes to avoid
Do not use thin paper because the bookmark may bend or tear.
Do not make the mandala too large for the bookmark space.
Do not use too many colours in a small design.
Do not punch the hole too close to the edge.
Do not laminate before the ink is dry.
Do not overcrowd the bookmark with patterns from top to bottom.
Do not forget to leave some clean space for balance.
Professional tips
Use cardstock or watercolour paper for a premium feel.
Plan the mandala placement before drawing.
Keep pencil lines light.
Use repeated dots to make the design look delicate.
Match ribbon colour with the artwork.
Make bookmarks in sets for gifting or selling.
Take photos on books, journals or wooden backgrounds for better presentation.
Handmade gift idea
Mandala bookmarks make beautiful gifts for teachers, students, friends, book lovers and festival hampers. You can place them inside a handmade card or wrap them with a ribbon.
You can also create personalised bookmarks by adding names, initials, short quotes or small festive messages.
For selling, mention the size, material, handmade nature, colours and whether it is laminated.
Care instructions for mandala bookmarks
Keep away from water.
Do not fold or bend.
Store inside a book or flat envelope.
Clean laminated bookmarks gently with a dry cloth.
Avoid scratching metallic or glitter details.
Creative challenge
Create one mandala bookmark inspired by your favourite colour combination. Add a half mandala, a border, a ribbon and one small quote on the back.
Your quote can be simple, such as:
Create with calm
Read and bloom
Art in every page
A little beauty between pages
Handmade with love
Homework
Make two bookmark designs.
For the first bookmark, create a half mandala.
For the second bookmark, create a vertical mandala border.
Compare both and observe which layout looks more balanced. This will help you understand product-style mandala composition.
Key takeaways
Mandala bookmarks are useful handmade art projects.
Half mandalas and corner mandalas work very well on bookmarks.
Thick paper gives a better finished product.
Borders, dots and ribbons make the bookmark look complete.
A limited colour palette keeps the design neat.
Bookmarks are great for gifting, selling and practising product design.
Lesson summary
In this lesson, you learned how to create a mandala bookmark using thick paper, light guidelines, half mandalas, petal layers, dot borders, vertical extensions, colour, highlights, ribbon and optional protection. You also learned how to plan bookmark layouts, avoid common mistakes and turn your artwork into a useful handmade gift.
Mandala bookmarks are an important project because they help you move from practice artwork to small handmade products that are easy to gift, sell and personalise.
Previous lesson: Lesson 32: Mandala stone painting
Next lesson: Lesson 34: Mandala greeting card project
Support the free Mandala Art Academy
Learning mandala art with us? The Mandala Art Academy is completely free, and every contribution helps us create more step-by-step lessons, practice guides and original tutorial images.
Even a small contribution helps us continue the next lesson.
For supporters in India
Scan the QR code below or use the UPI ID to contribute any amount you are comfortable with.

UPI ID: pallavi.rags-1@okhdfcbank
Pay securely through Razorpay
Prefer to pay by card or another supported online payment method? Use our secure Razorpay page below. Indian and international cards are accepted.
Support Mandala Art Academy and help create the next free lesson
Your support is entirely optional. Every Mandala Art Academy lesson will remain free for everyone.
Thank you for learning with us and helping us create the next lesson. ❤️