Learn how to make a handmade mandala greeting card with corner mandalas, borders, colours, messages, highlights and finishing tips.
Course: Mandala Art Academy
Module 5: Advanced Mandala Projects
Lesson 34 of 40
Skill level: Intermediate
Practice time: 45 to 75 minutes
Welcome to Lesson 34
Welcome back to the Mandala Art Academy. In the previous lesson, you learned how to create a handmade mandala bookmark using half mandalas, borders, colours, ribbons and finishing details. In this lesson, we will create another beautiful handmade product: a mandala greeting card.
Mandala greeting cards are perfect for birthdays, festivals, thank-you notes, friendship gifts, teacher gifts, wedding wishes, housewarming messages and handmade hampers. A simple card becomes special when you add a hand-drawn mandala because it carries your time, creativity and personal touch.
This lesson will help you design a neat and attractive greeting card using mandala patterns, borders, colours, lettering space and finishing details.
What is a mandala greeting card?
A mandala greeting card is a handmade card decorated with mandala art. The mandala can be placed in the centre, corner, side border, top section or background of the card.
You can create full mandalas, half mandalas, floral mandalas, dot mandalas, festive mandalas, metallic mandalas or simple black-and-white mandalas depending on the occasion.
The goal is not just to draw a mandala. The goal is to create a complete card that looks beautiful, balanced and gift-ready.
Why greeting cards are useful for mandala learners
Greeting cards help you understand how mandala art can be used on real handmade products. Unlike practice sheets, cards need planning because you must leave space for a message, balance the design with the card size and choose colours that suit the occasion.
This project also teaches presentation. A greeting card should look neat from the outside and feel thoughtful on the inside. When you learn this skill, you can create cards for family, friends, customers or festive collections.
Materials needed
For this lesson, you will need:
Thick cardstock or handmade paper
Pencil and eraser
Scale or ruler
Compass or circular objects
Black fine-liner pen
Brush pens, colour pencils or gel pens
Metallic pen or white gel pen
Glue or double-sided tape
Decorative paper or washi tape
Optional stickers, pearls or small embellishments
Optional ribbon or envelope
Optional calligraphy pen
Use thick paper so the card stands well and does not bend easily.
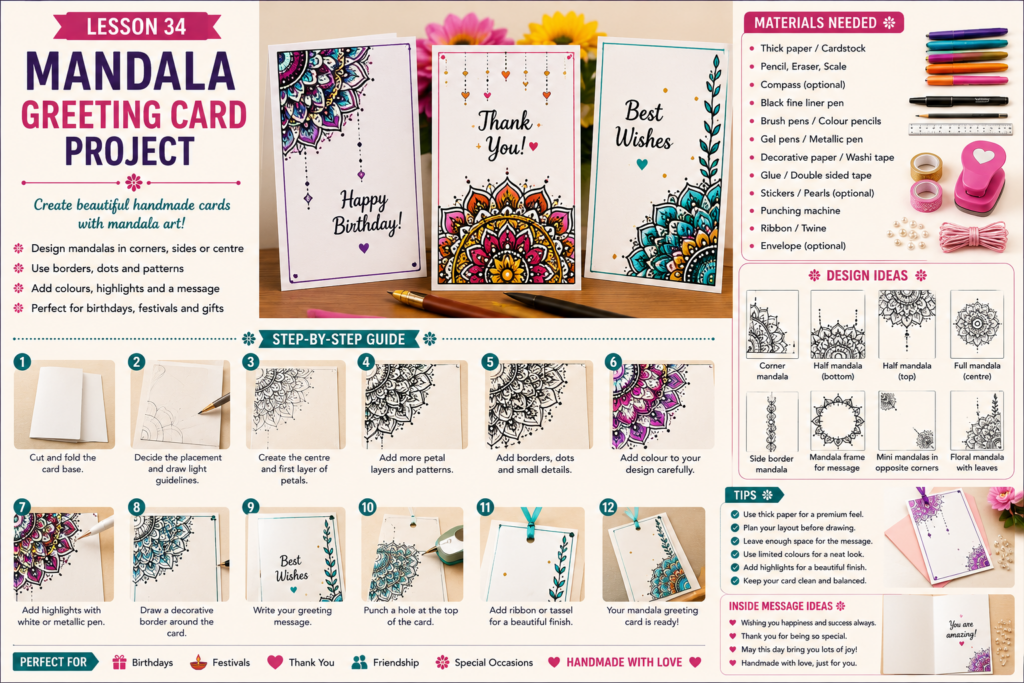
Step 1: Choose the card size
Start by choosing your card size. A simple beginner card can be made by folding an A4 sheet in half. You can also use pre-cut cardstock.
Common card styles include:
A5 folded card
Square greeting card
Small thank-you card
Festival card
Vertical invitation-style card
Mini gift-card note
For your first mandala greeting card, a folded A5 card is easy and practical.
Step 2: Decide the occasion
Before drawing, decide what the card is for. The occasion will help you choose the colours, patterns and message.
For example:
Birthday card: bright colours and playful patterns
Thank-you card: soft colours and floral patterns
Festival card: red, yellow, orange, green and gold
Friendship card: pastel colours and cute details
Wedding card: maroon, gold, cream and elegant mandalas
Teacher card: calm colours with neat borders
When the occasion is clear, the design becomes easier to plan.
Step 3: Plan the mandala placement
Now decide where the mandala will be placed on the card.
You can use:
A full mandala in the centre
A half mandala at the bottom
A corner mandala
A side mandala border
A small mandala behind the message
A mandala frame around the greeting
Two small mandalas on opposite corners
For beginners, a corner mandala or half mandala is best because it leaves enough space for the greeting text.
Step 4: Mark light guidelines
Use a pencil to mark your mandala area lightly. If you are drawing a corner mandala, place the centre point near one corner and draw quarter circles. If you are drawing a half mandala, place the centre point near the edge and draw half circles.
Keep the guidelines very light. Greeting cards look cleaner when pencil marks are not visible after finishing.
Also mark the area where your message will go. This helps you avoid drawing too much decoration in the writing space.
Step 5: Create the centre or starting point
Start your mandala with a small dot, flower, spiral or circle. If your mandala is at the corner, only part of the centre may be visible, and that is okay.
Trace the centre slowly with a fine-liner pen. Do not rush the first few lines because they decide the balance of the whole design.
A simple centre looks better on a greeting card than a very crowded centre.
Step 6: Add petal layers
Add petals around the centre. You can use rounded petals, lotus petals, teardrop petals or pointed petals.
Keep the petals suitable for the card size. If the petals are too big, they may take over the whole card. If they are too small, they may become difficult to colour.
Repeat the same shape neatly around the guideline.
Step 7: Add borders and decorative rings
Add small borders between layers. Borders make the mandala look organised and complete.
You can use:
Dot borders
Scallop borders
Double-line borders
Tiny triangle borders
Small leaf borders
Metallic line borders
Bead-style borders
A good greeting card mandala should look decorative but not too heavy.
Step 8: Leave space for the greeting message
This is very important. A greeting card needs space for words.
You can write:
Happy Birthday
Thank You
With Love
Best Wishes
Happy Diwali
Happy Raksha Bandhan
Congratulations
You are special
Handmade with love
Leave enough blank space around the message so it looks clean. Do not place text too close to the mandala details.
Step 9: Add colour based on the occasion
Choose three to five colours that match the card theme.
For a festive card, use warm colours with gold highlights.
For a birthday card, use bright and cheerful colours.
For a thank-you card, use pastel or soft floral colours.
For an elegant card, use black, white, gold and maroon.
For a calm card, use blue, green and lavender.
Colour slowly and neatly. Since greeting cards are meant to be gifted, finishing matters.
Step 10: Add highlights and accents
After colouring, add highlights using a white gel pen, metallic pen or glitter pen.
You can add highlights on petal tips, dot borders, greeting text, corners and small empty spaces.
You may also add tiny pearls, stickers, sequins or small embellishments, but use them carefully. Too many embellishments can make the card look crowded.
Step 11: Decorate the card border
A border around the card gives it a finished look. You can draw a simple line border, dotted border, floral corner border or small mandala-style edge.
You can also use washi tape, metallic tape or decorative paper strips.
Make sure the border supports the mandala design instead of distracting from it.
Step 12: Write the inside message
Once the outside of the card is complete, write a short message inside.
For example:
“Wishing you happiness, creativity and beautiful moments always.”
“Thank you for being such a special part of my life.”
“May this festival bring joy, peace and prosperity to your home.”
“Sending you handmade love and warm wishes.”
Write slowly and neatly. You can also add a tiny mandala corner inside the card for a special touch.
Step 13: Add final finishing touches
Check the full card once. Erase visible pencil lines carefully after the ink is dry.
Make sure there are no smudges, loose embellishments or uneven edges. If you want, place the card inside a matching envelope.
A handmade card becomes more beautiful when the finishing is neat.
Easy mandala greeting card ideas
Try these beginner-friendly ideas:
Half mandala birthday card
Corner mandala thank-you card
Gold mandala festive card
Black-and-white mandala card
Pastel floral mandala card
Mini mandala friendship card
Mandala border wedding card
Dot mandala festival card
Choose one style first and practise it before making a full set.
Beginner practice project
Create one simple greeting card with a corner mandala.
Use:
One corner mandala
Two petal layers
One dot border
One greeting message
Three colours
One simple card border
This project will help you understand card layout and spacing.
Intermediate practice project
Create a set of three mandala greeting cards for different occasions.
Card 1: birthday card with bright colours
Card 2: thank-you card with pastel colours
Card 3: festive card with gold highlights
This will help you learn how the same mandala technique can be changed for different themes.
Common mistakes to avoid
Do not draw the mandala without planning the message space.
Do not use thin paper because the card may bend.
Do not use too many colours or embellishments.
Do not write the greeting before the ink and colour dry.
Do not make the card border too heavy.
Do not place the mandala too close to the fold.
Do not forget to erase pencil marks gently.
Professional tips
Use thick cardstock for a premium feel.
Plan the card layout before drawing.
Match colours to the occasion.
Keep the message area clean.
Use metallic highlights only in selected places.
Create matching envelopes for a better presentation.
Make card sets for gifting or selling.
Take photos with flowers, books or festive props for social media.
Handmade selling idea
Mandala greeting cards can become a small handmade product. You can sell single cards, festive card sets, thank-you card packs or personalised name cards.
If selling, mention the size, paper type, handmade design, occasion, colour theme and whether an envelope is included.
You can also offer customisation such as name, message, colour theme or festival theme.
Care instructions for mandala greeting cards
Keep away from water.
Store flat in an envelope.
Avoid bending the card.
Do not press heavy items on embellished cards.
Keep metallic or glitter details away from rough surfaces.
Creative challenge
Create one greeting card for someone you appreciate. Choose a mandala placement, write a meaningful message and decorate the card with colours that suit that person.
This challenge will help you connect emotion with artwork, which is very important in handmade gifting.
Homework
Make two greeting cards.
For the first card, create a corner mandala.
For the second card, create a half mandala at the bottom.
Compare both cards and observe which layout gives better balance between artwork and message space.
Key takeaways
Mandala greeting cards combine art, emotion and usefulness.
Card layout is as important as mandala drawing.
Half mandalas and corner mandalas work beautifully on cards.
Leave enough space for the greeting message.
Use colours and highlights based on the occasion.
Neat finishing makes the card look gift-ready.
Lesson summary
In this lesson, you learned how to create a mandala greeting card using thick paper, planned layout, light guidelines, half or corner mandalas, petal layers, borders, colours, highlights, greeting text and finishing details. You also learned how to choose designs based on occasions and how to turn handmade cards into gifts or small products for selling.
Mandala greeting cards are an important project because they help you use mandala art in emotional, practical and gift-worthy ways.
Previous lesson: Lesson 33: Mandala bookmark project
Next lesson: Lesson 35: Mandala wall art project
Support the free Mandala Art Academy
Learning mandala art with us? The Mandala Art Academy is completely free, and every contribution helps us create more step-by-step lessons, practice guides and original tutorial images.
Even a small contribution helps us continue the next lesson.
For supporters in India
Scan the QR code below or use the UPI ID to contribute any amount you are comfortable with.

UPI ID: pallavi.rags-1@okhdfcbank
Pay securely through Razorpay
Prefer to pay by card or another supported online payment method? Use our secure Razorpay page below. Indian and international cards are accepted.
Support Mandala Art Academy and help create the next free lesson
Your support is entirely optional. Every Mandala Art Academy lesson will remain free for everyone.
Thank you for learning with us and helping us create the next lesson. ❤️