Choosing the right wick is one of the most important parts of candle making. You can use good wax, a beautiful container and a lovely fragrance, but if the wick is too small or too large, the candle may tunnel, smoke, burn unevenly or become unsafe.
In Lesson 4 of the STM Creator Academy Candle Making Course, we will understand what a candle wick actually does, the main types of wicks available, how candle diameter affects wick selection, why there is no single “perfect wick size” for every candle and how beginners can test a wick before making larger batches.
Course: STM Creator Academy Candle Making Course
Lesson: 4 of 30
Level: Beginner
Topic: Candle wicks and wick selection
What does a candle wick actually do?
A candle wick does much more than simply hold the flame. When the candle is lit, heat from the flame melts the wax surrounding the wick. The liquid wax then travels upward through the wick through capillary action and becomes fuel for the flame.
This means the wick and wax have to work together as a system.
If the wick cannot pull enough melted wax upward, the flame may remain very small and the candle may tunnel. If it pulls too much fuel, the flame may become excessively large, produce soot or make the container too hot.
That is why wick selection should always be treated as part of the candle recipe rather than as a decorative choice.
What determines the correct candle wick size?
The diameter of the candle or container is usually the first factor considered when choosing a wick, but it is not the only one.
Wax type, fragrance oil, fragrance concentration, colourants, container shape and even the specific wick construction can change how the candle burns.
For example, a wick that works beautifully in a plain soy candle may behave differently when the same candle contains a heavy fragrance load or a large amount of dye.
So beginners should use wick-size charts as a starting point, not as a guarantee.
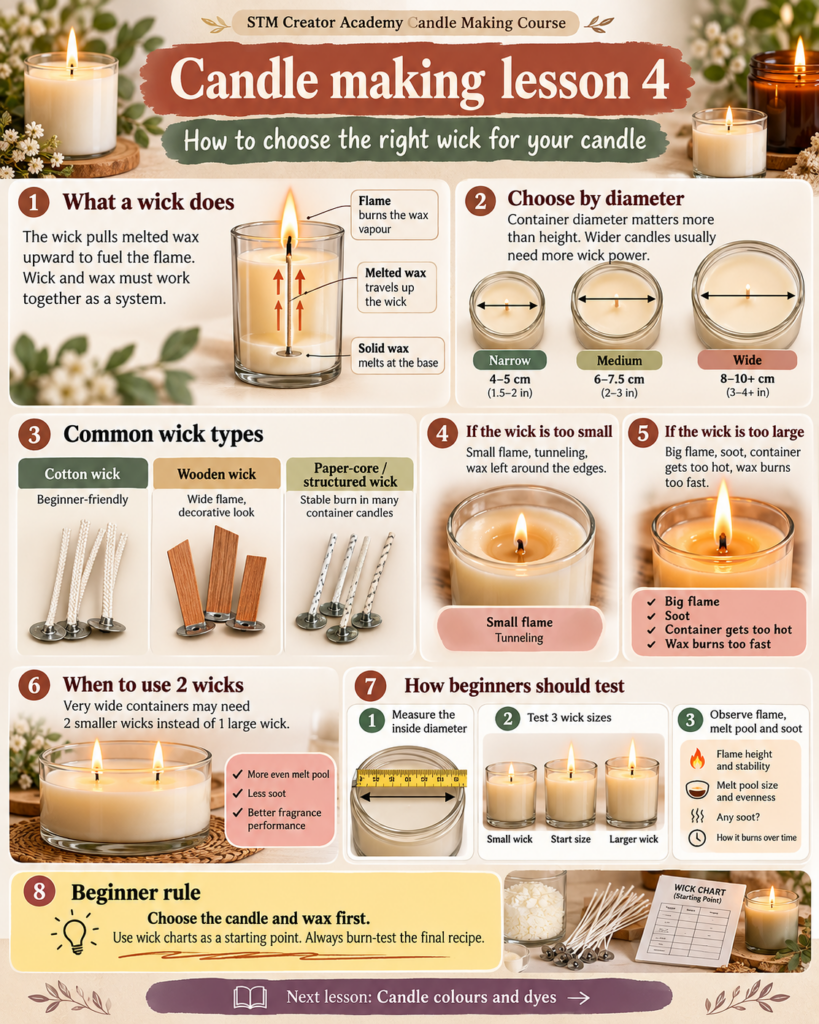
Candle diameter matters more than candle height
A common beginner mistake is choosing a larger wick simply because the candle is tall.
In most container candles, diameter is much more important than height when selecting a wick.
The wick must produce enough heat to create an appropriate melt pool across the surface of the candle. A wider candle therefore normally needs more wick power than a narrow candle, even when the narrow candle is much taller.
Measure the inside diameter of your container before beginning your wick testing.
What are the main types of candle wicks?
Different manufacturers use different wick series, but beginners will commonly encounter cotton, paper-core and wooden wicks.
| Wick type | General characteristics | Often used for |
|---|---|---|
| Cotton wick | Common, accessible and beginner-friendly | Container candles, pillars and many general candle types |
| Cotton-paper wick | Structured wick with stable burning characteristics | Container candles and some wax blends |
| Wooden wick | Creates a wider, distinctive flame and sometimes a gentle crackling effect | Decorative and premium container candles |
| Specialty braided wick | Designed for particular waxes or candle styles | Soy, paraffin, pillars and specialised recipes |
There are many wick families within these categories. Two cotton wicks that look almost identical can burn very differently, so always follow the supplier’s wick-series guidance.
Cotton wicks: a good starting point for beginners
Cotton wicks are widely used because they are relatively easy to work with and are available in many sizes.
Most come pre-tabbed for container candles, meaning a small metal sustainer is already attached to the bottom. The tab helps secure the wick to the centre of the container.
Cotton wicks can work with soy wax, paraffin, coconut blends and many other wax systems, but the exact size still needs testing.
For your first candle projects, cotton wicks are usually the easiest type to learn with.
What are wooden wicks?
Wooden wicks are thin strips of specially prepared wood designed to function as candle wicks.
They can create a wide flame and an attractive modern appearance. Some wooden-wick candles also produce a gentle crackling sound, although this varies depending on the wick and candle formulation.
Wooden wicks often require more testing than beginners expect. Wax type, fragrance and wick width can significantly affect whether the flame remains strong throughout the burn.
Do not substitute random craft wood or ordinary wooden sticks for proper candle wicks. Use wicks specifically manufactured for candle making.
What happens when the wick is too small?
A wick that is too small cannot generate enough heat for the candle.
The flame may appear weak, the wax may melt only around the centre and a thick ring of unmelted wax may remain around the edge.
This is commonly called tunnelling.
Some wax remaining around the edge during the first short burn is not automatically a failure, because the melt pool can develop over subsequent burns. However, severe tunnelling that continues throughout testing usually indicates that the wick is too small or the candle has another formulation problem.
What happens when the wick is too large?
A wick that is too large can create the opposite problem.
The flame may become excessively tall or unstable, the melt pool may become unnecessarily deep, the candle may consume wax too quickly and soot may appear around the container.
The container may also become hotter than intended.
An oversized wick is therefore not simply inefficient. It can become a safety issue.
Bigger is not better when choosing candle wicks.
What is mushrooming on a candle wick?
Sometimes a small carbon buildup forms at the top of the wick and resembles a mushroom.
This is called wick mushrooming.
A little buildup can occur with some wick types, but excessive mushrooming may suggest that the wick is too large, the fragrance load is high or the formulation needs adjustment.
Always evaluate the candle as a complete system instead of changing only one component without testing.
When should you use two wicks?
Very wide containers sometimes perform better with two smaller wicks instead of one extremely large wick.
Using two wicks can distribute heat more evenly across a wide candle surface.
However, double-wicking does not simply mean taking the wick you would normally use and placing two of them in the container. That could produce far too much heat.
Instead, two appropriately smaller wicks are selected and tested together.
For beginners, start with standard single-wick containers before moving into wide or multi-wick candles.
Why fragrance can change wick performance
Fragrance oil affects more than the smell of the candle.
Some fragrances are heavier or more difficult to burn than others. A wick that performs perfectly in an unscented candle may produce a weaker flame after fragrance is added.
That is why the final burn test should always use the same wax, fragrance, fragrance percentage, dye and container you plan to use in the finished product.
Testing an unscented candle and then selling a strongly scented version using the same wick without further testing is not a reliable method.
Why candle colour can also affect the wick
Colourants can also influence burning behaviour.
Using too much dye may interfere with the wick’s ability to transport fuel efficiently. This can contribute to a smaller flame or wick buildup.
Use colourants specifically designed for candles and follow the manufacturer’s recommended usage range.
Decorative materials such as ordinary crayons should not be treated as a replacement for candle dye.
How should beginners choose their first wick?
Start with your container diameter and wax type.
Check the wick manufacturer’s or candle-supply company’s recommendation for that combination. Select one wick near the recommended size and ideally one size above and below it.
Then create three otherwise identical test candles.
For example:
Test A: slightly smaller wick
Test B: recommended starting wick
Test C: slightly larger wick
Everything else should remain the same.
Use the same jar, same wax weight, same fragrance, same fragrance percentage and same curing conditions.
This lets you compare wick performance properly rather than guessing.
How to perform a basic candle burn test
Allow the candle to cure according to the recommendations for your wax and fragrance system before beginning the test.
Trim the wick to the appropriate starting length recommended by your wick supplier. Place the candle on a heat-resistant surface away from drafts.
Burn it for a controlled period and observe the flame, melt pool and container.
Record what happens rather than relying on memory.
Useful observations include flame height, visible smoke or soot, melt-pool width, melt-pool depth, container temperature, wick buildup and how much wax remains around the sides.
Repeat the burn over several sessions because a candle can behave differently when it reaches the middle and bottom of the container.
Never leave a test candle burning unattended.
Create a wick-testing notebook
One of the best habits you can develop as a candle maker is keeping records.
Your test notes might include:
- Wax type and batch
- Container diameter
- Wick brand, series and size
- Fragrance name and percentage
- Dye used
- Pour temperature
- Cure time
- Burn duration
- Flame behaviour
- Melt-pool observations
- Soot or mushrooming
- Final result
Over time, this becomes your personal candle-making reference library.
Instead of starting from zero every time, you will know which wick families previously worked well with particular jars and waxes.
Never copy another candle maker’s wick blindly
You may see someone online say, “Use wick X for an 8 cm jar.”
Treat that as information, not as a final recipe.
Their candle may use a different wax manufacturer, fragrance concentration, wick supplier, container shape or dye system.
Even apparently similar candles can require different wicks.
A good candle maker tests rather than assumes.
Important wick safety habits
Keep the wick properly centred during pouring and cooling. A wick positioned too close to one side of the container can heat the glass unevenly.
Use candle-safe wick tabs and adhesives designed to keep the wick securely attached.
Before each burn, consumers should generally trim the wick according to the candle maker’s instructions. Excessively long wicks can create larger flames and soot.
Never decorate the burning surface with materials that can ignite or interfere with the flame.
And when testing candles, always work in a controlled area with suitable fire-safety precautions.
Lesson 4 practice activity
Take one candle container you plan to use in the future.
Measure its inside diameter and write it down.
Next, decide which wax you intend to use. Check your wick supplier’s recommendations and identify three possible wick sizes: one slightly smaller than the suggested starting point, the suggested size and one slightly larger.
You do not have to make all three candles today. The purpose of this exercise is to learn how professional candle makers approach wick selection through measurement and testing rather than guessing.
The beginner rule to remember
If you remember only one lesson from today, remember this:
Choose the candle and wax first. Use wick charts only as a starting point. Then burn-test the finished recipe.
The correct wick is not determined by appearance alone.
Testing is part of candle making.
Once you become comfortable with wick testing, many of the problems that frustrate beginners become much easier to diagnose.
What comes next in the Candle Making Course?
In Lesson 5, we will learn about candle colours and dyes.
We will look at liquid dyes, dye blocks and chips, how much colour to use, why some colourants clog wicks, how wax affects the final shade and how to create attractive candle colours without affecting burn quality.
Support STM Creator Academy
STM Creator Academy creates free step-by-step courses, beginner-friendly tutorials and creative learning resources. If our lessons have helped you, you can support our work with any contribution you are comfortable with.
For supporters in India
Scan the QR code below or use the UPI ID to contribute any amount.

UPI ID: pallavi.rags-1@okhdfcbank
Pay securely through Razorpay:
Prefer card or another supported payment method? Use our Razorpay support page.
Your support is completely optional and helps us create more free lessons, original tutorial images, practice guides and future creative courses.
Our free course lessons will remain accessible to everyone.