Colour can completely change the personality of a candle. A soft ivory candle can feel calm and minimal, pastel shades can create a delicate decorative look, while rich red, green, blue or gold-toned candles can instantly feel festive.
But colouring candle wax is not the same as colouring paper, resin or soap. A colourant that looks beautiful when mixed into wax can affect wick performance, produce uneven shades or even interfere with how the candle burns if the wrong material or too much colour is used.
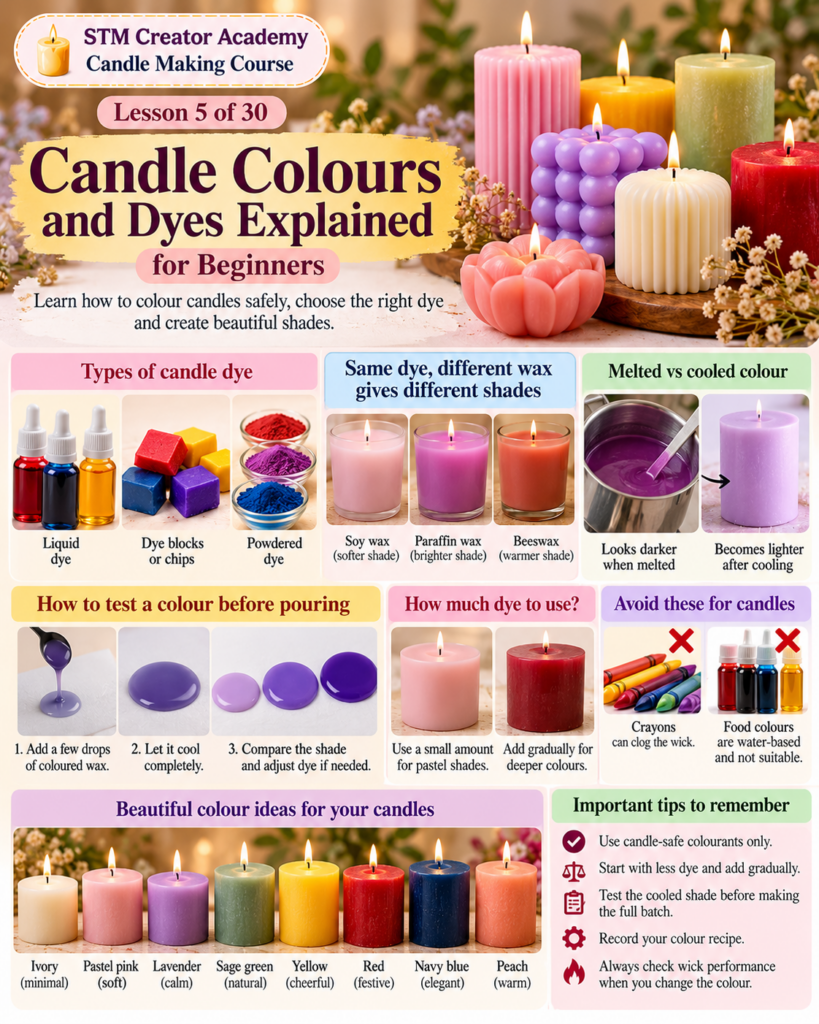
In Lesson 5 of the STM Creator Academy Candle Making Course, we will learn the main types of candle colourants, how wax changes the final shade, why ordinary crayons and food colours are poor choices, how much dye beginners should use and how to test colours without wasting an entire batch.
Course: STM Creator Academy Candle Making Course
Lesson: 5 of 30
Level: Beginner
Topic: Candle colours and dyes
Why does candle wax need special colourants?
Candle wax is an oil-based material. That means the colourant has to dissolve or disperse properly within melted wax without introducing ingredients that interfere with combustion.
This is why candle-making suppliers sell dyes specifically formulated for wax.
A suitable candle dye should produce colour while remaining compatible with the wax and wick system. Using an inappropriate colourant may create sediment, clog the wick or cause the candle to burn differently from the way it did before colour was added.
The safest beginner approach is therefore simple: use colourants specifically sold for candle making and follow the supplier’s recommended usage rate.
What are the main types of candle dye?
Beginners will normally come across three common forms of candle colourant: liquid dye, dye blocks or chips, and powdered candle dye.
Liquid candle dye is highly concentrated and convenient when you want to reproduce a shade accurately. Because it is easy to count drops, it can be useful when developing a repeatable recipe.
Dye blocks and chips are solid concentrated colourants that melt into the wax. They are easy to store and are commonly used by both hobbyists and larger candle makers.
Powdered dyes can create strong colours but require careful measurement and mixing. They may be less convenient for beginners because very small quantity differences can noticeably change the final shade.
None of these formats is automatically “best.” The right choice depends on the wax, the colour intensity you want and how comfortable you are measuring small amounts.
Why candle colour looks different after the wax cools
One of the first surprises beginners experience is that melted coloured wax often looks darker than the finished candle.
When wax is hot and transparent or semi-transparent, colour appears more concentrated. As the wax cools and becomes opaque, the shade usually becomes lighter.
This is especially noticeable with soy wax, which naturally has a creamy white appearance.
For example, a melted mixture that looks like a strong lavender may cool into a soft pastel purple.
That is why you should never judge the final candle colour only while the wax is in the pouring jug.
How does the type of wax affect candle colour?
Different waxes have different natural appearances, so the same dye can produce different results.
Soy wax tends to create softer, more muted colours because of its naturally creamy appearance.
Paraffin wax can usually produce brighter and more saturated shades.
Beeswax naturally ranges from pale yellow to deep golden tones, which can influence any colour added to it.
Coconut wax and coconut blends are often creamy or white and may produce elegant pastel shades.
Gel wax is transparent, so colour behaves differently again. Very small quantities of dye can create attractive translucent effects.
This is another reason candle recipes cannot always be copied directly from another maker. A shade developed in paraffin may look completely different when recreated in soy wax.
Why should beginners start with less dye?
With candle dye, adding more is easy. Removing colour after it has been mixed into the wax is much harder.
Start with a very small amount and build the shade gradually.
Excessive dye can do more than make the candle too dark. Very high dye concentrations may also interfere with how efficiently the wick draws melted wax upward.
A candle that burned perfectly before colouring may develop a weaker flame after too much dye is added.
So deeper colour should not automatically mean “keep adding dye until it looks right.”
Colour and burn performance have to work together.
Can candle dye clog the wick?
Potentially, yes.
The wick works by drawing liquid wax upward toward the flame. If the wax contains too much pigment or poorly dispersed material, that fuel movement may become less efficient.
This can contribute to a smaller flame, incomplete melt pool or increased carbon buildup.
Proper candle dyes are designed to minimise these problems when used within recommended ranges, but even good ingredients can cause difficulties when excessively used.
This is why wick testing should be repeated whenever you make a meaningful change to the candle recipe.
Adding colour is a formulation change.
Why crayons should not be used to colour candles
A common beginner experiment is melting crayons into candle wax because crayons appear to be coloured wax.
However, crayons contain pigments and other ingredients designed for drawing, not for being transported through a candle wick and burned as fuel.
Those pigments can interfere with wick performance and contribute to clogging or poor burning.
The candle may initially look attractive but develop a weak flame or tunnelling during use.
So keep crayons for artwork and use proper candle dye for candles.
Can food colouring be used in candles?
Ordinary water-based food colouring is generally unsuitable for colouring wax.
Oil and water do not mix easily. Because candle wax is oil-based, water-based food colouring may form droplets or fail to disperse evenly.
This can lead to patchy colour rather than a smooth candle.
Water contamination in hot wax can also create additional problems during candle making.
Use a wax-compatible candle colourant instead.
What about mica powder in candles?
Mica powders are beautiful and are widely used in crafts, cosmetics, resin and decorative wax products.
However, using large amounts of mica inside a burning candle can create problems because mica consists of fine mineral particles rather than a soluble candle dye.
Those particles may interfere with the wick.
For that reason, mica is generally better suited to decorative wax applications where it will not travel through a burning wick, or very limited surface decoration when the candle design and safety have been properly tested.
Do not assume that because a material is marketed for crafts it is automatically suitable for the combustion area of a candle.
What is the difference between dye and pigment?
This distinction helps explain many candle-colouring problems.
A dye is designed to dissolve into or become compatible with the wax.
A pigment consists of tiny coloured particles suspended in the material.
For a candle that needs to burn through a wick, dissolved colour is generally much easier for the fuel system to handle than a large concentration of suspended particles.
This is why candle dyes are normally preferred for colouring the entire wax body.
How can you test candle colour before pouring the whole batch?
There is a simple technique that can save wax and frustration.
After mixing the dye into melted wax, place a few drops of the coloured wax onto a white ceramic plate, piece of baking paper or another heat-safe light-coloured surface.
Allow the drops to cool completely.
The cooled sample gives you a much better idea of the finished shade than looking into the pot of hot wax.
If the shade is too light, add a very small amount of additional dye, mix thoroughly and test another drop.
Keep repeating until you are satisfied.
This is often called a colour drop test.
Why should candle makers record colour recipes?
Suppose you create the perfect dusty rose candle today.
Three months later, a customer wants exactly the same colour.
If you simply remember adding “a little red and maybe some brown,” reproducing the shade will be difficult.
Instead, record the wax weight, dye brand, dye colour and exact amount used.
For example:
500 g soy wax + 3 drops red liquid dye + 1 drop brown liquid dye
The exact recipe is not important here. What matters is developing the habit of recording your formulation.
This transforms candle making from guessing into a repeatable process.
How to create pastel candle colours
Pastel candles are often easier to achieve than beginners expect.
Use white or naturally creamy wax and add only a tiny amount of concentrated dye.
For pastel pink, begin with a very small quantity of red or pink dye.
For pastel lavender, use a tiny amount of purple.
For soft mint, start with a very small amount of green.
Remember that many dyes are extremely concentrated, so one additional drop can make a noticeable difference in a small batch.
How to create deeper colours
Deep red, navy blue, forest green and dark purple often require more dye than pastel shades.
However, simply increasing the dye indefinitely is not the best approach.
Some waxes naturally resist very dark colours, particularly opaque vegetable waxes such as soy.
If your wax repeatedly produces muted colours, accept its natural appearance or select a wax better suited to highly saturated decorative candles.
Trying to force an extremely dark shade into a wax by overloading it with dye may compromise burn performance.
Why red can be difficult to achieve
Red is one colour that often surprises beginners.
A small amount of red dye may create pink. Adding more may create stronger red, but depending on the wax it can still look softer after cooling.
Deep reds may require a concentrated candle dye specifically designed for rich shades.
Similarly, black candles can require significant colour concentration, which makes burn testing especially important.
Whenever you make a very dark candle, pay close attention to flame behaviour and wick performance.
How to mix your own candle colours
Once you understand individual dyes, you can begin mixing shades.
A small amount of blue mixed with red can create purple. Yellow with blue can create green. Red and yellow can create orange.
But concentrated candle dyes do not always behave exactly like children’s paint because each dye formulation has its own strength.
Instead of trying to memorise ratios, make small controlled tests and record what works.
You can eventually create your own signature colour recipes.
Why fragrance can affect the final candle colour
Fragrance oil itself may have colour.
Some fragrance oils are clear, while others are pale yellow, amber or darker.
When fragrance is mixed into lightly coloured wax, the natural colour of the fragrance can subtly alter the final shade.
Some fragrance ingredients may also contribute to colour changes as a candle ages.
For example, certain fragrance compositions can cause wax to become creamier, yellowish or darker over time.
This does not always mean something is wrong with the candle.
Why candles sometimes change colour over time
Several factors can influence candle colour after production.
Light exposure, fragrance composition, wax type, dye stability and storage conditions can all contribute.
A bright candle placed continuously in direct sunlight may gradually fade.
Some fragrances can also cause discolouration.
For this reason, finished candles are best stored in a cool location away from prolonged direct sunlight.
If you plan to sell candles, colour stability should be observed during product testing rather than checked only on the day the candle is poured.
Should candle colour match the fragrance?
It does not have to, but matching colour and fragrance can create a stronger sensory theme.
A lavender-scented candle may feel intuitive in pale purple.
A lemon candle may work beautifully in soft yellow.
Rose fragrance may suit blush pink, while sandalwood can look elegant in cream, beige or warm brown.
But contrast can also be creative.
The important thing is to develop a visual identity rather than assume every fragrance must have an obvious colour.
Colour psychology and candles
People often associate colours with different moods.
Soft blues and greens may feel calm, yellow can feel cheerful, red can appear energetic or romantic, while white can feel simple and clean.
These associations are influenced by culture, personal experience and context, so they should not be treated as universal scientific rules.
Still, colour can strongly affect how a candle is perceived.
This is why successful candle design considers appearance, fragrance, container and packaging as one experience.
Festive candle colour combinations
Festivals provide a wonderful opportunity to experiment with candle colours.
For Diwali, combinations such as red and gold, orange and yellow, maroon and gold or jewel tones can create a rich festive appearance.
For Christmas, red, green, white, gold and silver are popular.
For Valentine’s Day, pink, red, white and soft pastels work beautifully.
For weddings and return gifts, ivory, blush, champagne, lavender and sage shades can create a more elegant look.
The colour palette can become part of the story behind the candle.
A simple beginner colour-testing activity
For this lesson, take a small quantity of your chosen candle wax and divide it into three heat-safe containers after melting.
Leave the first sample uncoloured.
Add a tiny amount of dye to the second.
Add slightly more of the same dye to the third.
Allow all three samples to cool completely.
Place them side by side and observe how dramatically the shade changes with very small differences in dye concentration.
This simple exercise will teach you more about your chosen dye and wax combination than trying to memorise generic colour ratios.
Candle colour safety reminder
Every time you change the amount or type of colourant in a candle you intend to burn or sell, include that change in your testing.
Check flame size, soot, mushrooming, melt pool behaviour and container temperature.
Do not assume a candle is safe simply because the uncoloured version passed your test.
The colourant is part of the final candle formulation.
The beginner rule to remember
If you remember only one idea from Lesson 5, remember this:
Start with less colour, test the cooled shade and never sacrifice burn quality just to achieve a darker candle.
Beautiful candles should also burn correctly.
Colour is part of candle design, but wick performance and safety always come first.
What comes next in the Candle Making Course?
In Lesson 6, we will explore candle fragrance oils and fragrance load.
We will learn the difference between candle-safe fragrance oils and other scented products, how much fragrance wax can hold, why adding extra fragrance does not always create a stronger candle, what hot throw and cold throw mean, and how fragrance temperature can affect the finished candle.
Support STM Creator Academy
STM Creator Academy creates free step-by-step courses, beginner-friendly tutorials and creative learning resources. If our lessons have helped you, you can support our work with any contribution you are comfortable with.
For supporters in India
Scan the QR code below or use the UPI ID to contribute any amount.

UPI ID: pallavi.rags-1@okhdfcbank
Pay securely through Razorpay:
Prefer card or another supported payment method? Use our Razorpay support page.
Your support is completely optional and helps us create more free lessons, original tutorial images, practice guides and future creative courses.
Our free course lessons will remain accessible to everyone.