Course: STM Creator Academy Candle Making Course
A beautifully scented candle can completely change the feeling of a room.
Fresh citrus can feel energising. Lavender can create a calm atmosphere. Vanilla can make a space feel warm and comforting. Festive combinations such as cinnamon, clove and orange can instantly create a seasonal mood.
But making a strongly scented candle is not as simple as pouring perfume into melted wax.
The type of fragrance you use, the amount you add, the temperature of the wax, the way you stir it and even the wick you choose can all affect how your candle smells and burns.
In Lesson 8 of the STM Creator Academy Candle Making Course, you will learn how to choose candle-safe fragrance oils, understand fragrance load, calculate how much fragrance to use, add scent correctly and avoid the most common beginner mistakes.
What fragrance should you use for candle making?
The safest beginner choice is a fragrance oil specifically formulated and approved for candle making.
Candle fragrance oils are designed to blend with wax and withstand the conditions involved in candle making and burning.
Do not assume that every scented oil is suitable.
Perfume, room freshener, cosmetic fragrance, diffuser oil and random essential oil blends may not be formulated for use in candles.
Always check the supplier’s product information before using any fragrance.
Look for wording such as:
Suitable for candle making
or
Candle-safe fragrance oil
Following supplier instructions is especially important when you eventually make candles for other people or for sale.
What is fragrance load?
Fragrance load means the amount of fragrance oil added in relation to the amount of wax.
It is usually expressed as a percentage.
For example, if a particular candle wax allows a fragrance load of 8%, that means fragrance can be added according to the recommended calculation for that wax and formulation.
Different waxes have different fragrance capacities.
A soy wax may behave differently from paraffin wax.
One soy wax blend may also have a different maximum fragrance load from another soy wax blend.
That is why you should always check your wax manufacturer’s recommendations.
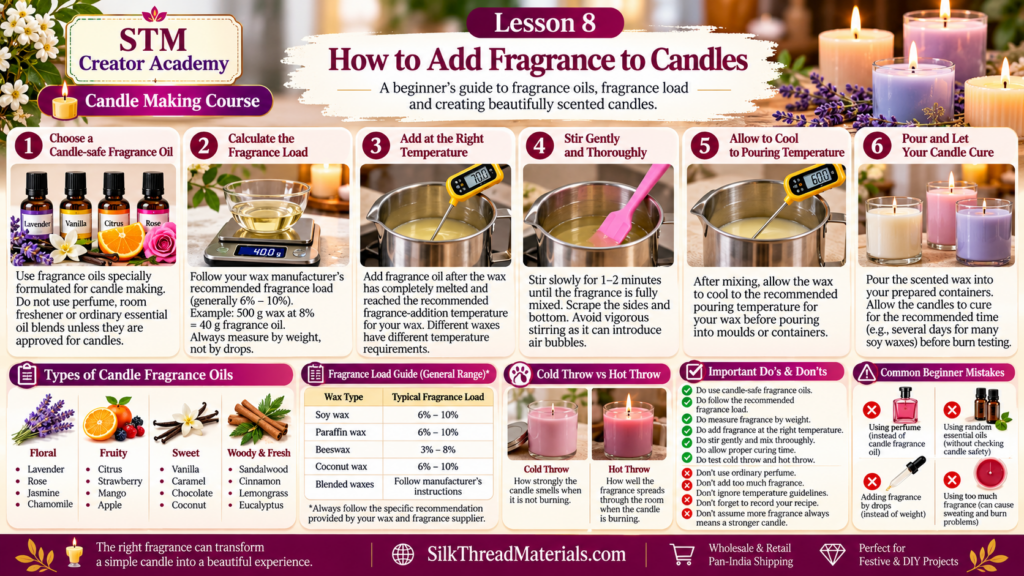
How much fragrance oil should beginners use?
Many candle waxes commonly work with fragrance levels somewhere around 6% to 10%, but this is only a general range.
It is not a universal rule.
Your wax supplier may recommend a different amount.
For beginners, starting around the lower or middle part of the manufacturer’s recommended range can make testing easier.
Do not automatically use the maximum amount.
A candle with more fragrance oil is not necessarily a better candle.
How do you calculate fragrance oil?
A simple beginner calculation is based on the amount of wax you are using.
Suppose you are working with:
500 grams of wax
and want to test approximately:
8% fragrance
A simple starting calculation is:
500 × 0.08 = 40 grams of fragrance oil
You would therefore use approximately 40 grams of fragrance oil for that test batch, provided your wax and fragrance manufacturer allow that usage level.
Another example:
250 grams of wax × 0.06 = 15 grams of fragrance oil
Keep in mind that professional candle formulas may calculate total batch percentages differently, so once you begin producing candles commercially, follow the calculation method recommended by your wax or fragrance supplier.
For our beginner course, the key lesson is:
measure fragrance by weight, not by guessing.
Why should fragrance be weighed rather than measured in drops?
Fragrance oils vary in thickness and density.
One oil may be very thin.
Another may be thick.
Counting drops can therefore produce inconsistent results.
A digital weighing scale gives you much better control.
Place your fragrance container on the scale.
Tare the scale to zero.
Then measure the exact amount required.
This makes your candle recipe repeatable.
When should fragrance oil be added to candle wax?
Fragrance oil is normally added after the wax has completely melted and reached an appropriate temperature.
The exact temperature depends on:
- wax type
- fragrance oil
- manufacturer instructions
- candle formulation
Do not rely on one temperature you saw online and assume it applies to every wax.
Many candle wax suppliers provide recommended fragrance-addition temperatures.
Follow those instructions first.
The goal is to have the wax warm enough for the fragrance to blend properly without unnecessarily overheating the mixture.
Step 1: Melt your wax safely
Use the double-boiler method from Lesson 6.
Measure your wax carefully.
Heat it gradually.
Monitor the temperature using your thermometer.
Wait until the wax has completely melted.
Step 2: Prepare your fragrance oil
While your wax is melting, calculate and weigh your fragrance oil.
Do this before you need to add it.
Candle making becomes much easier when everything is prepared in advance.
Keep the measured fragrance nearby in a clean, suitable container.
Step 3: Check the wax temperature
Before adding fragrance, check the temperature of your melted wax.
Refer to the recommended fragrance-addition temperature for your specific wax.
If the wax is too hot, wait for it to cool slightly.
If it is too cool, the fragrance may not incorporate as effectively.
Temperature control is one of the reasons we introduced the thermometer so early in this course.
Step 4: Add the fragrance oil
Pour the measured fragrance oil slowly into the melted wax.
Avoid splashing.
Keep your face away from concentrated fragrance oils.
Some fragrances can be very strong before they are diluted into wax.
Work in a well-ventilated area.
Step 5: Stir slowly and thoroughly
Stir the fragrance into the wax gently but thoroughly.
A common beginner practice is to stir slowly for around one to two minutes, but the exact process may vary depending on the wax and supplier instructions.
Do not whip the wax.
You are trying to distribute the fragrance evenly, not create bubbles.
Make sure you scrape around the sides and bottom of the pouring pitcher while stirring.
Step 6: Allow the wax to reach pouring temperature
After the fragrance has been mixed, allow the wax to reach the appropriate pouring temperature for your candle.
Again, this depends on your wax.
Some waxes are poured relatively warm.
Others perform better when allowed to cool further.
Once the wax reaches the recommended pouring temperature, it can be poured into your prepared container or mould.
What is cold throw?
You will often hear candle makers use the term cold throw.
Cold throw means how strongly the candle smells when it is not burning.
Imagine opening a candle jar and smelling it.
That scent is the cold throw.
A good cold throw is especially important for candles sold in shops or markets because customers often smell the candle before buying it.
What is hot throw?
Hot throw means how well the fragrance spreads through the room when the candle is burning.
A candle may have an excellent cold throw but weaker hot throw.
Another candle may smell subtle when unlit but perform beautifully when burning.
Hot throw depends on several factors, including:
- wax
- fragrance oil
- fragrance percentage
- wick
- container size
- candle diameter
- cure time
This is why fragrance performance cannot be judged by fragrance percentage alone.
Does adding more fragrance make the candle smell stronger?
Not always.
This is one of the most important lessons in candle making.
Wax can only hold a certain amount of fragrance effectively.
If you exceed that capacity, the extra fragrance may not remain properly incorporated.
You may see oil on the candle surface.
This is sometimes called fragrance sweating.
Too much fragrance may also affect the wick and overall burn performance.
So:
More fragrance does not automatically mean more scent.
Correct formulation is more important.
What is fragrance sweating?
Fragrance sweating appears as oily droplets or patches on the candle surface.
It can happen for several reasons.
One possible reason is excessive fragrance oil.
Temperature changes can also contribute.
Improper mixing or incompatibility between the wax and fragrance can cause problems as well.
If your candle repeatedly sweats after adding a high fragrance percentage, reduce the fragrance level and test again.
Can you use essential oils in candles?
Some essential oils can be used in properly formulated candles, but you should not assume that every essential oil is suitable.
Essential oils can behave differently when heated.
Some may produce weak scent throw.
Others may not be recommended for candle applications.
Always check the supplier’s technical and safety information.
For beginners who want predictable results, candle-safe fragrance oils are usually easier to work with.
Can you use perfume in candle wax?
No.
Do not pour your personal perfume into candle wax.
Perfumes may contain alcohol and other ingredients that are not designed for burning in candles.
Use fragrance materials specifically intended for candle making.
Can fragrance oil catch fire?
Fragrance oils are chemical mixtures and need to be handled carefully.
Keep fragrance bottles away from flames, sparks and excessive heat.
Do not work beside a burning candle.
Do not pour fragrance directly over an open flame.
Read the supplier’s safety information and keep containers properly closed when not in use.
Good ventilation is also important.
What is the fragrance oil flash point?
You may see a flash point listed on fragrance-oil documentation.
The flash point is related to the temperature at which vapours from a substance may ignite under specified test conditions.
Beginners sometimes misunderstand this number and believe fragrance will automatically disappear from wax once it reaches the flash point.
That is an oversimplification.
You should follow your wax and fragrance supplier’s recommended mixing temperature rather than trying to design your recipe around flash point alone.
Why do scented candles need time to cure?
After pouring, many candles benefit from a curing period before they are burned.
Curing allows the wax structure to settle and can influence fragrance performance.
The ideal cure time depends on the wax.
Some paraffin candles may perform well after a relatively short period.
Many soy-wax candle makers allow several days or longer before performing a final burn test.
Follow your wax supplier’s recommendations.
The difficult part for beginners is patience.
You make a beautiful candle.
It smells wonderful.
And naturally you want to light it immediately.
But testing after the appropriate cure time gives you a much more accurate idea of how the candle will actually perform.
How can you create fragrance combinations?
Once you become comfortable using single fragrance oils, you can experiment with blends.
Some popular combinations include:
Vanilla + Coffee
Warm and comforting.
Lavender + Vanilla
Soft and relaxing in character.
Orange + Cinnamon
Popular for festive and winter candles.
Rose + Vanilla
Floral with a sweet base.
Lemongrass + Citrus
Fresh and bright.
Sandalwood + Vanilla
Warm and rich.
Jasmine + Rose
A classic floral combination.
Always make small test batches before producing a large quantity.
Fragrances that smell beautiful separately may not always work well together.
How should fragrance combinations be recorded?
Suppose you create:
70% vanilla fragrance oil
30% coffee fragrance oil
and love the result.
Write it down.
Record:
Wax type.
Wax quantity.
Fragrance names.
Fragrance percentage.
Blend ratio.
Temperature when fragrance was added.
Pouring temperature.
Cure time.
Cold throw.
Hot throw.
Burn performance.
This is how you gradually build your own candle recipe library.
Common beginner mistakes when adding candle fragrance
Adding fragrance without weighing it
Guessing makes your recipe inconsistent.
Adding too much fragrance
This can create sweating and burning problems.
Assuming every wax accepts the same fragrance load
Different waxes have different limits.
Using ordinary perfume
Perfume is not candle fragrance oil.
Ignoring temperature
Temperature can affect how fragrance incorporates with wax.
Not stirring enough
Poor mixing may create inconsistent fragrance distribution.
Stirring aggressively
This may introduce unnecessary air into the wax.
Testing the candle immediately
Give your candle the recommended cure time.
Changing several things at once
If you change the wick, wax, fragrance amount and pouring temperature simultaneously, it becomes difficult to understand what caused a problem.
Change one factor at a time when testing.
Your Lesson 8 practice activity
For today’s practice, choose one candle-safe fragrance oil.
Prepare a small batch of wax.
Record:
Wax type:
Wax weight:
Fragrance oil:
Recommended fragrance load:
Fragrance percentage used:
Fragrance weight:
Temperature when fragrance was added:
Pouring temperature:
Cure time:
Cold throw after curing:
Hot throw during burn test:
For your first experiment, keep things simple.
Do not add three fragrances, glitter, multiple colours and decorative elements all at once.
Learn how your wax and fragrance behave together first.
Then build complexity gradually.
A simple fragrance test for beginners
If you have enough wax and containers, you can make three very small test candles using the same wax and fragrance.
For example, if permitted by your specific wax:
Candle A – Lower fragrance level
Candle B – Medium fragrance level
Candle C – Higher fragrance level within the manufacturer’s limit
Allow all three to cure for the same amount of time.
Then compare:
Cold throw.
Hot throw.
Flame behaviour.
Melt pool.
Wick performance.
Surface appearance.
You may discover that the candle with the highest fragrance level is not necessarily the best-performing candle.
That is an extremely useful lesson.
What have we learned in Lesson 8?
You now know that fragrance is not simply an ingredient that makes wax smell nice.
It is part of the entire candle formulation.
Choose candle-safe fragrance oils.
Measure fragrance by weight.
Follow your wax manufacturer’s fragrance-load recommendations.
Add fragrance at an appropriate temperature.
Mix thoroughly.
Allow adequate cure time.
Test both cold throw and hot throw.
And remember:
The strongest-smelling fragrance bottle does not automatically create the best candle.
Successful candle making comes from balance.
Wax.
Wick.
Fragrance.
Temperature.
Container.
Testing.
Each part works together.
Next lesson: Lesson 9 – How to prepare candle moulds, jars and containers
In Lesson 9, we will learn how to clean and prepare candle containers, position and secure the wick, choose appropriate jars and moulds, avoid moisture and contamination, and get everything ready before pouring the wax.
Support STM Creator Academy
STM Creator Academy creates free step-by-step courses, beginner-friendly tutorials and creative learning resources. If our lessons have helped you, you can support our work with any contribution you are comfortable with.
For supporters in India
Scan the QR code below or use the UPI ID to contribute any amount.

UPI ID: pallavi.rags-1@okhdfcbank
Pay securely through Razorpay:
Prefer card or another supported payment method? Use our Razorpay support page.
Your support is completely optional and helps us create more free lessons, original tutorial images, practice guides and future creative courses.
Our free course lessons will remain accessible to everyone.