Course: STM Creator Academy Candle Making Course
Colour is one of the easiest ways to transform a simple candle into something beautiful, festive or decorative.
A plain candle can become elegant with soft pastel shades, vibrant with bright colours or luxurious with deep jewel tones.
But adding colour to candles is not the same as adding ordinary paint or food colouring.
Candle wax needs wax-compatible colourants that can blend properly without affecting the way the candle burns.
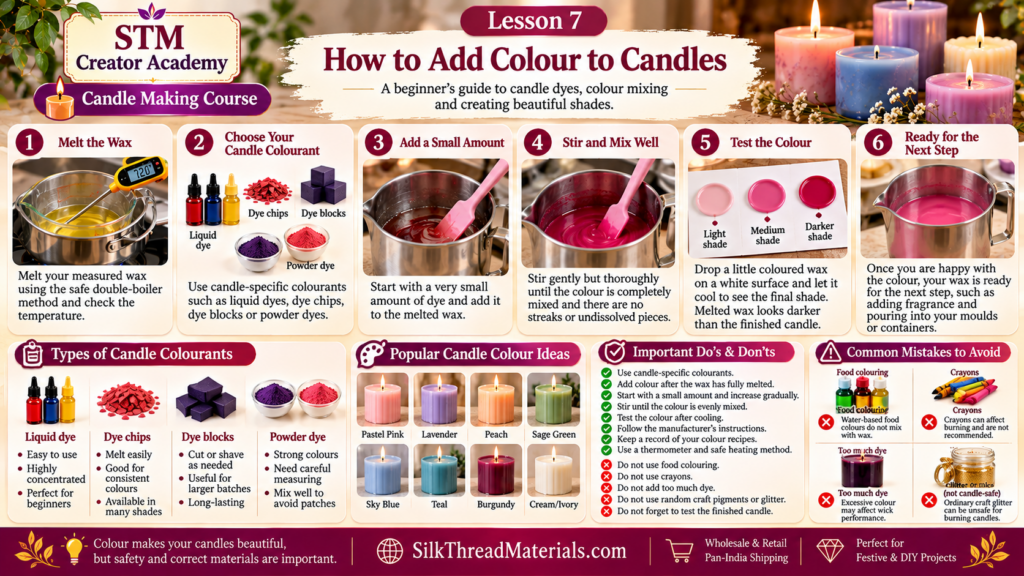
In Lesson 7 of the STM Creator Academy Candle Making Course, you will learn which candle colours to use, when to add them, how much colour to add, how to mix shades and which common mistakes to avoid.
Why should you use candle-specific colourants?
Candle wax is oil-based.
This means that water-based colours such as ordinary food colouring do not mix properly with candle wax.
Instead, candle makers use specially formulated colourants such as:
- Liquid candle dye
- Dye blocks
- Dye chips
- Powdered candle dye
These colourants are designed to dissolve or disperse into melted candle wax.
Using the correct colourant helps produce smoother, more even colour.
Can you use food colouring in candle wax?
No.
Liquid food colouring is generally water-based and does not mix well with wax.
If added to melted wax, it may separate, form droplets or create uneven patches.
This can also affect the finished candle.
For best results, always use colourants specifically designed for candle making.
Can you use crayons to colour candles?
Crayons are sometimes used in beginner DIY experiments, but they are not recommended for proper candle making.
Crayons contain pigments and additives that may clog the wick or interfere with burning.
A candle may look colourful but perform poorly when lit.
If you are learning candle making seriously, use proper candle dye instead.
What types of candle dyes are available?
There are several common forms of candle dye.
Liquid candle dye
Liquid dye is easy to use and especially convenient for beginners.
A very small amount can produce noticeable colour.
It is also useful when you want to mix custom shades.
Because liquid dye can be concentrated, add it slowly.
You can always add more colour.
Removing colour once too much has been added is much harder.
Dye chips
Dye chips are small pieces of concentrated candle colour.
They melt into hot wax and are useful for making consistent batches.
Different manufacturers provide different recommendations for how much dye should be used per quantity of wax.
Dye blocks
Dye blocks are similar to dye chips but are usually larger.
You shave or cut off a small amount and melt it into the wax.
They are useful when making larger quantities of candles.
Powdered candle dye
Powdered dyes can create strong colours but require careful measuring and mixing.
They may be slightly more difficult for beginners compared with liquid dyes or chips.
For your first few candles, liquid dye or dye chips are usually easier.
When should you add colour to candle wax?
Colour is normally added after the wax has completely melted.
The wax should still be warm enough for the dye to dissolve properly.
However, the exact recommended temperature depends on:
- Wax type
- Dye type
- Manufacturer instructions
Always follow the instructions supplied with your wax and candle colourant.
The safest beginner sequence is:
Melt wax → check temperature → add candle dye → mix thoroughly → continue with fragrance and pouring steps according to your recipe.
Step 1: Melt the wax safely
Use the double-boiler method covered in Lesson 6.
Melt your measured wax slowly and monitor the temperature with a thermometer.
Once the wax is completely liquid, remove it from direct heating if appropriate for the wax you are using.
Do not add colour while pieces of solid wax are still floating in the mixture.
Step 2: Start with a very small amount of dye
Candle dyes are often highly concentrated.
Begin with a tiny quantity.
For liquid dye, this may mean only a drop or two when working with a small practice batch.
For dye chips or blocks, use a very small piece.
Mix it into the wax and check the colour before adding more.
It is always easier to darken a candle than to lighten wax that has become too dark.
Step 3: Stir gently but thoroughly
Stir the dye into the melted wax using a clean heat-resistant spoon or silicone spatula.
Do not stir aggressively.
Gentle, consistent mixing is enough.
Continue stirring until there are no visible streaks or pieces of undissolved dye.
Even mixing is especially important if you are making several candles from the same batch.
Otherwise, one candle may appear darker than another.
Step 4: Test the colour before pouring
This is an extremely useful beginner trick.
Melted wax often appears much darker than the finished candle.
To see what the colour may look like after cooling:
Place a small drop of coloured wax onto:
- White paper
- Baking paper
- A ceramic plate
- A cold metal spoon
Allow it to cool.
The cooled sample gives you a better idea of the final candle colour.
If the shade is too light, add a little more dye.
If it looks right, stop adding colour.
Why does candle colour change after cooling?
Hot melted wax is translucent.
When wax cools and solidifies, its appearance changes.
The final colour may become:
- Lighter
- More opaque
- Softer
- Slightly different in tone
This is normal.
That is why experienced candle makers usually test colour on cooled wax rather than judging only the colour inside the pouring pitcher.
How much candle dye should you use?
There is no universal amount that works for every candle.
The quantity depends on:
- Type of wax
- Amount of wax
- Dye concentration
- Desired shade
- Brand of candle dye
One manufacturer’s liquid dye may be much stronger than another.
Always check the supplier’s recommended dosage.
For beginners, use less colour initially.
A soft shade is easier to correct than an excessively dark batch.
Can too much candle dye cause problems?
Yes.
More dye does not always mean a better candle.
Excessive dye may affect:
- Wick performance
- Burning
- Wax appearance
- Colour consistency
Very heavily coloured candles may also require wick testing.
When selling candles, always test the finished candle before assuming that a new colour combination is safe and reliable.
How do you create pastel candles?
Pastel shades are created by using only a small amount of candle dye in lighter-coloured wax.
For example:
A tiny amount of pink dye can create a soft blush candle.
A small amount of purple can create lavender.
A little blue can create pale sky blue.
The key is restraint.
Add colour gradually.
Pastel candles are especially useful for:
- Baby showers
- Weddings
- Home décor
- Gift hampers
- Minimalist candles
How do you create deep or rich candle colours?
Deep colours require more dye than pastels.
However, do not keep adding colour endlessly.
Instead:
Use concentrated candle dye.
Add it gradually.
Test cooled samples.
Follow the manufacturer’s recommended maximum dosage.
Rich colours such as burgundy, navy blue, emerald green or deep purple may require careful testing.
Dark candles can behave differently from lightly coloured versions of the same wax.
How to mix candle colours
You can create custom colours by mixing candle dyes.
Basic combinations include:
Red + Yellow = Orange
Blue + Yellow = Green
Red + Blue = Purple
You can also create more complex shades.
For example:
Pink + Purple = Mauve
Green + Blue = Teal
Red + Small amount of Brown = Burgundy
Yellow + Small amount of Brown = Mustard
Experiment with very small test batches first.
Write down your colour combinations.
This helps you recreate successful shades later.
Why should you keep colour recipes?
Suppose you make a beautiful dusty rose candle.
A customer loves it and later orders six more.
If you did not record how much dye you used, recreating the exact shade may be difficult.
Good candle makers maintain basic records.
Write down:
- Wax type
- Wax quantity
- Dye brand
- Dye colour
- Amount used
- Final result
This turns experimentation into a repeatable process.
Can you use mica powder in candles?
Mica powders are visually attractive, especially because they can create shimmer.
However, mica does not dissolve into wax like candle dye.
It remains suspended as tiny particles.
Too much mica may interfere with wick performance.
For this reason, mica is often better suited for decorative wax applications or wax melts rather than heavily colouring a burning candle.
If using mica in a candle, use only products designed for candle applications and test the finished candle carefully.
Do not assume that every craft mica is appropriate for candle making.
Can you add glitter to candle wax?
Ordinary craft glitter should not be mixed into candles that will be burned.
Some glitters can create fire hazards or interfere with the wick.
If you want decorative sparkle, use candle-safe materials specifically intended for the application.
Never sprinkle ordinary glitter near the wick or flame area.
Decorative appearance should never come before candle safety.
Do coloured candles need different wicks?
Sometimes.
Adding small amounts of candle dye may not significantly change wick requirements.
However, heavily coloured candles, fragrance combinations and other additives may change how the candle burns.
This is why wick testing is important.
Whenever you significantly change your candle recipe, perform a burn test.
A recipe should be treated as a complete system:
Wax + wick + fragrance + colour + container
Changing one component can influence the others.
Common beginner mistakes when colouring candles
Adding too much dye at once
Beginners often want a strong colour immediately.
Instead, add colour slowly.
Judging colour only while wax is hot
Melted wax often appears darker.
Always test a cooled sample.
Using food colouring
Water-based food colours do not mix properly with candle wax.
Using crayons
Crayons can affect wick performance.
Using random craft pigments
Not every pigment is suitable for burning candles.
Forgetting to write down the formula
If you create the perfect colour but do not record the quantities, reproducing it later becomes difficult.
Easy beginner candle colour combinations
Here are a few combinations you can experiment with.
Rose pink
Use a tiny amount of red or pink dye.
Lavender
Add a very small amount of purple dye.
Peach
Mix a little pink with a small amount of yellow or orange.
Sage green
Use a small amount of green with a very tiny amount of brown.
Teal
Mix blue and green.
Burgundy
Start with red and slowly add a small amount of brown or deep purple.
Cream
Many natural waxes already have a soft ivory or cream shade and may not need additional colour.
Remember that the final shade will depend on your base wax.
Your Lesson 7 practice activity
Today, create a simple colour test.
Melt a small amount of wax using the safe method from Lesson 6.
Divide it into three small heat-safe containers.
Create:
Sample 1 – Light shade
Sample 2 – Medium shade
Sample 3 – Darker shade
Use the same candle dye in all three samples but gradually increase the amount.
Allow them to cool.
Compare the results.
Record:
Wax type:
Dye type:
Colour:
Amount used:
Final shade after cooling:
Which sample did you prefer?
This simple exercise will teach you more about candle colour than simply reading instructions.
What have we learned in Lesson 7?
You now know:
- Use candle-specific dyes.
- Do not use food colouring.
- Avoid crayons for proper candle making.
- Add colour after the wax has melted.
- Start with a small amount.
- Mix thoroughly.
- Test the colour after cooling.
- Record successful colour formulas.
- Avoid excessive pigments and unsafe decorative materials.
Colour is one of the most enjoyable parts of candle making.
Once you become comfortable with it, you can begin creating your own signature palettes for seasons, festivals, gifts and home décor.
And in the next lesson, we will add another important element:
fragrance.
Next lesson: Lesson 8 – How to add fragrance to candles
We will learn how fragrance oils are measured, when they should be added, why fragrance load matters and why adding too much perfume does not automatically create a stronger candle.
Support STM Creator Academy
STM Creator Academy creates free step-by-step courses, beginner-friendly tutorials and creative learning resources. If our lessons have helped you, you can support our work with any contribution you are comfortable with.
For supporters in India
Scan the QR code below or use the UPI ID to contribute any amount.

UPI ID: pallavi.rags-1@okhdfcbank
Pay securely through Razorpay:
Prefer card or another supported payment method? Use our Razorpay support page.
Your support is completely optional and helps us create more free lessons, original tutorial images, practice guides and future creative courses.
Our free course lessons will remain accessible to everyone.