Learn how to create mandala wall art with grids, layers, colours, borders, highlights, framing tips and handmade décor ideas.
Course: Mandala Art Academy
Module 5: Advanced Mandala Projects
Lesson 35 of 40
Skill level: Intermediate to advanced
Practice time: 60 to 120 minutes
Welcome to Lesson 35
Welcome back to the Mandala Art Academy. In the previous lesson, you learned how to create handmade mandala greeting cards using corner mandalas, half mandalas, colours, messages and finishing details. In this lesson, we will create a bigger and more display-worthy project: a mandala wall art piece.
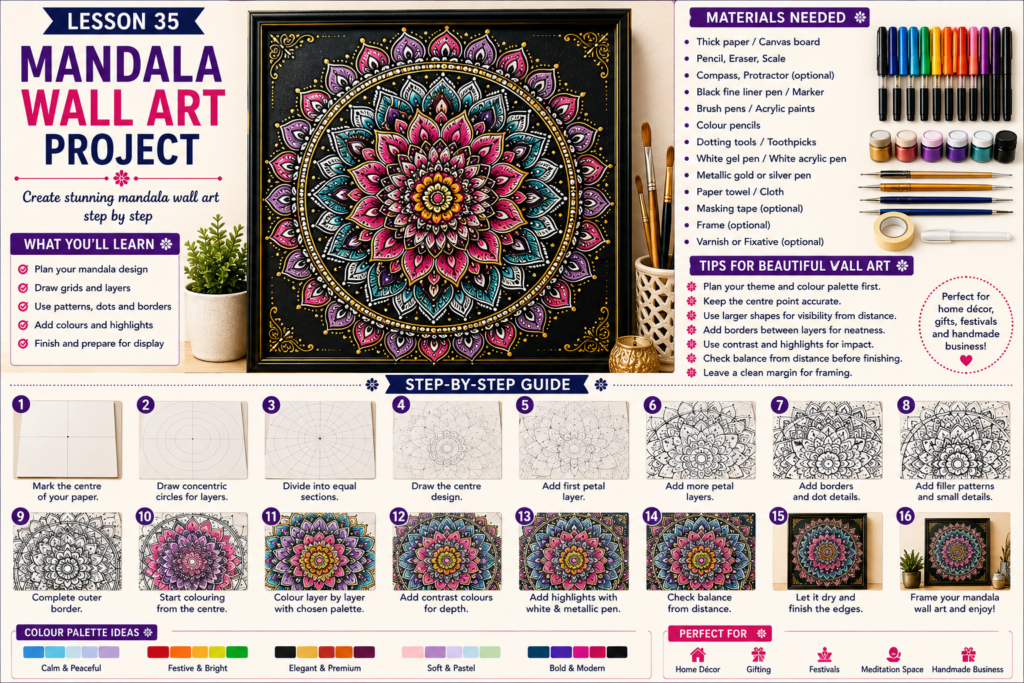
Mandala wall art is one of the most beautiful ways to use your mandala skills. It can be framed, gifted, used for home décor, placed in a meditation corner, added to festive decoration or even sold as handmade artwork. This project combines everything you have learned so far, including grids, layers, petals, borders, colours, dots, highlights and finishing.
By the end of this lesson, you will understand how to plan, draw, colour and finish a mandala wall art project that looks balanced, neat and ready for display.
What is mandala wall art?
Mandala wall art is a finished mandala artwork created on paper, canvas, board or another surface for display. Unlike practice mandalas, wall art needs stronger planning because it will be viewed from a distance.
The design should have a clear centre, balanced layers, strong borders, clean colours and enough contrast. Small details are beautiful, but the overall shape and impact matter more in wall art.
Mandala wall art can be simple, colourful, metallic, floral, geometric, spiritual, modern, festive or minimalist depending on your theme.
Why wall art projects are important
Wall art projects help you move from practice to finished artwork. When you create a wall art piece, you learn how to think like an artist and product creator.
You need to ask yourself:
Where will this artwork be displayed?
What mood should it create?
Which colours will suit the space?
How large should the design be?
Should it be framed, mounted or gifted?
Will it look good from both near and far?
These questions help you create mandalas that are not only beautiful but also useful and meaningful.
Materials needed
For this lesson, you will need:
Thick drawing paper, canvas board or handmade paper
Pencil and eraser
Compass or large circular objects
Scale or ruler
Protractor
Black fine-liner pen or marker
Brush pens, acrylic paints or colour pencils
Dotting tools or toothpicks
Metallic gold or silver pen
White gel pen or white acrylic pen
Paper towel or cloth
Optional frame
Optional varnish or fixative
Optional masking tape
Optional backing board
Choose a surface that feels strong and display-worthy. For beginners, thick A4 or A3 paper is a good choice. For a premium look, use canvas board or handmade paper.
Step 1: Choose the wall art size
Before drawing, decide the size of your artwork. Small wall art can be made on A4 paper. Medium wall art can be made on A3 paper. Large wall art can be made on canvas or poster-size sheet.
If this is your first wall art project, start with A4 or A3. A larger surface gives you more freedom, but it also needs more time and patience.
Make sure your design size matches your surface. Leave enough margin around the mandala if you plan to frame it.
Step 2: Decide the theme
A wall art mandala should have a theme. The theme will guide your colours, patterns and final mood.
You can choose:
Calm meditation mandala
Festive mandala
Floral wall mandala
Lotus mandala
Black and gold mandala
Rainbow mandala
Pastel mandala
Boho-style mandala
Geometric mandala
Traditional Indian-style mandala
For your first wall art project, choose one clear theme instead of mixing too many styles.
Step 3: Select a colour palette
Wall art looks more professional when the colours are planned before drawing. Choose three to six colours depending on your theme.
For a calm mandala, use blue, green, lavender and white.
For a festive mandala, use red, yellow, orange, green and gold.
For a premium mandala, use black, white, gold and maroon.
For a soft mandala, use pastel pink, peach, mint and lavender.
For a bold mandala, use dark blue, purple, magenta and metallic highlights.
Do not use too many unrelated colours. A planned palette makes the artwork look intentional.
Step 4: Prepare the surface
Place your paper or canvas on a flat surface. If you are using paper, you can tape the edges with masking tape to keep it steady and create a clean border.
If you are using canvas, make sure it is clean and dry. If needed, apply a base colour and allow it to dry fully before drawing.
Wall art needs neat finishing, so begin with a clean surface.
Step 5: Mark the centre
Find the centre of your surface carefully. Use a ruler to measure the height and width, then mark the centre point lightly with a pencil.
This step is very important. If the centre is not correct, the mandala may look slightly tilted when framed or displayed.
For square paper or canvas, you can draw very light diagonal lines from corner to corner to locate the centre.
Step 6: Draw the mandala grid
Using a compass, draw multiple circles from the centre. For wall art, draw 7 to 10 circles so you have enough layers to create depth.
Keep the circles evenly spaced, but not all spaces need to be the same size. You can make some rings wider for large petals and some rings thinner for borders.
Next, divide the mandala into equal sections. Use 12 or 16 sections for a detailed wall art look. Beginners can use 8 sections if they want a simpler design.
Step 7: Plan the layer structure
Before adding details, decide what each layer will contain. A good wall art mandala usually has a strong structure.
You can plan like this:
Centre flower
Small petal layer
Dot border
Large lotus petal layer
Leaf layer
Geometric border
Zentangle-inspired detail layer
Outer petal layer
Bold decorative border
Planning helps you avoid confusion while drawing.
Step 8: Create a clean centre
Start drawing from the centre. Use a small flower, spiral, dot circle, lotus centre or geometric star.
The centre should be neat and balanced because it becomes the focus of the entire artwork. Do not make it too crowded. A clean centre gives the wall art a peaceful look.
Trace the centre slowly with a fine-liner pen once you are happy with the pencil sketch.
Step 9: Build the first few layers
Around the centre, add small petals, dots, scallops or simple borders. These first layers should be neat and controlled.
Use repeated shapes so the mandala feels balanced. If you choose rounded petals, repeat rounded petals all around. If you choose pointed petals, keep the rhythm consistent.
The inner layers should guide the eye outward.
Step 10: Add strong middle layers
The middle layers are very important in wall art because they create the main visual impact. Use larger shapes here.
You can add:
Large lotus petals
Bold leaves
Paisley shapes
Diamond patterns
Arches
Sunburst rays
Floral layers
Geometric shapes
Keep the middle layers clear enough to be visible from a distance. Wall art should not depend only on tiny details.
Step 11: Add separating borders
After large pattern layers, add thin separating borders. These borders help the design stay organised.
Use dot borders, double lines, tiny scallops, bead borders, small triangles or thin metallic lines.
Separating borders are useful because they prevent the mandala from looking crowded and give each layer its own space.
Step 12: Add detailed filler patterns
Once the main layers are complete, add fillers inside selected areas. You can use tiny lines, dots, waves, leaves, curls, spirals or Zentangle-inspired patterns.
Do not fill every layer heavily. Choose only a few areas for dense details. Other areas should remain simple so the artwork has balance.
A professional wall art mandala has both detail and breathing space.
Step 13: Create contrast
Contrast makes wall art more powerful. You can create contrast through colour, line weight, pattern size and empty space.
Use thick outlines for important layers and thin lines for small details. Use darker colours in selected rings and lighter colours in others. Add metallic highlights only where they will stand out.
Contrast helps your mandala look beautiful from a distance and interesting when viewed closely.
Step 14: Design the outer border
The outer border completes the wall art. It should be strong, neat and decorative.
You can use:
Large petals
Scallop border
Lotus border
Triangle border
Leaf border
Sunburst border
Dot border
Geometric frame
Do not take the design too close to the paper edge if you plan to frame it. Leave enough margin so the border is not hidden inside the frame.
Step 15: Colour the artwork
Start colouring only after the outline is complete and the ink is dry. Colour from the centre outward so your hand does not smudge finished areas.
Use your planned colour palette. Repeat the same colours in different layers to create harmony.
Do not colour every tiny detail differently. That can make the mandala look messy. Instead, use colour repetition to make the design look balanced.
Step 16: Add highlights
After colouring, add highlights using a white gel pen, metallic pen, gold paint, silver paint or small dots.
Highlights can be added to:
Petal tips
Dot borders
Centre circle
Outer border
Leaf veins
Small empty spaces
Important pattern edges
Use highlights carefully. A few well-placed highlights look more premium than too much shine everywhere.
Step 17: Check balance from a distance
This step is very important for wall art. Place your artwork a little far away and look at it from a distance.
Ask yourself:
Is the centre clear?
Are the layers balanced?
Is one side looking too heavy?
Are the colours repeated well?
Is the outer border strong enough?
Does the artwork look good from far away?
If needed, add small dots, lines or highlights to balance the design.
Step 18: Finish and protect the artwork
Once the artwork is complete, let it dry fully. Erase any visible pencil marks carefully.
If you used paints, let the artwork dry for several hours. If you used colour pencils or pens, check that there is no smudging.
You can frame the artwork, mount it on a board, or apply a suitable fixative or varnish if the surface and colours allow it. Always test sealants before using them on the final artwork.
Simple wall art design idea
Try this beginner-friendly wall art plan:
White background
Black outline
Centre flower
Pink and purple petal layers
Dot borders
Leaf layer
Gold highlights
Bold outer lotus border
Clean white margin for framing
This design is easy but looks elegant and display-ready.
Festive wall art idea
For a festive mandala, use red, orange, yellow, green and gold.
Create a lotus centre, add bright petal layers, use dot borders and finish with a bold golden outer border. This style works well for Diwali décor, puja room décor, festive gifting and handmade wall frames.
Calm wall art idea
For a calm mandala, use blue, teal, lavender and white.
Use soft petals, leaf patterns, gentle dots and open spaces. This style is perfect for meditation corners, study spaces, bedrooms and peaceful décor.
Beginner practice project
Create one A4-size wall art mandala with seven layers.
Use:
One centre flower
Two petal layers
Two dot borders
One leaf layer
One bold outer border
Three to four colours
Frame or photograph the finished artwork after drying.
Intermediate practice project
Create one A3-size mandala wall art with at least nine layers.
Use a planned colour palette, one detailed filler layer, one geometric layer, one floral layer, one highlight layer and a strong outer border.
This project will help you practise patience, planning and professional finishing.
Common mistakes to avoid
Do not start without choosing a theme.
Do not place the centre incorrectly.
Do not make every layer equally heavy.
Do not use too many colours.
Do not ignore the outer border.
Do not forget to check the artwork from a distance.
Do not frame the artwork before it is fully dry.
Do not overfill the design until there is no breathing space.
Professional tips
Plan the full design before inking.
Use larger shapes for wall art visibility.
Keep a clean margin if framing.
Use repeated colours for harmony.
Use thick and thin lines for depth.
Use metallic highlights only in selected areas.
Check balance from far away before finishing.
Sign your artwork neatly at the back or bottom corner.
Handmade selling idea
Mandala wall art can become a beautiful handmade product. You can sell framed mandalas, canvas mandalas, festive wall art, meditation mandalas, custom name mandalas or colour-theme mandalas.
If selling, mention the size, surface, colours, frame availability, handmade nature and care instructions. Take clear photos in natural light with simple backgrounds.
You can also offer customisation for room colours, festival themes or gifting occasions.
Care instructions for mandala wall art
Keep away from water and moisture.
Avoid direct sunlight for long periods.
Do not bend paper artwork.
Frame paper mandalas for protection.
Dust framed artwork gently.
Avoid scratching painted or metallic areas.
Creative challenge
Create one mandala wall art piece for your room, work desk area or puja corner. Choose a theme that matches the space.
After finishing, give your artwork a title. For example:
Blooming Peace
Golden Lotus
Circle of Calm
Festive Harmony
Petals of Light
Creative Energy
Naming your artwork helps you connect emotionally with your creation.
Homework
Create one complete wall art plan before making the final artwork.
Write down:
Surface size
Theme
Colour palette
Number of layers
Main patterns
Outer border style
Finishing method
Then create your final wall art using this plan.
Key takeaways
Mandala wall art needs planning, theme and colour balance.
The centre, middle layers and outer border should be clearly structured.
Large patterns are important because wall art is viewed from a distance.
Separating borders keep detailed artwork neat.
Contrast and highlights make the design look professional.
A clean margin and proper finishing make wall art display-ready.
Lesson summary
In this lesson, you learned how to create a mandala wall art project using surface preparation, centre marking, grid drawing, theme planning, colour selection, layers, borders, fillers, highlights and finishing techniques. You also learned how to check balance from a distance and prepare your artwork for framing, gifting or selling.
Mandala wall art is an important advanced project because it brings together many skills from the Mandala Art Academy and turns them into a finished handmade artwork.
Previous lesson: Lesson 34: Mandala greeting card project
Next lesson: Lesson 36: How to sell mandala artwork from home
Support the free Mandala Art Academy
Learning mandala art with us? The Mandala Art Academy is completely free, and every contribution helps us create more step-by-step lessons, practice guides and original tutorial images.
Even a small contribution helps us continue the next lesson.
For supporters in India
Scan the QR code below or use the UPI ID to contribute any amount you are comfortable with.

UPI ID: pallavi.rags-1@okhdfcbank
Pay securely through Razorpay
Prefer to pay by card or another supported online payment method? Use our secure Razorpay page below. Indian and international cards are accepted.
Support Mandala Art Academy and help create the next free lesson
Your support is entirely optional. Every Mandala Art Academy lesson will remain free for everyone.
Thank you for learning with us and helping us create the next lesson. ❤️