Learn how to draw beautiful mandala leaf patterns step by step. Practise pointed, rounded, curved and decorative leaves with this beginner-friendly lesson.
Course: STM Creator Academy – Mandala Art Academy
Module: 2 – Basic Mandala Patterns
Lesson: 7 of 40
Estimated reading time: 20–25 minutes
Skill level: Beginner
Welcome back!
In Lesson 6, you learned how to draw basic mandala petals and use them to build simple floral patterns. You are now ready to add another versatile design element to your mandala toolkit: leaf patterns.
Leaves can make a mandala look delicate, natural, traditional or highly decorative depending on their shape and placement. A simple leaf outline can also be transformed into dozens of different patterns by adding lines, dots, curves and smaller shapes inside it.
In this lesson, you will learn how to draw several beginner-friendly leaf styles, position them evenly on a mandala grid and combine them with the petal patterns you already know.
What will you learn in this lesson?
By the end of Lesson 7, you should be able to draw basic pointed leaves, rounded leaves, double-lined leaves and curved vine-style leaves. You will also learn how to repeat leaf patterns evenly, decorate the interiors and combine leaves with petals without making your mandala feel crowded.
Why are leaf patterns so useful in mandala art?
Leaf shapes appear in many traditional and modern forms of decorative art. They can be seen in rangoli designs, mehndi patterns, textile motifs, floral borders, temple artwork and nature-inspired illustrations.
In mandala art, leaves are especially useful because they fit naturally between petals. They can fill empty spaces, form complete circular rings or create outward-flowing patterns that make the design appear larger.
Leaves are also beginner-friendly because they are made using only two curved lines. Once you understand that basic construction, you can create many variations without learning an entirely new shape.
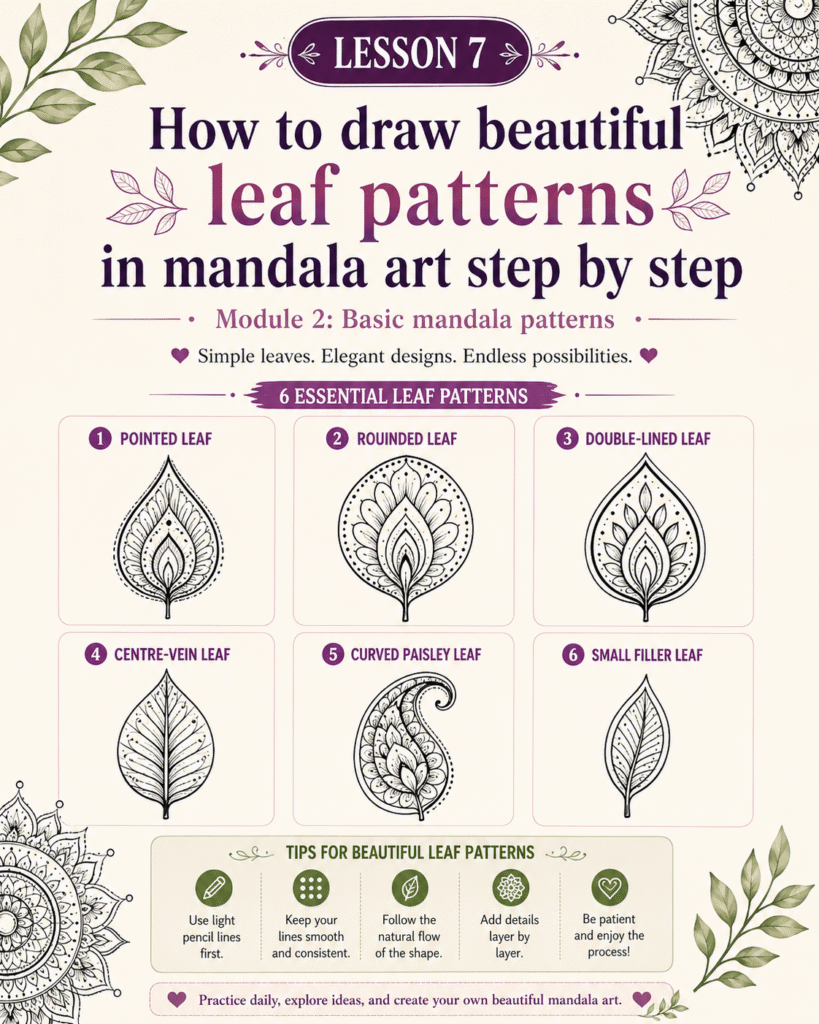
Leaf style 1: The simple pointed leaf
Begin by marking two points along one section of your mandala grid. The lower point will become the base of the leaf, while the upper point will become its tip.
Draw one curved line from the base to the tip. Draw a second curved line back from the tip to the base. The two lines should meet cleanly at both ends.
Your finished shape should resemble a narrow natural leaf. Repeat the same leaf in every section of the ring before adding any interior details.
Try to keep the height, width and angle of each leaf consistent. Small differences are completely normal, particularly during your first few practice sessions.
Leaf style 2: The rounded leaf
A rounded leaf has a softer and fuller appearance than a pointed leaf. Begin with the same two points, but allow the curved sides to spread farther outward.
Create a gently rounded body before bringing both lines together at the tip. Avoid making the tip extremely sharp.
Rounded leaves work beautifully in floral mandalas because they soften the appearance of pointed lotus petals and geometric lines.
They can also be used around the outer ring of a mandala to create a wreath-like effect.
Leaf style 3: The double-lined leaf
Draw a simple pointed or rounded leaf first. Inside that outline, add a smaller leaf following the same curve.
Leave an even space between the outer and inner outlines.
This small addition immediately gives the pattern more depth. You can leave the inner leaf blank or decorate it with dots, fine lines or a contrasting shaded section.
Double-lined leaves are ideal when you want your design to look more detailed without adding difficult patterns.
Leaf style 4: The centre-vein leaf
Draw your basic leaf outline and then add one straight or gently curved line from the base to the tip. This becomes the central vein.
Next, draw smaller diagonal lines extending from the centre vein toward both sides of the leaf.
Keep the lines evenly spaced and repeat the same decoration inside every leaf.
This pattern closely resembles the natural structure of a leaf and gives your mandala an organic appearance.
Leaf style 5: The curved paisley-style leaf
Start at the base and draw a long curve that bends slightly to one side before reaching the tip. Draw the second side of the leaf using a similar curve.
Instead of standing straight, the leaf should appear to lean or flow in one direction.
Repeat the same directional curve around the circle. When all the leaves lean consistently, they create a sense of movement and rotation.
This design works particularly well in outer rings and decorative borders.
Leaf style 6: The small filler leaf
Filler leaves are smaller shapes used between larger petals or patterns. Begin with a tiny pointed leaf and keep the interior simple.
You can place one filler leaf between two petals, arrange three small leaves as a cluster or alternate leaves and dots around a ring.
These small motifs help occupy empty areas without overwhelming the main design.
Use filler patterns carefully. Empty space is also an important part of mandala art, so you do not need to fill every available gap.
How can you decorate your mandala leaves?
Once the leaf outlines are complete, you can add simple interior decorations. Fine parallel lines create texture, while small dots add a softer ornamental effect. A central vein gives the leaf a natural appearance, and a smaller teardrop inside creates a layered look.
You can also shade one side of each leaf, fill alternate leaves with black ink or add tiny circles near the base.
Whatever decoration you choose, repeat it consistently around the ring. Consistency is what turns a group of separate leaves into one balanced mandala pattern.
How should leaves be placed on a mandala grid?
Leaves can point outward, inward or sideways.
Outward-facing leaves make the mandala appear to expand from its centre. Inward-facing leaves draw attention toward the centre. Side-facing leaves create movement and can make the design appear to rotate.
Before drawing the entire ring, sketch one sample leaf lightly in pencil. Observe how it fits within the section and check whether neighbouring leaves have enough space.
Once you are satisfied, repeat the pattern around the circle.
How can you combine leaves with mandala petals?
Leaves and petals naturally complement each other. One easy beginner combination is to draw a ring of rounded petals followed by a ring of pointed leaves.
You can also place one small leaf between every two petals or draw two outward-facing leaves behind each large lotus petal.
Another attractive option is to alternate one petal and one leaf around the same ring. This creates visual variety while maintaining symmetry.
Avoid using too many different shapes at once. Choose one petal style and one leaf style for your first combined design.
How do you maintain symmetry while drawing leaf patterns?
Complete one stage across the entire ring before moving on to the next stage.
First, draw all leaf outlines. Next, add all central veins. Then add the smaller decorative lines or dots.
Do not complete one highly detailed leaf and then attempt to copy it around the circle from memory. Working in stages makes repetition easier and reduces inconsistencies.
Rotate your paper after drawing each leaf so that your hand remains in a comfortable position. This is much easier than bending your wrist at awkward angles.
Common mistakes beginners make while drawing leaves
One common mistake is making every leaf lean in a different direction. Decide the direction before beginning and use the grid lines as a guide.
Another problem is creating uneven widths. Lightly mark the widest part of each leaf if you need help maintaining consistency.
Beginners may also add too many interior details, making small leaves appear crowded. Simple decoration is usually more effective.
Some artists rush through the final few leaves and make them noticeably different from the first ones. Take a short break if your hand becomes tired rather than finishing the ring hurriedly.
Practice exercise
Take a practice grid and divide it into several rings.
In the first ring, draw simple pointed leaves. In the second ring, draw rounded leaves. In the third ring, create double-lined leaves. In the fourth ring, use curved leaves that lean in the same direction.
Add one simple interior detail to every ring. This exercise will help you understand how small changes in shape and decoration can create very different results.
Creative challenge
Create a small nature-inspired mandala using only petals, leaves, dots and curved lines.
Begin with a simple flower at the centre. Surround it with one ring of pointed leaves and another ring of rounded petals. Finish the design with a border of small filler leaves and dots.
Keep the artwork simple and concentrate on repetition, spacing and balance.
Pro tips from STM Creator Academy
Draw the outline lightly in pencil before using your fineliner. Maintain the same direction throughout each ring. Complete outlines first and decorations later. Use smaller leaves to fill spaces between large patterns, but allow some blank space to remain.
Natural leaves are not perfectly identical, so do not become discouraged by tiny variations. Your goal is to create visual harmony rather than machine-made precision.
Homework
Create a practice mandala using at least three different leaf styles from this lesson.
Include one ring of pointed leaves, one ring of rounded or double-lined leaves and one set of small filler leaves. Decorate each ring differently while maintaining consistency within that ring.
Photograph your completed artwork and share it with STM Creator Academy.
Email: pallavi.rags@gmail.com
Instagram: @jewellerymakingmaterials
Hashtag: #STMCreatorAcademy
Key takeaways
Leaf patterns are versatile elements that can be used as main motifs, borders or fillers. A basic leaf is created using two curved lines meeting at the base and tip. Changes in width, direction and interior decoration can produce many different leaf styles.
Repeating the same pattern evenly creates harmony. Combining leaves with simple petals helps beginners build more attractive floral mandalas without introducing excessive complexity.
Lesson summary
In this lesson, you learned how to draw pointed, rounded, double-lined, centre-vein, curved and filler leaves. You also learned how to place them on a mandala grid, decorate them consistently and combine them with petals.
You now have two of the most important pattern families in mandala art: petals and leaves. In the next lesson, you will learn how to use dots to create texture, borders, highlights and decorative rhythm.
Previous lesson
← Lesson 6: Drawing basic mandala petals step by step for beginners
🏠 Back to Mandala Art Academy
Next lesson
➡ Lesson 8: Easy dot patterns anyone can draw in mandala art