Learn how to colour mandalas with colour pencils using light pressure, layering, blending, gradients and soft shading in Lesson 24.
Course: Mandala Art Academy
Module: Colouring Techniques
Lesson: 24
Skill level: Beginner to intermediate
Practice time: 45 to 70 minutes
Welcome to Lesson 24
In Lesson 23, you learnt how to colour mandalas with brush pens using smooth strokes, bright colours, gradients and blending techniques. Brush pens create bold and vibrant effects, but colour pencils offer something different.
Colour pencils are softer, slower and easier to control. They are perfect for beginners who want to practise shading, layering, blending and delicate colouring without worrying too much about ink bleeding or smudging.
In this lesson, you will learn how to colour mandalas with colour pencils step by step. You will understand how to apply light pressure, build colour gradually, create smooth shading and use different pencil shades to add depth to your mandala artwork.
Why use colour pencils for mandala art?
Colour pencils are one of the most beginner-friendly tools for colouring mandalas.
They allow you to colour small spaces neatly, control light and dark areas and correct small mistakes more easily than markers or brush pens.
Colour pencils are also excellent for soft floral mandalas, pastel mandalas, calm designs, greeting cards, bookmarks and detailed artworks.
Unlike brush pens, colour pencils do not usually bleed through paper. This makes them useful for sketchbooks, practice sheets and thinner drawing pages.
What will you learn in this lesson?
By the end of Lesson 24, you will understand how to hold colour pencils, control pressure, layer colours, create gradients, blend shades and colour small mandala details neatly.
You will also learn how to choose paper, sharpen pencils properly, avoid patchy colouring and use light and dark shades to make your mandala look more polished.
The practice exercise will guide you through colouring a simple mandala using three to five colour pencils.
Materials needed
Use a completed black-and-white mandala outline from any earlier lesson.
You will need colour pencils, a sharpener, an eraser, scrap paper and a clean sheet to place under your hand while colouring.
A smooth paper surface works best. Very rough paper may make the colour look grainy, while very glossy paper may not hold the pencil colour well.
You can use normal school colour pencils, artist colour pencils or watercolour pencils in dry form.
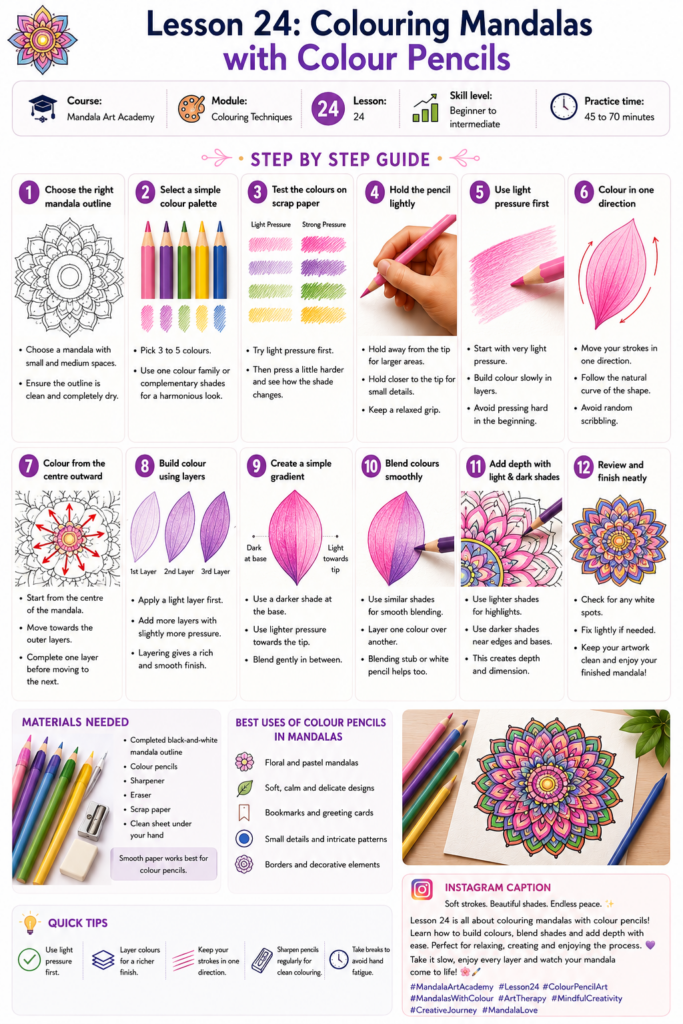
Step 1: Choose the right mandala outline
For colour pencil practice, choose a mandala that has both small and medium-sized spaces.
A floral mandala, lotus mandala or decorative border mandala works well.
Avoid very tiny details in your first colour pencil attempt because it may take too long and feel tiring.
Make sure the outline is clean and fully dry if you have used ink.
Colour pencils work beautifully with black fineliner mandala outlines because the soft colours contrast nicely with the dark lines.
Step 2: Select a simple colour palette
Choose three to five colours before you begin.
For example, you may choose pink, purple, green, yellow and blue.
A smaller palette helps your mandala look organised.
You can also choose one colour family, such as light pink, dark pink, magenta and purple.
Colour pencils are good for layering, so you do not need too many colours. You can create new effects by using light pressure, dark pressure and overlapping shades.
Step 3: Test the colours on scrap paper
Before colouring the mandala, test each pencil on scrap paper.
Try colouring lightly first.
Then press a little harder and observe how the shade changes.
Some pencils look pale with light pressure and much brighter with stronger pressure.
Testing helps you understand how each pencil behaves before using it on the final artwork.
Step 4: Hold the pencil lightly
Do not hold the colour pencil too tightly.
A relaxed grip gives smoother colour.
Hold the pencil slightly away from the tip when filling larger areas. This helps you colour lightly and evenly.
For small details, hold the pencil closer to the tip for better control.
Avoid pressing hard in the beginning. It is better to build colour slowly in layers.
Step 5: Use light pressure first
Begin colouring with very light pressure.
Move the pencil gently across the paper.
Do not try to make the colour dark immediately.
Light colouring gives you more control and allows you to add more layers later.
If you press hard from the beginning, the paper surface may become shiny and it will be difficult to add more colour on top.
Step 6: Colour in one direction
For smooth colouring, move your pencil strokes in one direction.
You can colour from left to right, top to bottom or follow the shape of the petal.
Avoid scribbling randomly because it can make the section look patchy.
For curved petals and leaves, follow the natural curve of the shape.
This makes the colouring look softer and more professional.
Step 7: Colour from the centre outward
Start colouring from the centre of the mandala.
Move slowly towards the outer layers.
This method helps you stay organised and follow the colour pattern properly.
It also prevents you from accidentally forgetting the colour sequence.
Colour one complete layer before moving to the next.
Step 8: Build colour using layers
Colour pencils look best when the colour is built in layers.
Apply one light layer first.
Then add another layer on top using the same colour.
If you want a darker shade, add a third layer with slightly more pressure.
Layering creates a smoother and richer look than pressing hard in one attempt.
This technique is especially useful for petals, leaves and borders.
Step 9: Create a simple gradient
Choose one petal shape.
Colour the base of the petal with a darker shade.
Use lighter pressure as you move towards the tip.
The colour should slowly fade from dark to light.
You can also use two pencils. Apply dark pink at the base and light pink towards the tip.
Gently overlap both colours in the middle.
This creates a soft gradient effect.
Step 10: Blend two colours
To blend two colours, choose shades that work well together.
For example, use yellow and orange, pink and purple, blue and teal or green and yellow.
Apply the lighter colour first.
Then add the darker colour near the edge, base or centre.
Use light strokes to overlap the two colours where they meet.
Do not press too hard while blending. Soft layers create smoother transitions.
Step 11: Add shading for depth
Shading helps your mandala look less flat.
Add darker colour near the base of petals, inside borders or around the centre circle.
Keep the darkest areas small.
Repeat the same shading in all matching sections.
For example, if you shade the base of one petal, shade the base of every similar petal in the same way.
This keeps the mandala balanced.
Step 12: Use white or light colours for highlights
If you have a white colour pencil, you can use it to soften colours and create highlights.
Light colours such as cream, pale yellow or light pink can also help blend darker colours gently.
Use highlights near the tips of petals, centres of flowers or open spaces in borders.
Do not overuse highlights. Small bright areas can make the mandala look delicate and fresh.
Step 13: Colour small details carefully
Colour pencils are very useful for small mandala details.
Keep the pencil sharp when colouring tiny dots, leaves, petals and borders.
Use the tip gently and avoid pressing too hard.
If a space is extremely small, leave it white or colour it with a very light shade.
Small details should remain clean and readable.
Step 14: Use darker outlines if needed
After colouring, some outlines may look lighter because the pencil colour has covered them slightly.
You can carefully redraw important lines with a black fineliner after the colouring is complete.
Make sure the pencil surface is not too waxy before doing this.
Use the fineliner only where needed, such as around the centre, main petals or outer border.
This step can make the finished mandala look sharper.
Step 15: Keep your hand clean while colouring
Colour pencils can leave light dust or colour residue on the paper.
Place a clean sheet of paper under your hand while colouring.
This prevents smudging and keeps the mandala neat.
Avoid rubbing your palm over coloured areas.
If there are pencil crumbs on the page, gently blow them away or tap the paper lightly. Do not wipe them with your hand.
How can you avoid patchy colouring?
Use light pressure.
Colour in one direction.
Build colour slowly in layers.
Keep your pencil sharp for small areas and slightly blunt for larger areas.
Avoid pressing hard in random spots.
If a section looks patchy, gently add another light layer over the whole area to even it out.
Patience is the key to smooth colour pencil mandalas.
How can you make colours look brighter?
To make colours brighter, add more layers slowly.
Use good-quality pencils if available.
Choose smooth paper that holds colour well.
Use a lighter shade first and then build with a deeper shade.
You can also use contrast. A bright yellow looks stronger when placed near purple, blue or dark orange.
Do not press too hard too early because that can make the paper shiny and stop more colour from sticking.
How can you choose colour pencil palettes?
For a soft floral mandala, use pink, peach, lavender and light green.
For a nature mandala, use green, brown, yellow and cream.
For a festive mandala, use red, orange, yellow, green and gold pencil if available.
For a calm mandala, use blue, teal, mint and purple.
For a royal mandala, use purple, magenta, deep blue and gold.
For beginners, a light, medium and dark shade from the same colour family is the easiest palette to control.
Beginner practice exercise
Choose a simple mandala outline.
Select three colour pencils.
Use the lightest colour for the centre and inner details.
Use the medium colour for the main petals.
Use the darkest colour for the outer border.
Add one light layer first, then add a second layer to make selected areas darker.
Leave some small sections white.
This exercise helps you practise pressure control and simple colour balance.
Intermediate practice exercise
Choose five colour pencils.
Use one main colour for the largest petals.
Use one supporting colour for the smaller petals.
Use green or another calm shade for leaves or fillers.
Use a darker shade for shadows near petal bases.
Use a light shade for highlights.
Create a gradient in every large petal.
Repeat the same shading style around the complete mandala.
This exercise will help you practise layering, blending and symmetry.
Common mistakes to avoid when using colour pencils
Avoid pressing hard from the beginning.
Do not colour randomly in different directions.
Avoid using too many colours without a plan.
Do not leave pencil strokes uneven in large spaces.
Avoid using a blunt pencil for tiny details.
Do not rub pencil dust with your hand.
Avoid rushing the colouring process.
Colour pencil mandalas look best when they are built slowly and gently.
How can you make colour pencil mandalas look professional?
Use a limited colour palette.
Apply colour in light layers.
Repeat colours symmetrically.
Use darker shades only where depth is needed.
Keep some areas white.
Follow the shape of petals and leaves with your pencil strokes.
Use gradients in larger spaces.
Clean the page gently after colouring.
A professional-looking colour pencil mandala is soft, balanced and carefully layered.
Colour pencil ideas for different mandalas
A lotus mandala can be coloured with pink, magenta, lavender and gold.
A floral mandala can use pink, yellow, peach and green.
A geometric mandala can use blue, grey, black and one bright accent colour.
A sunburst mandala can use yellow, orange, red and brown.
A paisley mandala can use teal, purple, mustard and maroon.
A large mandala can use one main palette repeated across many layers.
Homework for Lesson 24
Choose one mandala outline from an earlier lesson.
Colour it using only colour pencils.
Use three to five colours.
Apply the first layer with light pressure.
Add a second layer to make selected areas richer.
Create a gradient in at least one petal layer.
Use shading near the base of petals or inside borders.
Leave some white space.
After finishing, observe whether the colours look smooth and whether the shading adds depth.
Creative challenge
Create two versions of the same mandala using colour pencils.
In the first version, use only soft pastel shades.
In the second version, use deeper and richer shades.
Keep the same design and colour placement.
Compare how the mood changes.
This challenge will help you understand how pencil pressure and shade selection affect the final artwork.
Key takeaways from Lesson 24
Colour pencils are excellent for soft, controlled and detailed mandala colouring.
Light pressure gives better results than pressing hard immediately.
Layering helps build rich colour gradually.
Gradients and shading add depth to petals and borders.
Sharp pencils are useful for small details.
Colouring in one direction helps avoid patchiness.
White space keeps the mandala clean and balanced.
Colour pencil mandalas require patience, but the final result can look soft and beautiful.
Lesson summary
In Lesson 24, you learnt how to colour mandalas with colour pencils using light pressure, smooth strokes, layering, blending, gradients and shading.
You also learnt how to avoid patchy colouring, choose colour palettes, keep small details neat and make your mandala look more polished.
Colour pencils are perfect for calm, detailed and beginner-friendly mandala colouring. In the next lesson, you will explore watercolour mandalas and learn how to create soft, flowing colour effects.
Previous lesson: Lesson 23: Colouring mandalas with brush pens
Next lesson: Lesson 25: Creating Watercolour Mandalas
Support the free Mandala Art Academy
Learning mandala art with us? The Mandala Art Academy is completely free, and every contribution helps us create more step-by-step lessons, practice guides and original tutorial images.
Even a small contribution helps us continue the next lesson.
For supporters in India
Scan the QR code below or use the UPI ID to contribute any amount you are comfortable with.

UPI ID: pallavi.rags-1@okhdfcbank
Pay securely through Razorpay
Prefer to pay by card or another supported online payment method? Use our secure Razorpay page below. Indian and international cards are accepted.
Support Mandala Art Academy and help create the next free lesson
Your support is entirely optional. Every Mandala Art Academy lesson will remain free for everyone.
Thank you for learning with us and helping us create the next lesson. ❤️