Learn how to colour mandalas with brush pens using smooth strokes, gradients, blending, shadows and bright colour techniques in Lesson 23.
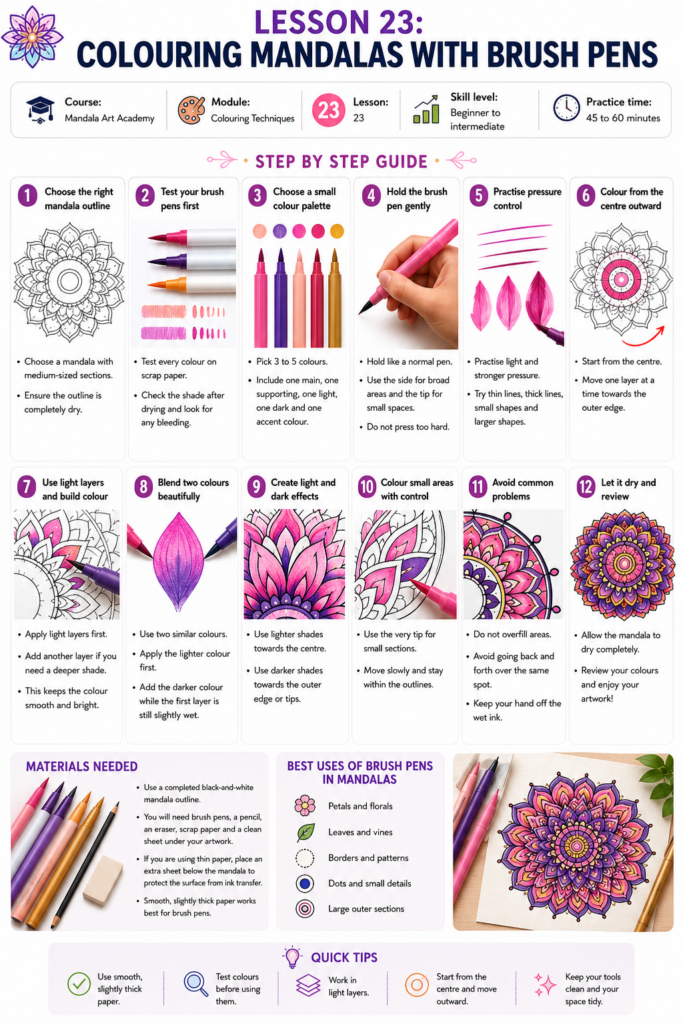
Course: Mandala Art Academy
Module: Colouring Techniques
Lesson: 23
Skill level: Beginner to intermediate
Practice time: 45 to 60 minutes
Welcome to Lesson 23
In Lessons 21 and 22, you learnt how to choose colour combinations and understand the mood created by different colours. Now it is time to apply colour using one of the most popular tools for mandala art: brush pens.
Brush pens are loved by artists because they create bright colours, smooth strokes and beautiful effects. They can be used for flat colouring, soft blending, shading, outlines, gradients and small decorative details.
In this lesson, you will learn how to colour mandalas with brush pens in a simple and controlled way. You will also learn how to avoid common problems such as bleeding, streaks, uneven colouring and smudging.
What are brush pens?
Brush pens are colouring pens with flexible tips that feel similar to a brush.
Some brush pens have soft tips, while others have firmer tips. Soft brush tips are useful for lettering, blending and flowing strokes. Firm brush tips are easier for beginners because they offer better control in small mandala spaces.
Brush pens may be water-based or alcohol-based. Water-based brush pens are commonly used for mandala art because they are easier to blend and usually more beginner-friendly.
Why are brush pens useful for mandala art?
Brush pens help you fill mandala sections quickly and neatly.
They are especially useful for petals, borders, leaves, dots, floral patterns and large outer sections.
The tip can create both thin and thick strokes depending on pressure. Light pressure creates fine lines, while slightly stronger pressure creates broader strokes.
Brush pens also give mandalas a clean and colourful appearance, which makes them great for cards, bookmarks, wall art, journals and social media posts.
What will you learn in this lesson?
By the end of Lesson 23, you will understand how to hold a brush pen, control pressure, colour small and large mandala spaces, blend two colours, create light and dark effects and avoid damaging your paper.
You will also learn how to choose the right paper, test colours before using them and colour from the centre outward without disturbing the design.
Materials needed
Use a completed black-and-white mandala outline.
You will need brush pens, a pencil, an eraser, scrap paper and a clean sheet under your artwork.
If you are using thin paper, place an extra sheet below the mandala to protect the surface from ink transfer.
Smooth, slightly thick paper works best for brush pens. Very rough paper can damage the brush tip, and very thin paper can cause ink bleeding.
Step 1: Choose the right mandala outline
For your first brush pen practice, choose a mandala with medium-sized sections.
Avoid a design with extremely tiny details because brush pens may be difficult to control in very small spaces.
A floral mandala, lotus mandala or simple geometric mandala works well.
The outline should be fully dry before colouring. If you have drawn the mandala with a black fineliner, allow the ink to dry completely before using brush pens.
Step 2: Test your brush pens first
Before colouring the mandala, test every colour on scrap paper.
Check whether the colour appears light or dark after drying.
Some brush pens look brighter on paper than they do on the cap.
Also check whether the ink bleeds through the page.
Testing helps you understand the tool before applying colour to the final artwork.
Step 3: Choose a small colour palette
For beginners, choose three to five brush pen colours.
Use one main colour, one supporting colour, one light shade, one dark shade and one accent colour.
For example, you can choose pink, purple, light peach, deep magenta and gold.
Do not use too many colours at first. Brush pens are already bright, so a smaller palette often looks cleaner.
Step 4: Hold the brush pen gently
Hold the brush pen like a normal pen, but do not press too hard.
A relaxed grip gives better control.
Use the side of the brush tip for broader areas and the pointed tip for smaller spaces.
Avoid bending the brush tip too much because it may lose its shape.
Move your hand slowly, especially near the black outlines.
Step 5: Practise pressure control
On scrap paper, draw lines using light pressure.
Then draw another set using slightly stronger pressure.
You will notice that the same brush pen can create thin and thick lines.
Practise colouring small petal shapes using only the tip.
Then practise filling a larger shape using the side of the brush tip.
Pressure control is important because mandalas contain many different shapes and sizes.
Step 6: Colour from the centre outward
Begin colouring from the centre of the mandala.
Move one layer at a time towards the outer edge.
This helps you follow your colour plan and prevents confusion.
Colouring from the centre outward also reduces the chance of accidentally placing your hand over freshly coloured outer sections.
Take your time and allow wet areas to dry before touching them.
Step 7: Use light colours first
Start with lighter colours before using darker shades.
Light colours are easier to cover or adjust if needed.
Use light shades for inner petals, delicate details and background sections.
Use darker shades for larger petals, borders or important outlines.
If you use dark colours too early, they may dominate the design.
Step 8: Colour small areas carefully
For tiny petals, dots, leaves and borders, use only the pointed tip of the brush pen.
Do not press down.
Work slowly and colour from the centre of the small shape towards the edge.
If the space is too small for the brush tip, leave it white or use a fine-tip pen instead.
Trying to force a brush pen into very small areas can make the ink spread outside the outline.
Step 9: Colour larger areas smoothly
For larger petals or outer sections, use longer strokes.
Try to move in one direction.
If you colour randomly in different directions, the section may look streaky.
Begin near one edge and slowly move across the shape.
Do not go over the same area too many times while the ink is wet because this can damage the paper.
Step 10: Create a simple gradient
Choose two colours from the same family, such as light pink and dark pink.
Colour the base of a petal with the darker shade.
Colour the tip with the lighter shade.
While both colours are still slightly wet, gently overlap the middle area.
This creates a soft gradient.
Practise this on scrap paper before using it in your mandala.
Step 11: Blend colours carefully
Water-based brush pens can sometimes blend when colours are layered.
Use a lighter colour to soften the edge of a darker colour.
For example, apply purple near the base of a petal and then use pink to pull the colour outward.
Do not rub the paper too much.
Blending should be gentle. Too much pressure can tear or roughen the paper surface.
Step 12: Add shadow with a darker shade
To create depth, add a darker shade near the base of petals, inside borders or around the centre.
Keep the shadow small.
You do not need to shade every section.
A little darker colour can make the mandala look more dimensional.
Use the same shadow placement around the complete circle for balance.
Step 13: Use brush pens for borders
Brush pens are useful for colouring mandala borders.
Use one colour for a dot border, another colour for scallops and a darker colour for the outer frame.
If the border is narrow, use the pointed tip.
If the border is wide, use the side of the brush tip with slow strokes.
Keep the colour sequence repeated around the mandala.
Step 14: Use accent colours for final details
After the main colouring is complete, add small accent details.
You can use gold, silver, white gel pen, black fineliner or a bright brush pen.
Add accents to dots, petal tips, centre circles or small borders.
Do not add accents everywhere.
Small highlights look more elegant when used carefully.
Step 15: Let the artwork dry
After colouring, allow the mandala to dry completely.
Do not stack paper on top of it immediately.
Do not erase or rub the surface while it is still wet.
Once dry, check whether any section needs small correction.
If needed, add tiny details with a fineliner or gel pen.
How can you avoid streaky colouring?
Use smooth paper.
Colour in one direction.
Avoid going over the same area many times.
Keep your strokes slow and even.
Use enough ink to cover the area, but do not soak the paper.
For large areas, work section by section instead of colouring randomly.
How can you avoid bleeding?
Test the brush pen on scrap paper first.
Use thicker paper if possible.
Do not press too hard.
Avoid colouring the same area repeatedly.
Place a spare sheet under your artwork.
If your pen bleeds easily, use it only for larger sections and avoid tiny details.
How can you choose colours for brush pen mandalas?
Brush pens are bright, so choose colours carefully.
For a soft design, use pastel pink, lavender, peach and mint.
For a bold design, use red, blue, purple, orange and black.
For a festive design, use yellow, orange, red, green and gold.
For a calm design, use blue, teal, lavender and pale green.
For your first attempt, use one colour family with a light, medium and dark shade.
Beginner practice exercise
Draw or use a small mandala outline with petals and borders.
Choose three brush pen colours.
Colour the centre with the lightest colour.
Colour the main petals with the medium colour.
Use the darkest colour for the outer border.
Add small dots using the same colour sequence.
Keep some areas white.
This exercise helps you practise clean colouring without using too many shades.
Intermediate practice exercise
Choose five brush pen colours.
Use light shades for inner layers.
Use medium shades for main petals.
Use darker shades near petal bases and borders.
Add one accent colour for dots and small details.
Try one simple gradient in every large petal.
Repeat the same colour and gradient pattern around the mandala.
This exercise will help you practise depth and symmetry.
Common mistakes to avoid when using brush pens
Avoid pressing too hard because the tip may bend or fray.
Do not use rough paper because it can damage the brush tip.
Avoid colouring very tiny spaces with a large brush tip.
Do not use too many bright colours in one design.
Avoid rubbing the same area repeatedly.
Do not forget to test colours before starting.
Avoid touching wet areas with your hand.
How can you make brush pen mandalas look professional?
Use a limited palette.
Work from light colours to dark colours.
Repeat colours symmetrically.
Use the brush tip carefully for small details.
Keep strokes smooth and controlled.
Use darker shades only where depth is needed.
Leave white space for balance.
Finish with small accents instead of overcolouring.
Colouring ideas with brush pens
Create a floral mandala using pink, purple, green and yellow.
Create a lotus mandala using light pink, magenta, lavender and gold.
Create a sunburst mandala using yellow, orange, red and brown.
Create a cool mandala using blue, teal, mint and silver.
Create a festive mandala using red, orange, yellow, green and gold.
Create a modern mandala using black, grey, white and one bright colour.
Homework for Lesson 23
Choose one mandala outline from an earlier lesson.
Colour it using only brush pens.
Use three to five colours.
Start from the centre and move outward.
Use one light shade, one medium shade and one dark shade.
Try a simple gradient in at least one petal layer.
Leave some areas white.
After finishing, observe whether the colours look balanced and whether the brush strokes are smooth.
Creative challenge
Create two small mandalas using brush pens.
In the first mandala, use only warm colours.
In the second mandala, use only cool colours.
Use the same design outline for both.
Compare how the brush pen colours change the mood of the artwork.
This challenge will help you practise both colour psychology and brush pen control.
Key takeaways from Lesson 23
Brush pens create bright, smooth and expressive mandala colours.
Smooth, slightly thick paper gives better results.
A small colour palette is easier to control.
Light pressure helps protect the brush tip and paper.
Colouring from the centre outward keeps the design organised.
Gradients and shadows can add depth.
Testing colours before use prevents mistakes.
White space keeps brush pen mandalas clean and balanced.
Lesson summary
In Lesson 23, you learnt how to colour mandalas with brush pens using simple, beginner-friendly techniques.
You explored brush pen pressure control, colour testing, smooth colouring, gradients, blending, shadows, borders and accent details.
Brush pens can make mandala art look bright and beautiful, but they work best when used patiently with a clear colour plan.
In the next lesson, you will learn how to colour mandalas with colour pencils, which offer a softer and more controlled colouring style.
Previous lesson: Lesson 22: Understanding colour psychology in mandala designs
Next lesson: Lesson 24: Colouring Mandalas with Colour Pencils
Support the free Mandala Art Academy
Learning mandala art with us? The Mandala Art Academy is completely free, and every contribution helps us create more step-by-step lessons, practice guides and original tutorial images.
Even a small contribution helps us continue the next lesson.
For supporters in India
Scan the QR code below or use the UPI ID to contribute any amount you are comfortable with.

UPI ID: pallavi.rags-1@okhdfcbank
Pay securely through Razorpay
Prefer to pay by card or another supported online payment method? Use our secure Razorpay page below. Indian and international cards are accepted.
Support Mandala Art Academy and help create the next free lesson
Your support is entirely optional. Every Mandala Art Academy lesson will remain free for everyone.
Thank you for learning with us and helping us create the next lesson. ❤️