Learn how to create watercolour mandalas using soft washes, gradients, blending, backgrounds and final pen details in Lesson 25.
Course: Mandala Art Academy
Module: Colouring Techniques
Lesson: 25
Skill level: Beginner to intermediate
Practice time: 60 to 90 minutes
Welcome to Lesson 25
In Lesson 24, you learnt how to colour mandalas with colour pencils using light pressure, layering, shading and soft blending. In this lesson, you will explore a very different colouring style: watercolour mandalas.
Watercolour mandalas look soft, calm and artistic. They can have gentle washes, dreamy backgrounds, smooth colour transitions and delicate handmade effects.
Unlike colour pencils or brush pens, watercolours move with water. This makes them beautiful, but it also means they need patience and control.
In this lesson, you will learn how to create watercolour mandalas step by step using simple beginner-friendly techniques.
What is a watercolour mandala?
A watercolour mandala is a mandala artwork coloured using watercolour paints, watercolour brush pens or diluted colour.
The mandala may be drawn first with waterproof ink and then coloured, or a watercolour background may be painted first before drawing the mandala on top.
Watercolour mandalas can be soft and minimal or bright and detailed.
The beauty of this style comes from gentle colour flow, light layers and natural blending.
Why are watercolours useful in mandala art?
Watercolours help create a peaceful and flowing look.
They are excellent for backgrounds, floral mandalas, lotus designs, soft spiritual mandalas, bookmarks, greeting cards and wall art.
Watercolour can make a simple mandala look elegant because the colour itself adds mood and movement.
This technique is also useful when you want your mandala to feel less rigid and more expressive.
What will you learn in this lesson?
By the end of Lesson 25, you will understand how to choose paper, prepare watercolours, create soft washes, colour mandala sections, blend colours, control water and avoid common problems such as paper warping, muddy colours and bleeding outlines.
You will also learn two simple methods: colouring a mandala after drawing it and drawing a mandala over a watercolour background.
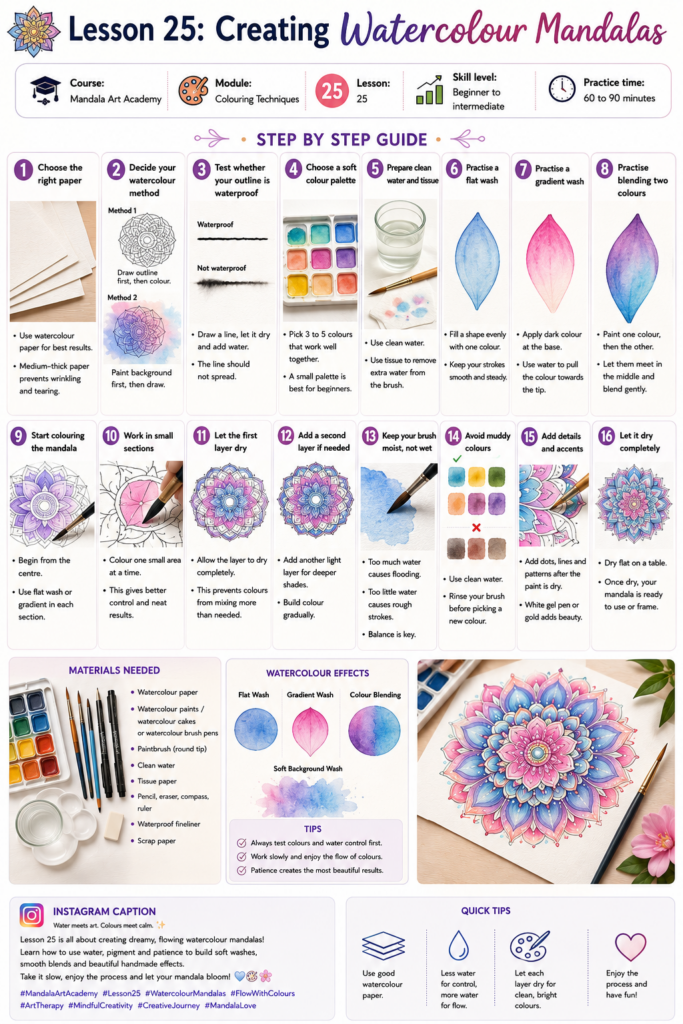
Materials needed
Use watercolour paper if possible. Normal paper may wrinkle when water is added.
You will need watercolour paints, watercolour cakes, watercolour brush pens or diluted sketch pen ink.
You will also need a paintbrush, clean water, tissue paper, pencil, eraser, compass, ruler and a waterproof fineliner.
If you do not have a waterproof fineliner, paint the background first and draw the mandala after the paper dries.
Keep a scrap sheet nearby to test colours and water control.
Step 1: Choose the right paper
Paper is very important for watercolour mandalas.
If the paper is too thin, it may wrinkle, tear or become uneven.
Watercolour paper works best because it can handle moisture.
For beginners, use medium-thick paper with a smooth or slightly textured surface.
If you are only practising, you can use thick drawing paper, but avoid adding too much water.
Good paper makes the colouring process easier and the final mandala cleaner.
Step 2: Decide your watercolour method
There are two easy methods for creating watercolour mandalas.
The first method is to draw the mandala outline with waterproof ink and then colour the sections with watercolour.
The second method is to paint a soft watercolour background first, let it dry completely and then draw the mandala over it with a black pen.
Both methods are beautiful.
For detailed mandalas, use the first method. For soft artistic mandalas, use the second method.
Step 3: Test whether your outline is waterproof
If you want to colour inside a drawn mandala, your outline must be waterproof.
Draw a small line with your black pen on scrap paper.
Let it dry.
Brush a little water over it.
If the ink spreads, the pen is not waterproof.
If the line stays clean, you can safely use watercolour over it.
This test is important because water can smudge normal ink.
Step 4: Choose a soft colour palette
Watercolour mandalas look best when the palette is planned.
Choose three to five colours.
For a calm mandala, use blue, teal, lavender and mint.
For a floral mandala, use pink, peach, yellow and green.
For a sunset mandala, use yellow, orange, coral and red.
For a spiritual mandala, use purple, blue, white space and gold accents.
Avoid using too many colours in your first attempt.
Watercolours can mix easily, so a small palette is safer.
Step 5: Prepare clean water and tissue
Keep one cup of clean water beside you.
Use tissue paper to remove extra water from your brush.
A brush that is too wet can flood the mandala section.
A brush that is too dry may create rough strokes.
Dip the brush in water, touch it to the colour and then gently dab it on tissue if needed.
This simple habit gives better control.
Step 6: Practise a flat wash
A flat wash means colouring an area evenly with one colour.
On scrap paper, draw a small petal or circle.
Fill it with diluted watercolour using smooth strokes.
Try to keep the colour even from start to finish.
Do not keep rubbing the same area.
A flat wash is useful for petals, borders and simple mandala sections.
Step 7: Practise a gradient wash
A gradient wash changes from dark to light.
Load your brush with colour and paint the base of a petal.
Then clean the brush slightly and use water to pull the colour towards the tip.
The colour should gradually fade.
This technique is beautiful for petals, leaves, paisley shapes and outer borders.
Practise it several times before using it in your final mandala.
Step 8: Practise blending two colours
Choose two colours that mix well, such as pink and purple, blue and green or yellow and orange.
Paint one colour on one side of a shape.
Paint the second colour on the other side.
While both are still slightly wet, let them meet in the middle.
The colours will gently blend.
Do not overmix them. Too much brushing can make the colours muddy.
Step 9: Colour from light to dark
Watercolour is easier to control when you begin with light colours.
Start with pale washes.
After the first layer dries, you can add darker colour in selected areas.
This layering technique creates depth.
If you begin too dark, it is difficult to make the colour lighter later.
Watercolour rewards patience.
Step 10: Colour small sections carefully
Mandala designs often have tiny sections.
Use a small brush for dots, small petals, borders and detailed areas.
Do not overload the brush with water.
Touch the brush gently to the paper and guide the colour slowly.
If a section is too small, leave it white or use a coloured pencil or gel pen later.
You do not need to paint every tiny space.
Step 11: Add colour to larger sections
For large petals or background areas, use a slightly bigger brush.
Work smoothly and avoid stopping in the middle of the section.
If the colour dries unevenly, let it dry completely before adding another layer.
Do not keep adding water to a half-dry area because it can create patches.
Large sections look better when coloured with calm, steady strokes.
Step 12: Create a watercolour background
For the background-first method, lightly wet the paper with clean water.
Add soft colours gently and allow them to spread.
You can use two or three colours and let them blend naturally.
Once the background is finished, let it dry completely.
Then draw your mandala on top using a black pen.
This method creates a dreamy and artistic mandala style.
Step 13: Use white space beautifully
Watercolour mandalas do not need every section to be filled.
White space helps the colours look fresh.
Leave some petals, borders or tiny details uncoloured.
This creates contrast and prevents the artwork from looking heavy.
White space is especially beautiful with pastel watercolour palettes.
Step 14: Add a second layer for depth
After the first watercolour layer dries, add a second layer in selected areas.
Add darker colour near the base of petals, around the centre or inside borders.
Do not cover the entire first layer.
Small darker areas create depth and make the mandala look more dimensional.
Let every layer dry before adding the next one.
Step 15: Add final pen details
After the watercolour is completely dry, you can add final details.
Use a black fineliner to strengthen outlines.
Use a white gel pen for highlights.
Use gold or silver pen for dots, borders and accents.
Do not add pen details while the paper is wet.
Wet paper can damage the pen tip and blur the lines.
How can you avoid muddy colours?
Do not mix too many colours in one small area.
Use colours that blend well together.
Clean your brush before changing colours.
Avoid brushing repeatedly over wet colour.
Let one layer dry before adding another.
Muddy colours usually happen when too many shades are mixed without planning.
How can you avoid paper warping?
Use watercolour paper if possible.
Avoid using too much water.
Tape the paper edges to a board if you are using a wet background technique.
Let the paper dry naturally.
Do not rub or press the paper while it is wet.
Some slight waviness is normal, especially for beginners.
How can you fix small watercolour mistakes?
If the colour is still wet, gently touch it with tissue to lift some pigment.
If the colour has dried, you can soften the area with a little clean water and dab it lightly.
For small mistakes outside the outline, you may cover them later with dots, pen details or background colour.
Do not panic over tiny imperfections.
Watercolour art naturally has soft and unexpected effects.
Beginner practice exercise
Draw a small mandala with a centre flower, one petal layer and one border.
Use only three watercolour shades.
Colour the centre with the lightest shade.
Use a gradient in the petal layer.
Use the darkest shade for the outer border.
Leave some tiny details white.
After drying, add black or white pen details if needed.
This exercise helps you practise water control and simple colour planning.
Intermediate practice exercise
Create a soft watercolour background using two colours.
Let it dry completely.
Draw a mandala over the background using black waterproof ink or a fineliner.
Add small gold or white dots around the mandala.
This exercise teaches you how to combine free-flowing colour with structured mandala linework.
Common mistakes to avoid when creating watercolour mandalas
Avoid using very thin paper.
Do not use non-waterproof ink if you plan to paint over the outline.
Avoid adding too much water inside small sections.
Do not mix too many colours at once.
Avoid colouring every space heavily.
Do not add pen details before the paint dries.
Avoid rushing the drying process.
Watercolour mandalas need patience and gentle handling.
How can you make watercolour mandalas look professional?
Use a limited colour palette.
Work with light layers.
Keep clean water nearby.
Test colours before applying them.
Use white space intentionally.
Let each layer dry properly.
Add final details with black, white, gold or silver pens.
Keep the design soft and balanced.
A professional watercolour mandala looks calm, clean and thoughtfully layered.
Colour ideas for watercolour mandalas
A calm palette can use sky blue, lavender and mint.
A floral palette can use pink, peach, yellow and green.
A sunset palette can use yellow, orange, coral and red.
A lotus palette can use soft pink, magenta and gold.
An ocean palette can use turquoise, teal, navy and white space.
A dreamy palette can use lavender, pale blue, blush pink and cream.
Choose colours based on the feeling you want the artwork to express.
Homework for Lesson 25
Create one watercolour mandala using either the outline-first method or the background-first method.
Use three to five colours.
Practise at least one flat wash, one gradient wash and one two-colour blend.
Leave some white space.
Let the artwork dry completely before adding final pen details.
After finishing, observe which parts looked soft, which parts needed more control and how the colours changed after drying.
Creative challenge
Create two watercolour mandalas.
For the first mandala, draw the outline first and colour inside the shapes.
For the second mandala, paint the background first and draw the mandala after it dries.
Compare both results.
Notice which method feels easier and which one looks more artistic to you.
Key takeaways from Lesson 25
Watercolour mandalas look soft, calm and expressive.
Watercolour paper gives better results than thin paper.
Waterproof ink is important if painting over the outline.
Light washes are easier to control than dark paint.
Gradients and blending create beautiful effects.
White space helps watercolour mandalas look fresh.
Each layer should dry before adding more colour or pen details.
Watercolour art needs patience, but the results can be beautiful and unique.
Lesson summary
In Lesson 25, you learnt how to create watercolour mandalas using simple beginner-friendly techniques.
You explored paper choice, waterproof outlines, flat washes, gradient washes, two-colour blending, soft backgrounds, layering, white space and final pen details.
Watercolour mandalas are perfect when you want your artwork to feel peaceful, flowing and handmade.
In the next lesson, you will learn how to create metallic mandalas using gold, silver and shimmering accents.
Previous lesson: Lesson 24: Colouring Mandalas with Colour Pencils
Next lesson: Lesson 26: Creating Metallic Mandalas
Support the free Mandala Art Academy
Learning mandala art with us? The Mandala Art Academy is completely free, and every contribution helps us create more step-by-step lessons, practice guides and original tutorial images.
Even a small contribution helps us continue the next lesson.
For supporters in India
Scan the QR code below or use the UPI ID to contribute any amount you are comfortable with.

UPI ID: pallavi.rags-1@okhdfcbank
Pay securely through Razorpay
Prefer to pay by card or another supported online payment method? Use our secure Razorpay page below. Indian and international cards are accepted.
Support Mandala Art Academy and help create the next free lesson
Your support is entirely optional. Every Mandala Art Academy lesson will remain free for everyone.
Thank you for learning with us and helping us create the next lesson. ❤️