Learn how to create metallic mandalas using gold, silver, copper, shimmer pens, dots, borders and highlights in Lesson 26.
Course: Mandala Art Academy
Module: Colouring Techniques
Lesson: 26
Skill level: Beginner to intermediate
Practice time: 45 to 75 minutes
Welcome to Lesson 26
In Lesson 25, you learnt how to create soft and dreamy watercolour mandalas using washes, gradients and gentle colour blending. In this lesson, you will explore a more festive and decorative style: metallic mandalas.
Metallic mandalas use gold, silver, bronze, copper or shimmer colours to create a rich and eye-catching effect. Even a simple mandala can look premium when metallic details are added thoughtfully.
The secret is not to use metallic colour everywhere. Metallic accents look most beautiful when they are used in selected areas such as dots, borders, petal tips, centre designs and final highlights.
What is a metallic mandala?
A metallic mandala is a mandala design that uses shiny or reflective colours such as gold, silver, bronze, copper, rose gold or pearl shades.
You can create metallic mandalas using metallic gel pens, metallic markers, metallic acrylic paint pens, shimmer watercolours, metallic brush pens or metallic poster colours.
Metallic mandalas can be drawn completely in metallic ink or decorated with small metallic highlights after colouring.
This style works especially well for festive artwork, greeting cards, gift tags, bookmarks, black paper mandalas, wall art and handmade décor.
Why are metallic colours useful in mandala art?
Metallic colours add brightness, elegance and celebration to mandala designs.
Gold can make a mandala feel festive and royal. Silver can make it feel cool and refined. Copper and bronze can add warmth and an antique look. Rose gold can make the artwork feel soft and stylish.
Metallic accents also help highlight important areas. A gold centre, silver dots or bronze border can guide the viewer’s eye through the design.
When used carefully, metallic details can make your mandala look more finished and professional.
What will you learn in this lesson?
By the end of Lesson 26, you will understand how to choose metallic tools, test them before use, add metallic dots, create shiny borders, decorate petals, combine metallic colours with normal colours and avoid overusing shimmer.
You will also learn how to use metallic pens on white paper, coloured paper and black paper.
The practice exercise will guide you through creating a simple mandala with metallic highlights.
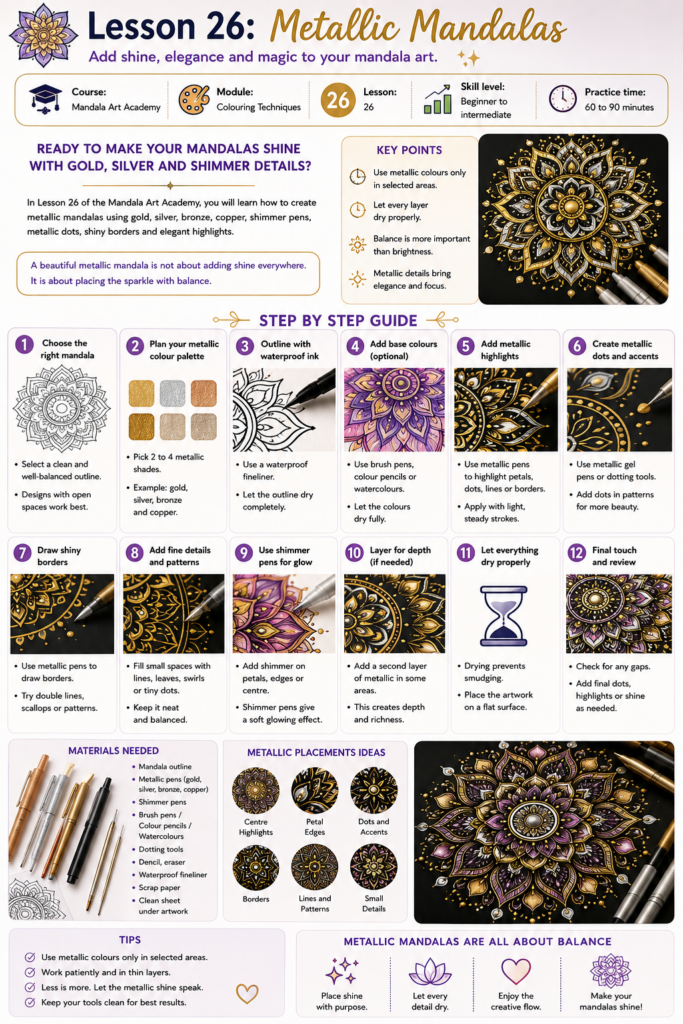
Materials needed
Use a completed mandala outline or draw a fresh simple mandala.
You will need metallic gel pens, metallic markers, metallic brush pens, acrylic paint pens or shimmer paints.
You may also use normal colour pencils, brush pens or watercolours along with metallic accents.
Keep scrap paper nearby for testing. If using paint pens or markers, keep tissue paper and an extra sheet under your artwork.
For black paper mandalas, use metallic gel pens, acrylic markers or opaque metallic pens.
Step 1: Choose your metallic tool
Different metallic tools give different effects.
Metallic gel pens are good for fine details, dots, thin lines and small borders.
Metallic markers are better for larger sections, bold petals and thick borders.
Acrylic paint pens are useful when you want strong metallic colour on black paper or coloured paper.
Shimmer watercolours create soft glowing effects, especially in backgrounds and wide petals.
Choose the tool based on the type of mandala you want to create.
Step 2: Test the metallic colour first
Always test metallic colours on scrap paper before using them on your final mandala.
Some metallic pens look dull when first applied but become shinier after drying.
Some markers may bleed through the paper.
Some gel pens may skip if the paper is rough.
Test the colour on the same type of paper you plan to use for the mandala.
Wait for it to dry and observe how it looks under light.
Step 3: Choose a simple metallic palette
For beginners, choose one metallic colour and two or three normal colours.
For example, you can use pink, purple and gold.
Another simple combination is blue, teal and silver.
For a festive mandala, try red, orange, green and gold.
For an elegant mandala, try black, white and gold.
Using one metallic colour keeps the design controlled and clean.
Once you gain confidence, you can combine gold, silver and bronze in the same artwork.
Step 4: Decide where the metallic details will go
Before starting, decide which areas will receive metallic colour.
You can use metallic colour in the centre, dots, borders, petal tips, small leaves, outlines or selected background spaces.
Do not colour every section with metallic ink.
Metallic colour is strongest when used as an accent.
A good rule is to use metallic colour in small repeated details throughout the mandala.
This creates sparkle without making the artwork look heavy.
Step 5: Add a metallic centre
Begin with the centre of the mandala.
Add a gold or silver dot in the middle.
You may surround it with smaller metallic dots or a small metallic circle.
A metallic centre immediately creates focus.
Keep this area neat because the viewer’s eye naturally moves towards the centre first.
Let the metallic ink dry before continuing.
Step 6: Create metallic dots
Metallic dots are one of the easiest ways to decorate a mandala.
Place dots around the centre, inside petals, along borders or between geometric shapes.
Use light pressure and lift the pen vertically.
If using a paint pen, test the dot size first because paint pens can release more ink.
Allow metallic dots to dry fully before touching them.
Metallic dots look especially beautiful when placed on dark colours or black paper.
Step 7: Add metallic petal tips
Choose one petal layer.
Colour only the tips of the petals with metallic gold, silver or copper.
This creates a delicate highlight without covering the entire design.
You can also add one metallic dot at every petal tip.
Repeat the same placement around the full mandala.
Small metallic tips can make floral, lotus and sunburst mandalas look more festive.
Step 8: Create a metallic border
Draw a thin metallic ring around one mandala layer.
You can also create a border using alternating metallic dots and short lines.
For a bolder look, use a metallic marker to colour a narrow outer border.
Keep the line steady and rotate the paper slowly.
Metallic borders are useful for greeting cards and framed artwork because they give the mandala a polished finish.
Step 9: Combine metallic colour with black outlines
Metallic colours look strong beside black outlines.
Draw the mandala with a black fineliner first.
After the ink dries, add metallic details inside selected areas.
Gold on black outline creates a royal look. Silver with black creates a modern look. Copper with black creates an antique look.
Do not cover the black outlines completely because they help keep the mandala structure clear.
Step 10: Use metallic colour on coloured paper
Metallic pens can look beautiful on coloured paper.
Try using gold on deep red, silver on navy blue, copper on brown or rose gold on pastel pink paper.
Draw the mandala lightly with pencil first.
Then outline or decorate it with metallic pen.
Some metallic tools may not show clearly on certain papers, so always test before starting.
Coloured paper can make simple metallic designs look very special.
Step 11: Use metallic colour on black paper
Black paper is one of the best backgrounds for metallic mandalas.
Gold, silver, bronze, copper, white and pastel metallic pens stand out beautifully on black.
Use opaque gel pens, acrylic paint pens or good-quality metallic markers.
Normal colour pencils may not show strongly on black paper unless they are very opaque.
Keep the design slightly simpler because metallic lines on black paper already create a dramatic effect.
Step 12: Add metallic highlights after colouring
You can first colour your mandala with normal colours such as brush pens, colour pencils or watercolours.
After the artwork dries, add metallic highlights.
Use gold dots over red or purple sections.
Use silver lines over blue or teal sections.
Use bronze highlights over orange, brown or green sections.
This method creates a layered and finished look.
Always make sure the first colouring layer is dry before adding metallic details.
Step 13: Avoid overusing metallic colour
Metallic colours are attractive, so it is tempting to use them everywhere.
But too much shine can make the mandala look crowded.
Use metallic colour to highlight important areas, not to fill every space.
If the centre is metallic, keep some borders simple.
If the outer border is metallic, keep the inner details softer.
Balance is the key to elegant metallic mandala art.
Step 14: Let metallic ink dry properly
Metallic gel pens and paint pens may take longer to dry than normal pens.
Do not touch the design immediately.
Do not stack another sheet on top of it.
Do not erase pencil marks over wet metallic ink.
Allow enough drying time before adding more details.
This prevents smudging and keeps the shine clean.
Step 15: View the mandala under light
Metallic colours change depending on light.
After the artwork dries, tilt the paper gently under natural light or room light.
Check whether the metallic details are visible and balanced.
Some areas may need one more dot or highlight.
Add final details only where needed.
Stop when the shine feels balanced across the mandala.
How can you choose the right metallic colour?
Use gold for festive, royal and warm designs.
Use silver for calm, cool and modern designs.
Use bronze or copper for earthy, antique and traditional designs.
Use rose gold for soft, elegant and stylish designs.
Use pearl or shimmer shades for delicate and dreamy designs.
Choose the metallic colour based on the mood of your mandala.
How can you make metallic mandalas look neat?
Use clean outlines.
Test the pen before applying it.
Add metallic details slowly.
Repeat the same metallic placement in matching sections.
Avoid dragging your hand over wet ink.
Use metallic colour in selected areas only.
Keep some sections plain so the shiny parts stand out.
A neat metallic mandala depends on patience and controlled highlights.
Beginner practice exercise
Draw a small mandala with a centre circle, one petal layer and one border.
Colour the petals with normal colour pencils or brush pens.
Add a gold dot in the centre.
Place small gold dots at the tips of the petals.
Add a thin metallic border around the outer circle.
Leave some areas without metallic colour.
This simple exercise teaches you how to use metallic accents without overdoing them.
Intermediate practice exercise
Create a mandala on black paper.
Use silver or gold pen to draw the main outlines.
Add copper or bronze dots between the layers.
Use white gel pen for small highlights if available.
Keep the design clean and avoid too many tiny details.
This exercise will help you understand how metallic colours behave on dark paper.
Common mistakes to avoid when creating metallic mandalas
Avoid using metallic colour everywhere.
Do not touch metallic ink before it dries.
Avoid using rough paper if your gel pen skips.
Do not press paint pens too hard on the final artwork without testing.
Avoid combining too many metallic shades in a small mandala.
Do not erase pencil lines before the metallic ink dries.
Avoid hiding the mandala structure under thick metallic colouring.
How can you make metallic mandalas look professional?
Use metallic accents with purpose.
Repeat metallic dots, lines or borders symmetrically.
Combine metallic colour with a limited palette.
Use black outlines for clarity.
Allow each layer to dry before continuing.
Keep the centre and outer border polished.
Use light wisely to check the shine.
A professional metallic mandala looks elegant because the shine is balanced, not excessive.
Metallic colour combination ideas
Gold works beautifully with red, purple, green, black, pink and orange.
Silver works well with blue, teal, purple, black, white and grey.
Copper pairs nicely with brown, orange, cream, green and maroon.
Rose gold looks beautiful with blush pink, lavender, white, peach and grey.
Bronze works well with earthy colours such as olive green, mustard, brown and deep red.
Try one metallic shade with two or three normal colours for your first design.
Homework for Lesson 26
Create one mandala using metallic accents.
Use one normal colour palette and one metallic colour.
Add metallic details to the centre, one petal layer and one border.
Use dots, lines or small highlights.
Do not cover the entire mandala with metallic colour.
After finishing, observe whether the metallic accents guide the eye through the design.
Creative challenge
Create two metallic mandalas.
In the first design, use white paper with colourful mandala sections and gold highlights.
In the second design, use black paper with silver or gold outlines.
Compare both artworks.
Notice how metallic colours behave differently on light and dark backgrounds.
Key takeaways from Lesson 26
Metallic mandalas use gold, silver, bronze, copper, rose gold or shimmer colours.
Metallic colours work best as accents, not full coverage.
Gold feels festive and royal, while silver feels cool and modern.
Metallic dots, borders, petal tips and centre details can make a mandala look polished.
Black paper makes metallic colours stand out beautifully.
Testing metallic tools before use prevents mistakes.
Drying time is important because metallic ink can smudge easily.
A balanced metallic mandala uses shine thoughtfully and patiently.
Lesson summary
In Lesson 26, you learnt how to create metallic mandalas using gold, silver, bronze, copper and shimmer effects.
You explored metallic tools, paper choices, colour combinations, centre details, dots, borders, petal highlights, coloured paper and black paper techniques.
Metallic mandalas are perfect for festive artwork, handmade cards, gift designs and premium-looking mandala pieces.
In the next lesson, you will learn how to draw mandalas on black paper, where metallic and opaque colours can create dramatic and beautiful results.
Previous lesson: Lesson 25: Creating Watercolour Mandalas
Next lesson: Lesson 27: Drawing Mandalas on Black Paper
Support the free Mandala Art Academy
Learning mandala art with us? The Mandala Art Academy is completely free, and every contribution helps us create more step-by-step lessons, practice guides and original tutorial images.
Even a small contribution helps us continue the next lesson.
For supporters in India
Scan the QR code below or use the UPI ID to contribute any amount you are comfortable with.

UPI ID: pallavi.rags-1@okhdfcbank
Pay securely through Razorpay
Prefer to pay by card or another supported online payment method? Use our secure Razorpay page below. Indian and international cards are accepted.
Support Mandala Art Academy and help create the next free lesson
Your support is entirely optional. Every Mandala Art Academy lesson will remain free for everyone.
Thank you for learning with us and helping us create the next lesson. ❤️