Learn dot mandala art for beginners using acrylic paint, dotting tools, dot rings, trails, borders and colourful patterns in Lesson 28.
Course: Mandala Art Academy
Module: Advanced Mandala Projects
Lesson: 28
Skill level: Beginner to intermediate
Practice time: 60 to 90 minutes
Welcome to Lesson 28
Welcome to Module 5 of the Mandala Art Academy. You have already completed the foundations, basic patterns, intermediate designs and colouring techniques. Now you will begin learning project-based mandala art styles that can be used for finished artworks, gifts, décor and handmade products.
Lesson 28 introduces dot mandala art for beginners.
You already learnt simple dot patterns in Lesson 8. In this lesson, you will go deeper and create a full mandala using dots as the main design element. Instead of drawing petals and lines first, you will build the design using different dot sizes, colours, spacing and circular arrangements.
Dot mandala art is relaxing, colourful and beginner-friendly when practised patiently. You can create beautiful designs using dotting tools, paint, pens, earbuds, toothpicks or the back of a brush.
What is dot mandala art?
Dot mandala art is a style of mandala making where the design is created mainly with dots.
The dots may be arranged around a centre point in circular layers. Some dots may be large, some may be small and some may gradually reduce in size to create a flowing effect.
Dot mandalas can be created on paper, canvas, wood, stones, coasters, bookmarks, greeting cards, décor pieces and craft projects.
The beauty of dot mandala art comes from symmetry, spacing, colour repetition and patience.
How is dot mandala art different from normal mandala drawing?
In regular mandala drawing, you usually draw outlines first using petals, circles, lines, leaves, borders and geometric shapes.
In dot mandala art, the dots themselves create the shape.
A row of dots can become a circle. A group of dots can become a petal. A trail of dots can create movement. Large and small dots together can create depth.
Dot mandala art needs less line drawing but more control over paint quantity, dot size and spacing.
What will you learn in this lesson?
By the end of Lesson 28, you will understand how to choose dotting tools, prepare paint, create different dot sizes, arrange dots around a centre point and build a beginner-friendly dot mandala step by step.
You will also learn how to use colour combinations, avoid smudging, keep dots round and create a neat finished design.
The practice exercise will guide you through creating your first simple dot mandala.
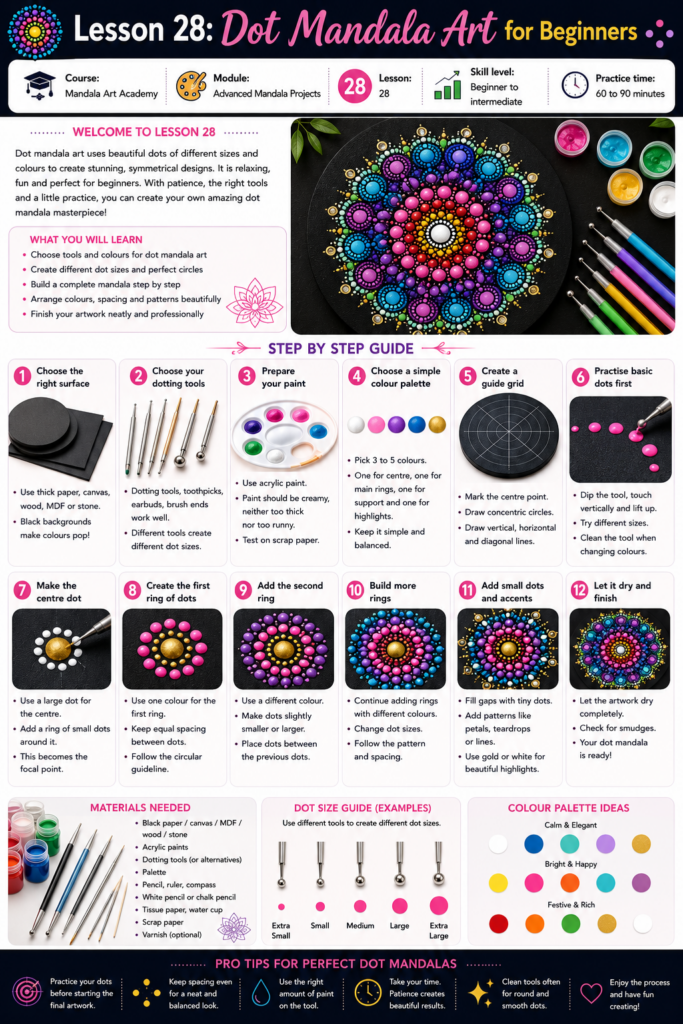
Materials needed
You can practise dot mandala art with simple materials.
Use thick paper, canvas sheet, cardstock, MDF base, wooden coaster, stone or any smooth surface.
You will need acrylic paints, poster colours or paint markers. Acrylic paint works well because it gives thick, bright and raised dots.
You will also need dotting tools. If you do not have dotting tools, you can use toothpicks, earbuds, the back of paintbrushes, pencil ends, bobby pins, ball pens without ink, skewers or small sticks.
Keep tissue paper, water, a palette, scrap paper, pencil, ruler and compass nearby.
Step 1: Choose the right surface
For your first dot mandala, choose thick paper or cardstock.
Thin paper may bend or wrinkle when paint is added.
If you want to create a decorative piece, use canvas board, MDF base, wooden coaster or smooth stone.
The surface should be clean and dry.
If you are working on wood or stone, you may paint the background first and allow it to dry completely before adding dots.
Black backgrounds are popular for dot mandala art because bright colours stand out beautifully.
Step 2: Choose your dotting tools
Different tools create different dot sizes.
A toothpick creates tiny dots.
The back of a thin brush creates small dots.
The back of a larger brush creates medium dots.
An earbud can create soft round dots.
A proper dotting tool set gives more size options.
Before starting the final artwork, test each tool on scrap paper and observe the dot size.
This will help you decide which tool to use for the centre, petals, borders and small details.
Step 3: Prepare your paint
Place small amounts of acrylic paint on a palette.
Do not add too much water because watery paint spreads and creates flat uneven dots.
The paint should be creamy and slightly thick.
If the paint is too thick, the dots may look lumpy. If it is too thin, the dots may spread.
Test the paint on scrap paper.
A good dot should look round, smooth and controlled.
Step 4: Choose a simple colour palette
For beginners, choose three to five colours.
A simple palette may include white, pink, purple, blue and gold.
A festive palette may include red, orange, yellow, green and gold.
A calm palette may include blue, teal, lavender and white.
A bright palette may include pink, yellow, turquoise, orange and purple.
Use one colour for the centre, one for the main dot rings, one for supporting dots and one accent colour for highlights.
Do not use too many colours in your first attempt.
Step 5: Create a guide grid
Mark the centre point of your surface.
Use a compass to draw light circular guidelines.
For a beginner dot mandala, draw four or five circles.
Draw one vertical line and one horizontal line through the centre.
Add diagonal lines to divide the circle into eight sections.
These guidelines help you place dots evenly.
If you are working on black paper or a painted background, use a white pencil or light chalk pencil for guidelines.
Keep the lines very light.
Step 6: Practise basic dots first
Before working on the final mandala, practise dots on scrap paper.
Dip the tool gently into paint.
Touch the tool vertically on the paper and lift it straight up.
Do not drag the tool.
Try making large dots, medium dots and tiny dots.
Clean the tool when paint starts building up around the tip.
A clean tool creates cleaner dots.
Step 7: Start with the centre dot
Begin your mandala with one centre dot.
Use a medium or large dotting tool.
Dip the tool into paint and place one dot exactly on the centre point.
This centre dot becomes the anchor for the whole design.
Let it settle for a few seconds before adding dots around it.
You may use white, gold, yellow or any bright colour for the centre.
Step 8: Add the first ring of dots
Around the centre dot, add a ring of smaller dots.
Place the first four dots at the top, bottom, left and right positions.
Then place dots at the diagonal positions.
Now fill the spaces between them.
This method keeps the spacing more even than starting randomly from one side.
Try to keep all dots in the first ring the same size.
Step 9: Create a second ring with larger dots
Move to the next circular guideline.
Add dots that are slightly larger than the first ring.
Place the dots evenly around the circle.
You can use the same colour or a second colour.
If the first ring is white, the second ring can be pink or blue.
The dots should not touch each other unless that is your planned style.
Leave a small gap between them.
Step 10: Add small dots between large dots
Between the larger dots, add tiny dots using a toothpick or small tool.
These tiny dots help fill spaces and create detail.
You can use a lighter colour or metallic colour for these dots.
For example, place tiny gold dots between large pink dots.
This creates a decorative effect without making the design crowded.
Step 11: Create a dot petal shape
Dot petals are created by arranging dots in a teardrop or petal pattern.
Start with one large dot near the outer circle.
Add smaller dots below it, gradually reducing the size as they move towards the centre.
Repeat this petal arrangement in every section of the mandala.
Dot petals are very useful for creating floral dot mandalas.
They look beautiful when the dots reduce smoothly in size.
Step 12: Create descending dot trails
A descending dot trail begins with one large dot and continues with smaller and smaller dots.
These trails can move outward, inward or along a curve.
Use the back of a brush for the large dot and a toothpick for the smallest dots.
Descending dot trails add movement and elegance to the design.
They are also useful for filling spaces between bigger dot patterns.
Step 13: Add a dotted border
Create a circular dotted border around the main design.
Use equal-sized dots for a clean look.
You can also alternate large and small dots.
For example, place one large dot, one small dot, one large dot, one small dot.
A dotted border gives the mandala a finished frame.
Use a colour that contrasts with the background.
Step 14: Add accent dots
Accent dots are small decorative dots added after the main design is complete.
You can place tiny white dots on top of dried larger dots.
You can also place gold or silver dots in empty spaces.
Accent dots should be added only after the base dots are dry.
If you add a small dot on top of wet paint, the colours may mix.
Accent dots make the mandala look more detailed and professional.
Step 15: Let the mandala dry completely
Dot mandala art needs proper drying time.
Acrylic dots may look dry on top but remain soft underneath for some time.
Do not touch the dots immediately.
Do not stack paper or objects on top of the artwork.
Let the mandala dry flat.
If you are working on a stone, coaster or wooden base, allow extra drying time before handling it.
How can you keep dots round?
Use thick, creamy paint.
Dip the tool straight into the paint.
Place the tool vertically on the surface.
Lift the tool straight up without dragging.
Clean the tool regularly.
Avoid adding too much water to the paint.
Practise on scrap paper before working on the final design.
Round dots come with practice, so do not worry if the first few attempts are uneven.
How can you make dots equal in size?
Use the same tool and the same amount of paint.
Dip the tool lightly each time.
If the dot becomes smaller after two or three dots, reload the tool with paint.
Do not press harder to make a bigger dot because that can make the dot spread unevenly.
For consistent dots, use a steady rhythm.
Dip, dot, lift, repeat.
How can you avoid smudging?
Work from the centre outward.
Avoid resting your hand on wet dots.
Rotate the paper or surface instead of stretching your hand across the artwork.
Let each section dry before adding dots nearby if the spaces are tight.
Keep tissue nearby to clean tools and accidental paint marks.
Patience is very important in dot mandala art.
How can you choose colours for dot mandalas?
Dot mandalas look beautiful when colours repeat in rings.
You can use light colours near the centre and darker colours outside.
You can also use a rainbow pattern or a monochrome palette.
For beginners, use one dark background and three bright colours.
For example, black background with white, turquoise, pink and gold dots.
Make sure the colours are visible against the surface.
Test the colours before starting.
Beginner practice exercise
Create a small dot mandala on thick paper.
Draw one centre dot.
Add a ring of eight small dots around it.
Add a second ring of larger dots.
Place tiny dots between the larger dots.
Create eight descending dot petals around the outer ring.
Finish with a dotted border.
Use only three colours.
This exercise will help you practise dot size, spacing, repetition and drying control.
Intermediate practice exercise
Create a dot mandala on black paper or a painted black background.
Use white, gold, pink, blue and purple.
Begin with a gold centre dot.
Add white dots around the centre.
Create a ring of pink large dots.
Add blue descending dot trails between them.
Use purple dots for the outer ring.
Finish with tiny white accent dots after the paint dries.
This exercise will help you practise contrast, colour planning and layered dot details.
Dot mandala project ideas
You can create dot mandalas on greeting cards.
You can decorate bookmarks with small dot mandala borders.
You can paint dot mandalas on stones.
You can create coaster designs using acrylic dots.
You can make festive décor pieces using gold and bright colours.
You can create wall art on canvas or MDF boards.
Start small and gradually move to larger surfaces.
Common mistakes to avoid in dot mandala art
Avoid using watery paint.
Do not drag the dotting tool.
Avoid placing dots too close together when the paint is wet.
Do not use too many colours without planning.
Avoid touching the artwork before it dries.
Do not start a large dot mandala without practising dot sizes first.
Avoid worrying too much about tiny imperfections.
Handmade dot mandalas do not need to look machine-made.
How can you make dot mandalas look professional?
Use a clean surface.
Plan the colour palette before starting.
Keep the centre aligned.
Use circular guidelines.
Repeat dots symmetrically.
Use large dots for main structure and small dots for details.
Let base dots dry before adding accent dots.
Use white, gold or silver highlights carefully.
A professional dot mandala looks balanced because every dot has a purpose.
Colour ideas for dot mandala art
For a festive dot mandala, use red, orange, yellow, green and gold.
For a calm dot mandala, use blue, teal, lavender, white and silver.
For a floral dot mandala, use pink, purple, peach, green and white.
For a royal dot mandala, use purple, magenta, emerald green and gold.
For a night-sky dot mandala, use black background with white, silver, blue and purple.
For a bright beginner mandala, use yellow, pink, turquoise and white.
Homework for Lesson 28
Create one complete dot mandala using at least four dot patterns.
Include a centre dot, circular dot rings, descending dot trails and one dotted border.
Use three to five colours.
Work slowly and allow the dots to dry properly.
After finishing, observe whether the dots are evenly spaced and whether the colour sequence feels balanced.
Creative challenge
Create two dot mandalas using the same grid.
In the first design, use equal-sized dots in every ring.
In the second design, use large dots, small dots and descending dot trails.
Compare which design looks more dynamic.
This challenge will help you understand how dot size variation changes the final artwork.
Key takeaways from Lesson 28
Dot mandala art uses dots as the main design element.
Acrylic paint works well because it creates bright and raised dots.
Dotting tools, toothpicks, earbuds and brush ends can all be used for dot making.
Creamy paint creates better dots than watery paint.
Circular guidelines help maintain symmetry.
Large and small dots create rhythm and depth.
Accent dots should be added only after base dots dry.
Dot mandala art improves with patience, spacing and steady hand control.
Lesson summary
In Lesson 28, you learnt how to create dot mandala art for beginners using simple tools, acrylic paint, circular guidelines and repeated dot patterns.
You explored centre dots, circular dot rings, large and small dots, descending dot trails, dot petals, dotted borders and accent dots.
This lesson begins Module 5: Advanced Mandala Projects, where you will turn your mandala skills into finished creative projects.
In the next lesson, you will learn how to create zentangle-inspired mandala designs using detailed line patterns and mindful drawing techniques.
Previous lesson: Lesson 27: Drawing mandalas on black paper
Next lesson: Lesson 29: Zentangle-Inspired Mandala Designs
Support the free Mandala Art Academy
Learning mandala art with us? The Mandala Art Academy is completely free, and every contribution helps us create more step-by-step lessons, practice guides and original tutorial images.
Even a small contribution helps us continue the next lesson.
For supporters in India
Scan the QR code below or use the UPI ID to contribute any amount you are comfortable with.

UPI ID: pallavi.rags-1@okhdfcbank
Pay securely through Razorpay
Prefer to pay by card or another supported online payment method? Use our secure Razorpay page below. Indian and international cards are accepted.
Support Mandala Art Academy and help create the next free lesson
Your support is entirely optional. Every Mandala Art Academy lesson will remain free for everyone.
Thank you for learning with us and helping us create the next lesson. ❤️