Learn easy dot patterns for beginner mandala art, including borders, flowers and petal designs. Practise Lesson 8 and improve your dot control.
Course: Mandala Art Academy
Module: Beginner Mandala Drawing Techniques
Lesson: 8
Skill level: Beginner
Practice time: 20 to 30 minutes
Welcome to Lesson 8
Dots may look like the simplest element in mandala art, but they can completely transform a design. A plain circle, petal or border can become detailed and decorative by adding just a few carefully placed dots.
Dot patterns are also perfect for beginners because they do not require complicated drawing skills. You only need to observe the spacing, maintain a steady hand and repeat the same movement around the mandala.
In this lesson, you will learn how to create easy dot patterns using a pencil, pen, marker or dotting tool. You will also learn how to combine dots of different sizes to make your mandala look balanced, layered and visually interesting.
What will you learn in this lesson?
By the end of Lesson 8, you will understand how to draw evenly spaced dots, create simple dot borders, arrange dots inside petals and combine large and small dots to build decorative mandala patterns.
You will also practise controlling the pressure of your pen or tool so that your dots remain similar in size.
Materials needed
You can complete this lesson using materials you already have at home.
Use plain paper, a pencil, an eraser, a black fineliner or gel pen and a compass or circular object for drawing guidelines. You may also use coloured pens, sketch pens, acrylic paint markers, toothpicks or dotting tools.
A dotting tool is helpful, but it is not compulsory. The rounded end of a paintbrush, pencil, cotton swab or toothpick can also be used to create dots.
Why are dots important in mandala art?
Dots help fill empty spaces without making the mandala look overcrowded. They can be used as borders, centre decorations, background details or finishing elements.
A row of dots can create rhythm and movement. A cluster of dots can make the centre of a flower look more detailed. Alternating large and small dots can add contrast and make the pattern look more professional.
The secret is not to add dots everywhere. Leave enough empty space around them so that each dot remains clearly visible.
Step 1: Practise making equal-sized dots
Before adding dots to a mandala, draw several rows of dots on a practice sheet.
Place the tip of your pen gently on the paper and lift it without dragging. Try to use the same pressure for every dot.
Create one row of small dots, one row of medium dots and one row of larger dots. Observe how changing the pressure or using a different tool changes the size.
Do not worry if your dots are not perfectly equal during your first attempt. Consistency improves naturally with practice.
Step 2: Draw a simple circular dot border
Draw a small circle using a compass or circular object. Add dots around the outside edge of the circle.
Begin by placing four dots at the top, bottom, left and right sides. These dots act as reference points.
Add one dot halfway between each reference point. Continue filling the remaining spaces until the dots form a complete circular border.
This method makes it easier to maintain equal spacing than beginning at one point and drawing dots continuously around the circle.
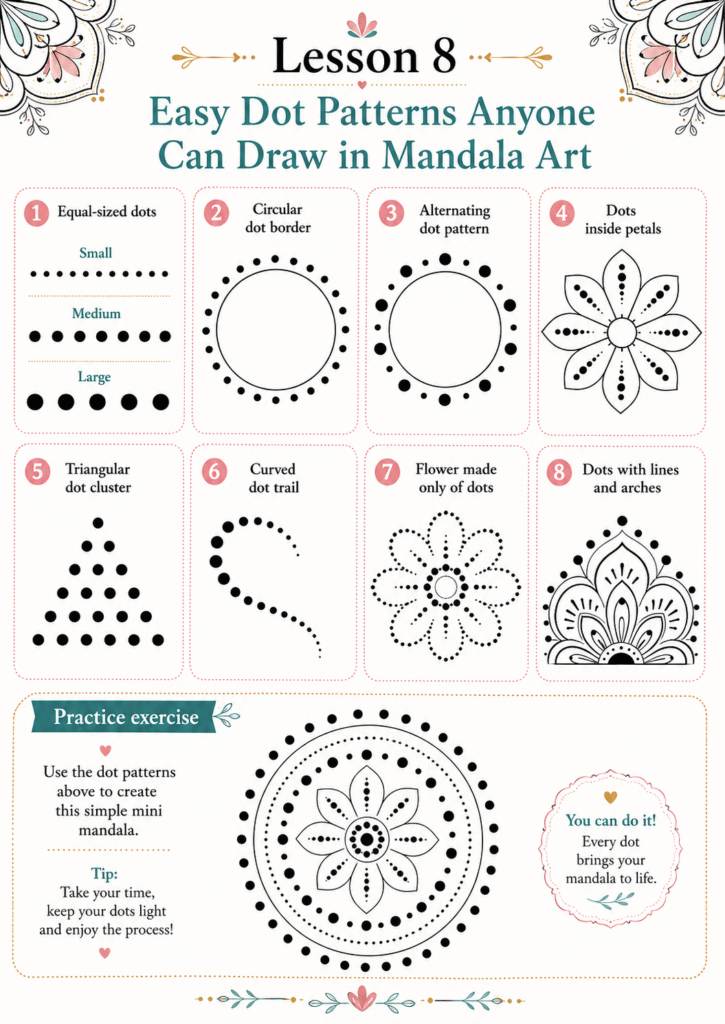
Step 3: Create an alternating dot pattern
Draw another circular guideline. This time, alternate between one large dot and one small dot.
The pattern will look like this:
Large dot, small dot, large dot, small dot.
Continue the sequence around the circle. Try to keep the space between the dots equal.
Alternating dot sizes create contrast and make even a simple border look decorative.
Step 4: Add dots inside petals
Draw a basic flower with six or eight petals.
Place one medium-sized dot near the rounded end of each petal. Add two or three smaller dots below it, moving towards the centre of the flower.
You can gradually reduce the size of the dots to create a flowing effect.
Repeat the same dot arrangement inside every petal. The repetition will make the flower look symmetrical and complete.
Step 5: Create a triangular dot cluster
Draw one large dot. Add two smaller dots below it. Then add three dots below the second row.
This forms a simple triangular cluster.
You can place this pattern between petals, inside larger shapes or around the outer border of a mandala.
For a more detailed version, continue adding rows of dots while increasing the number of dots in every row.
Step 6: Draw a curved dot trail
Draw a gentle curved line using a pencil. Place dots along the curve, beginning with a large dot and gradually reducing the size.
Erase the pencil guideline after the ink has dried.
Curved dot trails are useful for decorating leaves, petals, paisley shapes and empty spaces between mandala sections. They can also create a sense of movement in the design.
Step 7: Make a flower using only dots
Place one large dot in the centre. Add six or eight medium dots around it to form petals.
Add a second outer ring using smaller dots. Position each small dot between two dots from the first ring.
You now have a complete flower created entirely from dots.
Try making several dot flowers using different sizes and arrangements. These flowers can be added to greeting cards, bookmarks, borders and larger mandala designs.
Step 8: Combine dots with lines and shapes
Dots become even more attractive when combined with lines, arches, petals and circles.
Draw a row of arches and place one dot inside each arch. Draw a petal border and add three dots above every petal. Draw a circle and surround it with alternating dots and short lines.
Keep the arrangement consistent throughout the mandala. Whenever you add a particular dot pattern to one section, repeat it in every matching section.
Beginner practice exercise
Draw three concentric circles.
Decorate the first circle with evenly spaced small dots. Decorate the second circle with alternating large and small dots. Decorate the third circle with groups of three dots.
Next, draw eight simple petals outside the largest circle. Add one large dot and two smaller dots inside each petal.
Outline the important shapes with a black pen and erase the pencil guidelines after the ink has dried.
This exercise will help you practise dot size, spacing, repetition and symmetry in one simple design.
Common mistakes to avoid while drawing dot patterns
Avoid pressing the pen too hard because the ink may spread and create uneven dots. Lift the pen vertically instead of dragging it across the paper.
Do not place the dots too close together. Crowded dots may merge and lose their shape.
Do not rush while working around a circle. Pause after every few dots and check whether the spacing remains balanced.
Avoid adding too many different dot patterns in one small area. One or two repeated arrangements usually look cleaner than several unrelated patterns.
How can you make your dot patterns look more professional?
Begin with pencil guidelines and divide the circle into equal sections before adding dots.
Work from the centre towards the outside. This reduces the chance of accidentally touching wet ink.
Allow painted or inked dots to dry fully before erasing guidelines. If you are using paint, test the consistency on a separate sheet first.
Use contrast thoughtfully. Large dots can become focal points, while small dots can be used for borders and delicate details.
Most importantly, repeat the same pattern carefully. In mandala art, repetition creates beauty even when each individual element is very simple.
Homework for Lesson 8
Create one small mandala containing at least four different dot patterns.
Include a circular dot border, alternating large and small dots, dots inside petals and one flower made entirely from dots.
You may complete the design using only black ink or add two or three colours. Keep the colour arrangement symmetrical by repeating the same colour sequence around the mandala.
After completing the design, observe which dot pattern was easiest and which one required more control.
Key takeaways from Lesson 8
Dots are simple elements that can add detail, rhythm and contrast to mandala art.
Equal spacing is more important than creating perfectly round dots.
Large and small dots can be combined to form borders, flowers, trails and decorative clusters.
Reference points and pencil guidelines help maintain symmetry.
Regular practice improves dot size, pressure control and overall consistency.
Lesson summary
In Lesson 8, you learnt how to create equal-sized dots, circular dot borders, alternating dot patterns, triangular clusters, curved trails and flowers made entirely from dots.
You also learnt how to place dots inside petals and combine them with lines, arches and other mandala elements.
These beginner-friendly patterns can be used in almost every mandala you create. Practise them on a separate sheet before adding them to a final design, and you will gradually develop greater control and confidence.
Previous lesson: Lesson 7: Creating beautiful leaf patterns
🏠 Back to Mandala Art Academy
Next lesson: Lesson 9: Lines, curves and borders explained