Learn how to draw your first mandala grid with this easy step-by-step beginner tutorial. Create balanced circles and perfect symmetry before designing your first mandala.
Course: STM Creator Academy – Mandala Art Master Course
Module: 1 – Foundations
Lesson: 3 of 40
Estimated Reading Time: 15–20 minutes
Skill Level: Beginner
Welcome back!
Congratulations! You’ve completed the first two lessons of the STM Creator Academy Mandala Art Master Course.
You now understand what mandala art is and have gathered the basic supplies needed to begin your creative journey.
Now it’s time to draw your very first mandala.
Before creating beautiful petals, leaves and intricate patterns, every mandala artist starts with the same foundation—a balanced grid.
Think of the grid as the blueprint of a house. Without a strong foundation, even the most beautiful patterns can look uneven. Once you learn this simple technique, every future mandala will become easier to design.
What you’ll learn
By the end of this lesson, you’ll be able to:
- Draw perfectly balanced circles.
- Divide a circle into equal sections.
- Create a simple mandala grid.
- Understand why symmetry is important.
- Prepare the foundation for your first mandala.
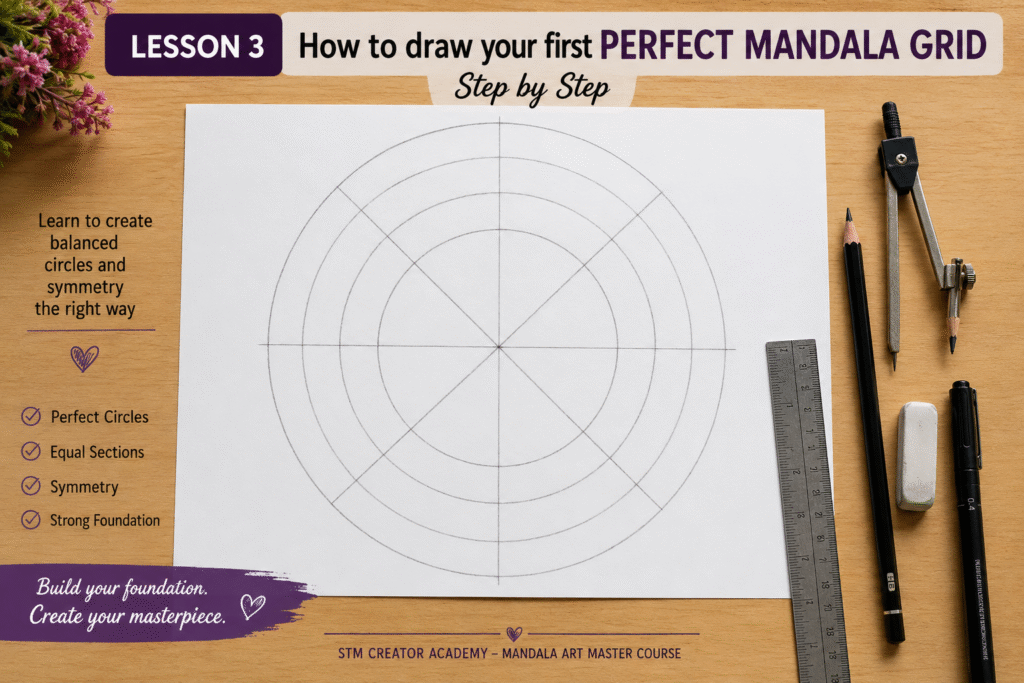
What is a mandala grid?
A mandala grid is a set of circles and guideline lines that act as the framework for your artwork.
Instead of drawing patterns randomly, artists build every design around these guides.
The grid helps maintain:
- Balance
- Symmetry
- Consistency
- Professional-looking artwork
Even experienced mandala artists begin with a grid.
Materials you’ll need
Gather the supplies from Lesson 2:
- A4 drawing paper
- HB pencil
- Compass
- Ruler
- Eraser
- Black fineliner (don’t use it until the grid is complete)
Step 1: Find the centre of your page
Place your drawing paper on a flat surface.
Using a ruler, lightly mark the horizontal and vertical centre of the page.
Where the two lines meet is the centre point.
This tiny point will become the heart of your mandala.
Draw your guidelines lightly so they can be erased later.
Step 2: Draw your first circle
Place the compass needle on the centre point.
Draw a smooth circle without stopping midway.
If your first circle isn’t perfect, don’t worry.
Every artist improves with practice.
Step 3: Add more circles
Using the same centre point, draw several larger circles around the first one.
Try increasing the radius gradually.
For your first practice, draw five circles.
These circles create different sections where your future patterns will sit.
Step 4: Divide the circle
Using your ruler, draw:
- One vertical line
- One horizontal line
Your circle is now divided into four equal parts.
Next, draw diagonal lines.
You now have eight equal sections.
These sections will help repeat every pattern evenly around the circle.
Why symmetry matters
One of the reasons mandalas look calming is because every pattern repeats evenly around the centre.
Instead of inventing a new design in every section, you’ll draw one shape and repeat it around the circle.
This repetition creates rhythm and harmony.
Don’t worry if your measurements aren’t perfect today.
The goal is to understand the process, not to create a masterpiece on your first attempt.
Common beginner mistakes
Many beginners:
- Press too hard with the pencil.
- Forget to keep the compass in the same centre point.
- Draw uneven circles.
- Skip guideline lines.
- Rush into decorating before completing the grid.
Taking a few extra minutes to create a clean grid will make every future lesson easier.
Pro tips from STM Creator Academy
- Keep your pencil lines light.
- Rotate the paper instead of twisting your hand.
- Check that every circle shares the same centre point.
- Practice grids several times before adding decorative patterns.
- Remember that mistakes are part of learning.
Practice activity
Today’s goal is not to complete a finished mandala.
Instead:
- Draw three separate grids.
- Each grid should contain five circles.
- Divide each into eight equal sections.
- Compare your grids and notice how they improve with practice.
The more grids you create, the more confident you’ll become.
Homework
Create one clean mandala grid on a fresh sheet of paper.
Do not decorate it yet.
Take a clear photo of your completed grid and share it with STM Creator Academy.
📧 Email: pallavi.rags@gmail.com
📸 Instagram: @jewellerymakingmaterials
🏷 Hashtag: #STMCreatorAcademy
Key takeaways
- Every mandala begins with a balanced grid.
- Symmetry creates harmony and beauty.
- Light pencil guidelines make corrections easier.
- Practice grids before attempting detailed patterns.
- A strong foundation leads to better artwork.
Lesson summary
You’ve now created the most important part of every mandala—the grid.
This foundation will support every petal, leaf, border and decorative pattern you learn throughout the course.
Take your time practising this lesson. The more comfortable you become with drawing grids, the easier every future lesson will feel.
Previous lesson
← Lesson 2: Essential mandala art supplies for beginners: Everything you need before you draw
🏠 Back to Mandala Art Master Course
Next lesson
➡ Lesson 4: Understanding circles, symmetry and balance in mandala art
Support the free Mandala Art Academy
Learning mandala art with us? The Mandala Art Academy is completely free, and every contribution helps us create more step-by-step lessons, practice guides and original tutorial images.
Even a small contribution helps us continue the next lesson.
For supporters in India
Scan the QR code below or use the UPI ID to contribute any amount you are comfortable with.

UPI ID: pallavi.rags-1@okhdfcbank
Pay securely through Razorpay
Prefer to pay by card or another supported online payment method? Use our secure Razorpay page below. Indian and international cards are accepted.
Support Mandala Art Academy and help create the next free lesson
Your support is entirely optional. Every Mandala Art Academy lesson will remain free for everyone.
Thank you for learning with us and helping us create the next lesson. ❤️